Test Product Qualification Rules
Learning Objectives
After completing this unit, you’ll be able to:
- Complete the setup for the qualification rule.
- Test the qualification rule.
Complete the Setup
As a best practice, Product Designer Manoj always tests the qualification rule before finalizing it. But before that, to ensure that the changes he made are effective, he updates a few settings. Follow along to do the same in your Developer Edition org.
Update Pricing Procedure
If your organization uses different context definitions for qualification and pricing, ensure your pricing procedure uses the same definition you established for the qualification procedure.

- From the App Launcher, find and select Price Management.
- On the home page, click the Pricing Procedures tile.
- Select Product Discovery Pricing Procedure.
- In the Pricing Procedure Versions section, click Product Discovery Pricing Procedure. The pricing procedure opens in a new browser tab.
- Click Deactivate and confirm.
- Click
 , and enter the current date and time in the Start Date Time field.
Enter a date that’s after the Effective From date of the ProductQualificationContext context definition. To identify this date, locate the custom context definition in Setup and note its Effective From date.
- Save your changes.
- Switch to the Product Discovery Pricing Procedure browser tab and click Edit, and for Context Definition, select ProductQualificationContext.
- Save your changes.
- Switch to the Pricing procedure browser tab, and then click Activate.
The pricing procedure and qualification rule procedure now use the same context definition.
Refresh Decision Tables
Next, refresh the required decision tables.
- From Setup, in the Quick Find box, find and select Decision Tables.
- From the available decision tables list, select Product Disqualification.
- Click Refresh.
- Similarly, refresh these decision tables.
- Product Qualification
- Price Book Entries V2
- Product Qualification
Manoj does this every time he updates product qualification set up, just like you did.
Update Product Discovery Settings
Next, Manoj updates the Product Discovery settings to specify the context definition and qualification rule procedures to use. Follow along.
- From Setup, in the Quick Find box, find and select Product Discovery Settings.
- In the Select Context Definition dropdown, select ProductQualificationContext.
- In the Select Qualification Procedure dropdown, click
 to remove the current selection.
- Select Product Qualification Procedure. If the procedure name does not appear in the list, refresh the page and try again.
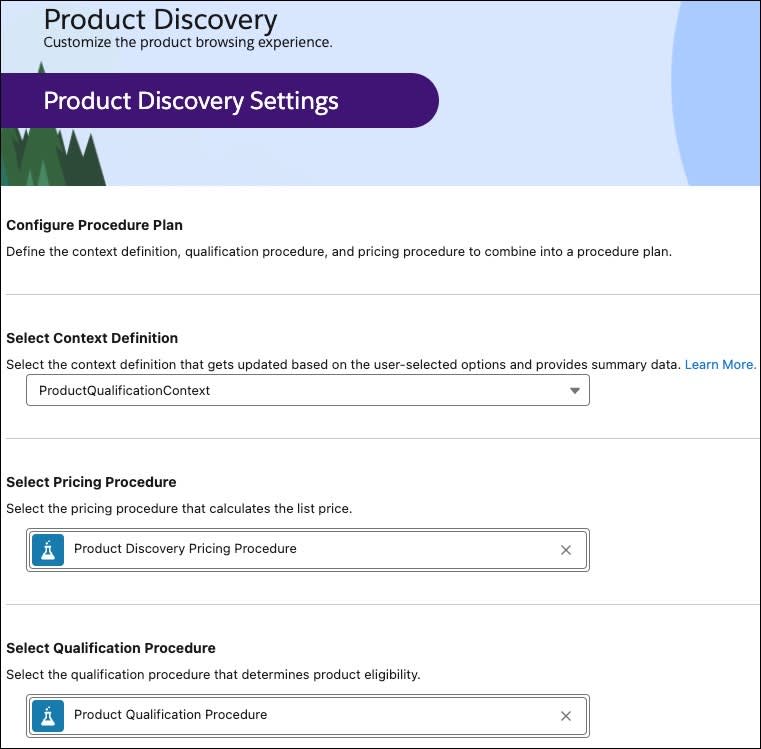
Now, you have completed the org level settings and are ready for testing the qualification rule.
Test Qualification Rule
When customers or sales reps add a product to a quote, the qualification rule procedure evaluates various conditions set in the decision tables and displays the products that match the criteria. It’s time to create a quote and add products to it.
Test how this works based on the billing state of the customer. First, create a quote for a customer based in CA. The laptop product will be available for this customer. Next, try the same for a customer based in TX. The laptop product will not appear for the customer. Follow along to create a quote and compare the results.
- From the App Launcher, find and select Quotes.
- Click New Quote and then, enter these details.
- Quote Name:
Laptop Purchase - Account for Quote: GenePoint
Note that the GenePoint account has the billing state as CA.
- Quote Name:
- Save the quote.
- In the Laptop Purchase Quote record, click Browse Catalogs.
- In the Choose Price Book window, ensure that the Standard Price Book is selected, and click Save.
- Select Hardware Catalog and click Next.
- Click the Laptops category. Three products are listed including the Laptop product.
- Close the Browse Products window.
- Click
 and select Edit.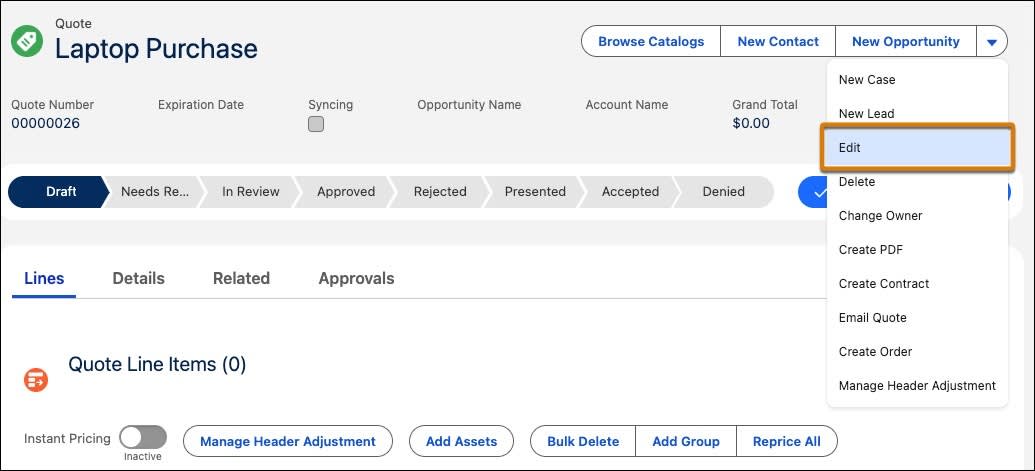
- For Account for Quote, select Edge Communications. Note that the Edge Communications account has the billing state as TX.
- Save your changes.
- Just how you did earlier, open the Browse Products window. Notice that only two products are listed for the Laptops category now. The Laptop product is not available.
- Click
 , de-select Qualified Products, and then select Disqualified Products.
- Click Apply.
- The Laptop product is now listed. Hover over
 next to the product and review the reason explaining why the product is not qualified for this account.
Your qualification rule is working as intended and displaying only the qualified products.
Next Up
Nice work! In this unit, you updated the org level settings to ensure that the qualification rule is effective and tested the rule using a quote. In the next unit, you similarly create and test a product disqualification rule.
For now, click Check Challenge to Earn Points.