Prompt and Co-Create Your React App
Learning Objectives
After completing this unit, you’ll be able to:
- Write effective React app prompts in Plan Mode.
- Co-create your React app using Agentforce Vibes chat and Metadata Visualizer.
Start in Plan Mode
In the previous unit, you set up your org and created a React project from the Internal User App template. Now start the Prompt and Co-create stages. Describe what you want Agentforce Vibes to build, review the plan, and generate the app.
Before you send your first prompt, turn on Plan Mode.
- In the Agentforce Vibes Chat interface, select Chat. The Send Mode dropdown menu opens.
- In the dropdown, select the Plan send mode.
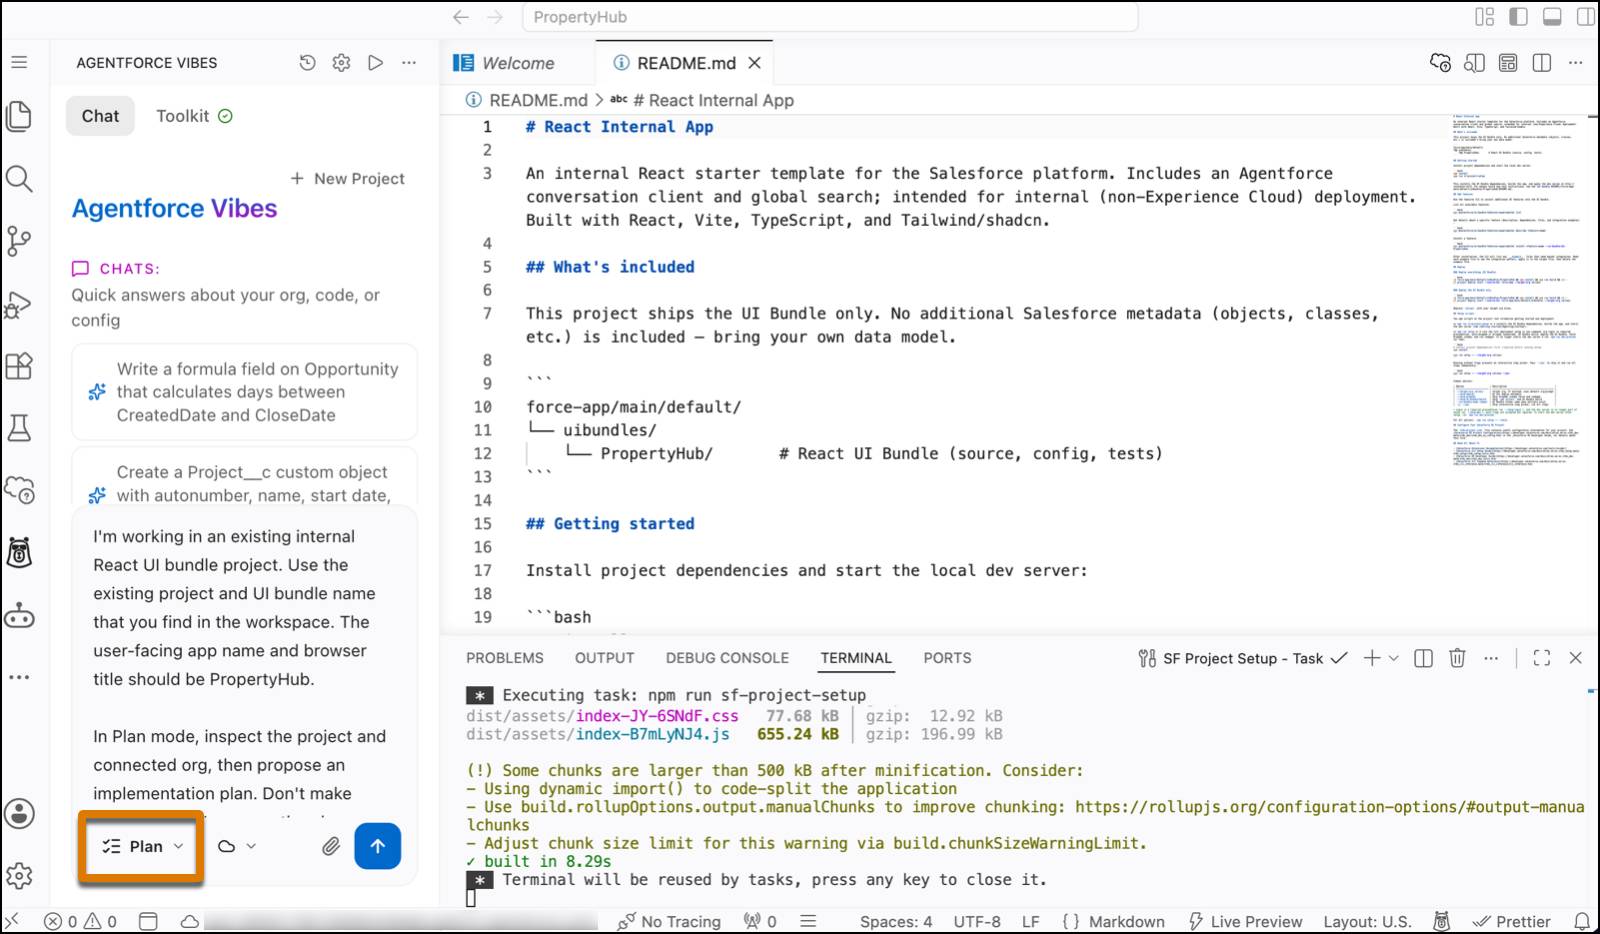
Plan Mode is a read-only interaction mode that’s perfect for multistep work like building an app. In Plan Mode, Agentforce Vibes analyzes your request, asks clarifying questions, and produces a structured implementation plan without writing or deploying any metadata.
Describe Your App in a Prompt
Now for the fun part—telling Agentforce Vibes what to build. A good prompt describes your data model, workflows, UI, and any integrations you want. The more detail you provide, the better the result.
With Plan Mode on, use this prompt for your property management app.

Turn the existing internal React UI bundle into a PropertyHub app for internal property managers. Use the project and UI bundle names in the workspace, and set the user-facing app name and browser title to PropertyHub. Inspect only what’s needed and propose a PropertyHub implementation plan that lists expected file changes without code samples or speculative alternatives.
- Create Property__c with Name, Address__c (Text), Monthly_Rent__c (Currency), Status__c (picklist), and Hero_Image_URL__c (URL). The Status__c picklist has these values: Available, Reserved, and Leased. The app has no record types. Create and assign a new Property__c permission set that lets the current user read and update Property__c.
- First deploy only the Property__c metadata and property permission set, and wait until both deployment and assignment to the current user succeed. Pause after this step and wait for my input before you move on to the data and UI layers.
- After my approval, verify the connected org's GraphQL schema. Before running codegen, scan the schema for violations, such as empty input/enum types, and fix each with a placeholder field rather than deleting it, since downstream references may exist. Author Property__c queries, mutations, and generated types only from that verified schema.
- Use Salesforce Data SDK and GraphQL to build a listings home page where managers update each property's status inline. Use the three fixed statuses in the UI and show a saved status immediately.
- Reuse the existing React UI bundle's supported layout, routing, and component patterns. Make the listings page the default route. Don't modify unrelated template pages. Make the experience responsive, accessible, and appropriate for internal operations.
- In this phase, build the source but defer deployment of the UI bundle, custom application, and PropertyHub custom application permission set until final deployment. Run relevant build and lint checks. Report pre-existing warnings outside the PropertyHub path without changing unrelated code.
Notice what this prompt does well.
-
Establishes clear context: References the existing internal React UI bundle and provides the "PropertyHub" name, which gives Agentforce Vibes a clear starting point
-
Defines the exact data model: Specifies “Property__c” and its fields to eliminate ambiguity when building custom metadata
-
Outlines specific user workflows: Connects the inline property status update requirement directly to the necessary UI, GraphQL query, and mutation design
-
Enforces a phased deployment order: Introduces an explicit approval checkpoint to keep execution safe and predictable
-
Guides design and accessibility goals: Directs Agentforce Vibes to build a polished, inclusive, and responsive user interface for internal operations
-
Sets clear scope limits: Prevents unnecessary code edits, skips speculative alternatives, and defers final deployments to keep work within AI usage limits
Review the Plan
With Plan Mode on, Agentforce Vibes responds to your prompt with a plan rather than building right away. Because your request is complex, Agentforce Vibes might spend a few minutes reviewing and analyzing your project files before it shares the plan. Keep the Agentforce Vibes chat interface open so that you can review and respond to tool call requests, such as asking permission to read project files.
A plan can include these sections.
-
Context or Overview: A summary of what you asked for
-
Approach: The number of tasks and the overall strategy
-
Tasks: Numbered steps with descriptions, expected outcomes, and relevant file paths
-
Considerations: Cross-cutting decisions and caveats that can span multiple tasks
-
Out of Scope: What the plan deliberately leaves out, such as work that the platform handles or that your requirements exclude
To refine the plan, just give feedback in the chat and Agentforce Vibes edits the plan based on your response. Confirm that the plan scaffolds complete steps in a logical order. For example, make sure that Agentforce Vibes plans to deploy the data model and assigns object and field access, and then pauses before it builds the data layer. Any corrections are easiest to make in the plan, before any metadata exists.
As you review a plan, evaluate it against these recommended development patterns.
-
Reuse existing project patterns: When possible, build on what the template already provides, such as its component library, styling, routing, and layout.
-
Use built-in Salesforce features instead of rebuilding them: Lean on platform capabilities, such as authentication, object search, and the Agentforce Conversation Client, rather than writing them from scratch.
-
GraphQL-first data access: Read and write record data through Salesforce Data SDK and GraphQL, which enforces platform security automatically.
When you’re satisfied with the plan, select Approve Plan. The mode switches to Agent mode, and Agentforce Vibes starts building.
Co-Create Your App
As Agentforce Vibes works, it creates files in your project. How much it pauses for your approval depends on the default session mode you set in the Permissions and Safety settings. The Run safe defaults mode auto-approves read-only actions but still asks before file edits and other write operations, so you stay in control of the changes that matter.
Review the generated files as they appear, and if you think that something’s incorrect, say so. For example, if you’re unsatisfied with the generated data model, select Stop in the chat interface and ask Agentforce Vibes to make a correction. This way, you can review changes as they’re generated and catch issues early, before they cascade into later stages. After Agentforce Vibes generates files, you can also review each file individually. You can undo all changes, edit files inline, or keep all changes.
To make generated metadata easier to understand, use the Metadata Visualizer extension. Instead of reading raw metadata files, you get visual diagrams of your metadata, including fields, relationships, and properties. This helps you quickly confirm that the data model matches what you intended. To open the Metadata Visualizer, select Visualize in the Agentforce chat interface next to the object or field that you want to inspect.
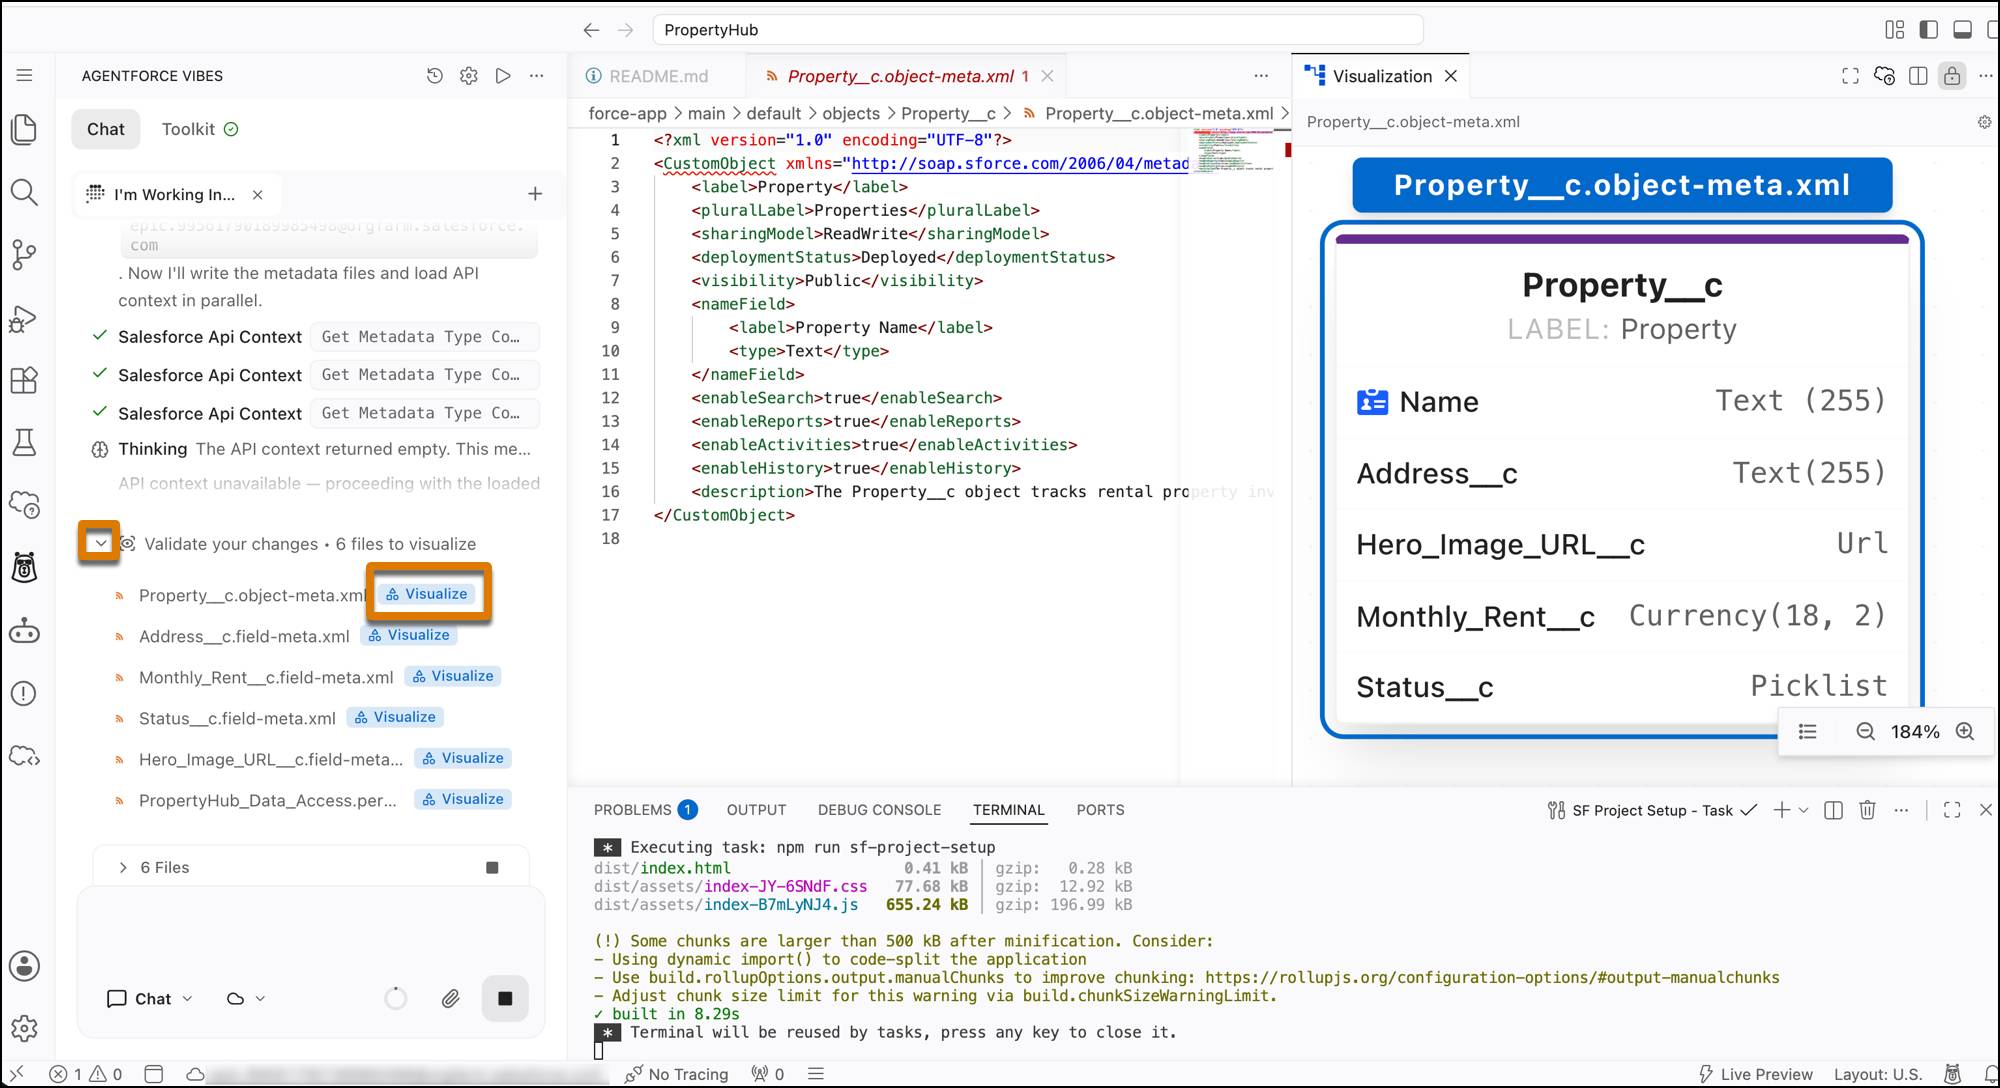
Let Agentforce Vibes run and complete Phase 1 of the plan, which includes the first metadata deployment and permission set assignment.
You’ve now prompted and started co-creating a React app. Next, bring it to life with real Salesforce data and review your changes instantly in Live Preview.