Work with the GitHub Workflow
Learning Objectives
After completing this unit, you’ll be able to:
- List the steps in the GitHub workflow.
- Explain the difference between the remote and local working environments.
- Complete the steps to create a new file and make changes to an existing file.

Overview of the GitHub Workflow
The GitHub flow is a lightweight workflow that lets you experiment with new ideas safely, without fear of compromising a project. The main steps are:
- Create a branch off of main
- Make commits
- Open a pull request
- Collaborate
- Make more commits
- Discuss and review code with team members
- Make more commits
- Deploy for final testing
- Merge your branch into the main branch
Create a Branch
Branching is a key concept within Git. Everything in Git lives on a branch. By default, the production version of your project lives in the main branch.
When you’re ready to experiment with a new feature or fix an issue, create a new branch of the project. The branch will look exactly like main at first, but any changes you make will only be reflected in your branch.
Make Commits
As you make changes to the files within the project, commit them to your feature branch.
Open a Pull Request and Collaborate
Open a pull request to start discussing your changes. A pull request is meant to be a starting point for further code refinement—no need for it to be a perfect work of art.

Merge to Main Branch
Once your team approves your changes, deploy and merge your pull request from the feature branch into the main branch.
So that’s great in theory, but let’s put this into practice.
Install Git
Before we can work through the Git examples in the rest of this unit, the first thing you'll do is install Git on your computer. This sets you up to work with repositories locally. Visit the Git website and follow instructions to install the official version of Git. Accept all the default settings during installation.
Sign Up for a GitHub Account and Create a Repository
The first thing you’ll do is sign up for a GitHub personal account. This is a free version of GitHub and will allow you to follow along with the steps below.
Next create a repository to work with.
- In the header, click
 and select New repository
- For Owner, select your account.
- For Repository name, enter
best-repo-ever.
- Select Public.
- Under Initialize this repository with, select Add a README file.
- Then, click Create repository.
Working on GitHub Versus Working Locally
You can make changes to your project directly on GitHub, but most people prefer to work on their local machine so they can make changes in their favorite IDE or text editor. Let’s review a couple important terms:
- The remote repository is the copy of the repository on GitHub. All collaborators synchronize their changes with this, making it the source of truth for the group.
-
Local repositories are git repositories stored on a user's computer. If the local directory is linked to a remote repository, then the local repository is a full copy with everything on the remote repository, including all of its files, branches, and history.
The local and remote repositories only interact when you run one of the four network commands in Git: git clone, git fetch, git pull, and git push.
To work locally on a repository, you first need to create a clone on your machine. To clone a repository, follow these steps:
- In GitHub, click the Code tab of the repository you just created.
- Click the Code button.
- Copy the clone URL to your clipboard.
- Open your command line application. If you are on a Mac or Linux, you can use your terminal. If you are on Windows, we recommend you use Git Bash, which comes installed with Git.
- Retrieve a full copy of the repository from GitHub:
git clone URL
Replace with the clone URL you copied above. You should see something like this:
Cloning into 'best-repo-ever'...
remote: Enumerating objects: 3, done.
remote: Counting objects: 100% (3/3), done.
remote: Total 3 (delta 0), reused 0 (delta 0), pack-reused 0 (from 0)
Receiving objects: 100% (3/3), done.
- Once the clone is complete, navigate into the new directory created by the clone operation:
cd best-repo-ever
Configure Your Local Environment
Before you can make changes to your code, you need to set a few basic configurations. You typically only need to set these configurations once. Git lets you set configuration options at three different levels. Check out these config command options.
Command Option |
Description |
|---|---|
git config --system |
These are system-wide configurations. They apply to all users on this computer. |
git config --global |
These are the user-level configurations. They only apply to your user account. |
git config --local |
These are the repository-level configurations. They only apply to the specific repository where they are set. The default value for git config is |
Git adds several configurations automatically—type git config --list to see config settings from all three levels.
Git uses the config settings for your user name and email address to generate a unique fingerprint for each of the commits you create.
You can't create commits without these settings, so set them yourself using your command line application:
git config --global user.name "First Last"
and then enter,
git config --global user.email "you@email.com"
Configure autocrlf
Next, we set core.autocrlf (autocrlf stands for auto carriage return line feed). Different systems handle line endings and line breaks differently. If you open a file created on another operating system and do not have this config option set, Git will think you made changes to the file based on the way your operating system handles the line endings.
For Windows users enter:
git config --global core.autocrlf true
For Mac or Linux users enter:
git config --global core.autocrlf input
Track a File with GitHub
In order to work with GitHub you will need a way to authenticate your requests. For command line interaction you can use GitHub CLI, or for desktop, there is GitHub Desktop. We’ll use GitHub Desktop for this badge.
- Download and install GitHub Desktop.
- Start GitHub Desktop.
- Click Sign in to GitHub.com.
- Follow the directions to allow access.
- On Configure Git, select Use my GitHub account name and email address.
- Click Finish.
Welcome to the GitHub Desktop. You already cloned the repo from GitHub so let’s connect the local repo to the remote GitHub repo.
- Click Add an Existing Repository from your Local Drive or click File > Add Local Repository.
- Click Choose to find and select the best-repo-ever directory.
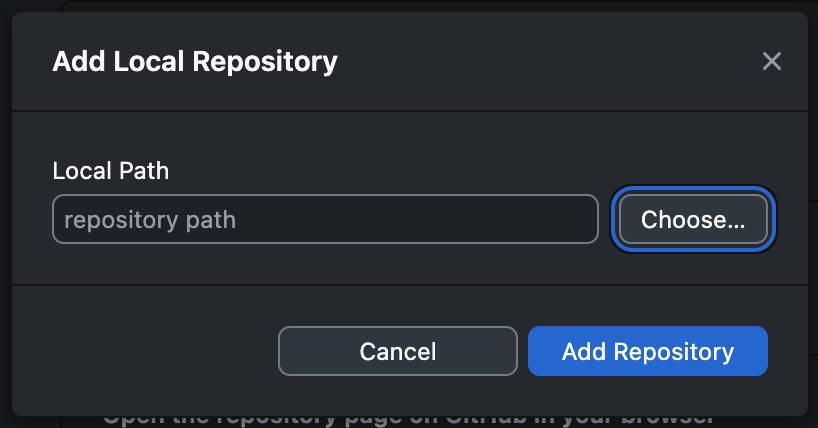
- Click Open.
- Click Add Repository.
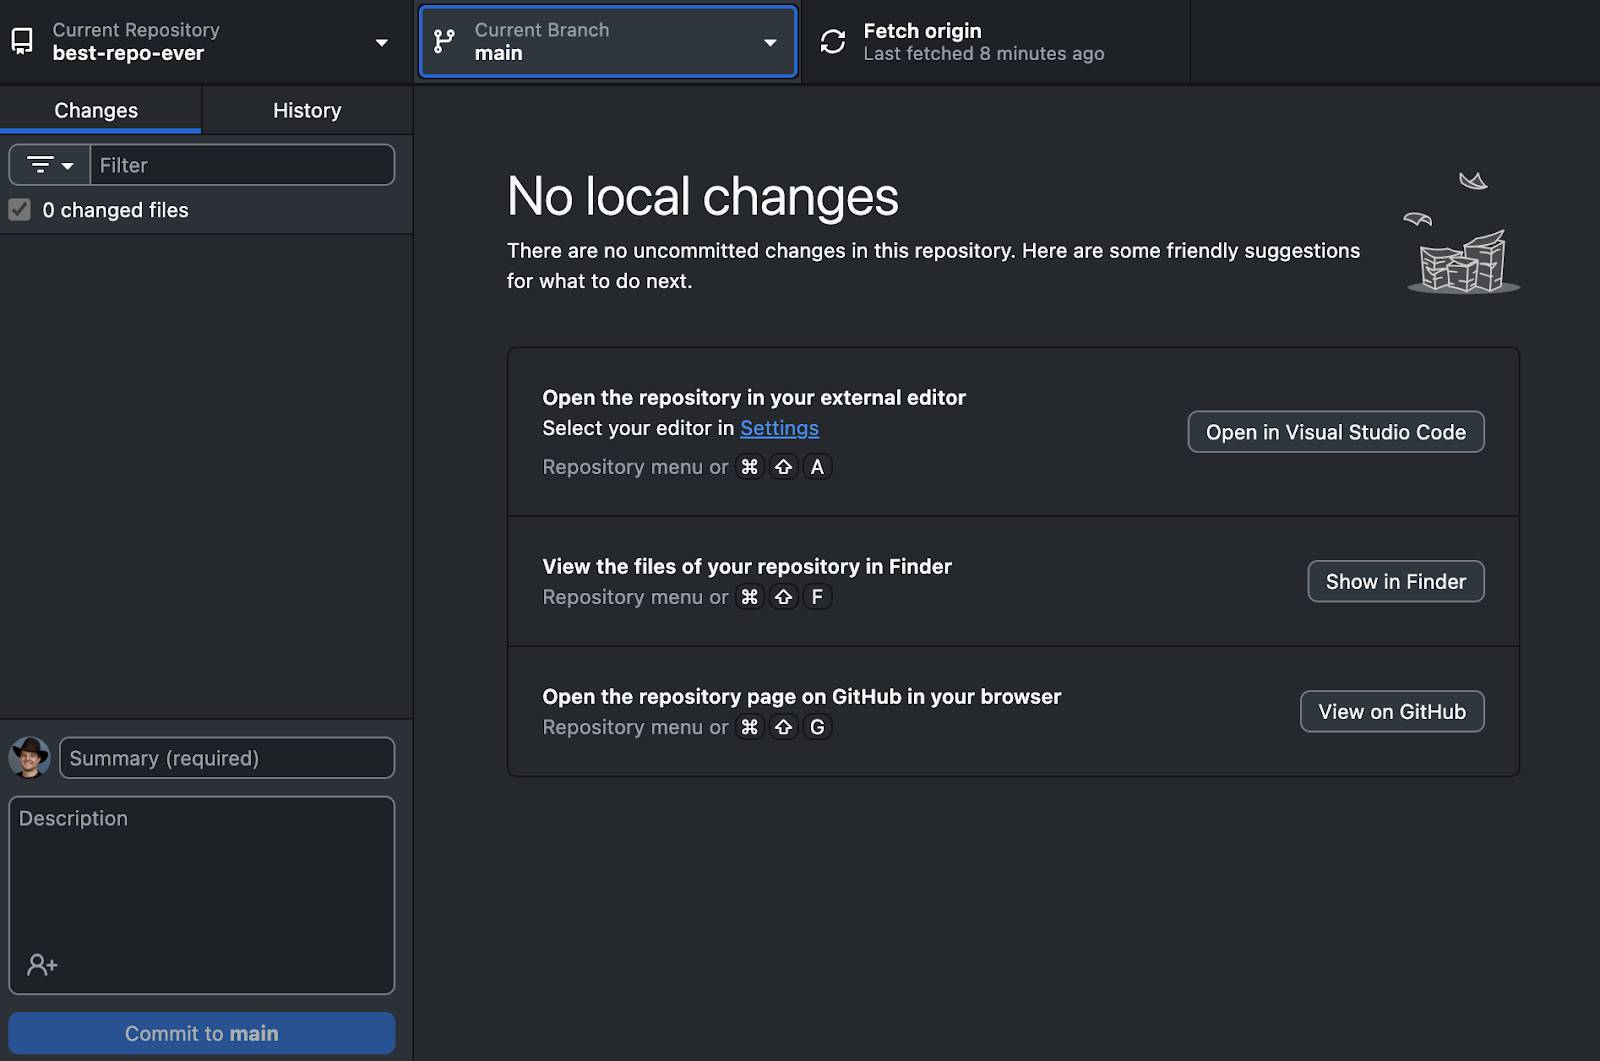
Now that you have a local copy of the repository and you have Git configured and authenticated to GitHub, you’re ready to use the GitHub Workflow to make some changes to the project. We’ll be going back and forth between the command line, GitHub Desktop, and GitHub as we work with Git. Let’s start by making a simple change to the README.md file.
Step 1: Create a Branch
To see a list of local branches in your terminal, type git branch. Right now, you probably only see one branch, main.
Let’s create a new branch (myfeaturebranch) for our work:
- Create the branch:
git branch myfeaturebranch
- Checkout to that branch:
git checkout myfeaturebranch
You should see something like this:
|
git checkout myfeaturebranch Switched to branch 'myfeaturebranch' |
|---|
Step 2: Make Changes to README.md File and Commit the Change to Your Local Repository
Now that you’ve checked out to the new branch, we'll make some changes and see Git in action.
- Open the README.md in your repository.
- Add some content using your favorite text editor.
- When you’re finished, save your changes.
After you made some changes to your file, it’s time to create your first snapshot. When working from the command line, you will need to be familiar with the idea of the two stage commit.
When you work locally, Git keeps track of your history by organizing your files and changes in three trees. They are working, staging (also called index), and history. When we add, delete, and make changes to files, we do this in the working tree.

To add your changes to version control, create a collection of files that represent a discrete unit of work—we build this unit in the staging area.
When we are satisfied with the unit of work we’ve assembled, we take a snapshot of everything in the staging area. This is called a commit.
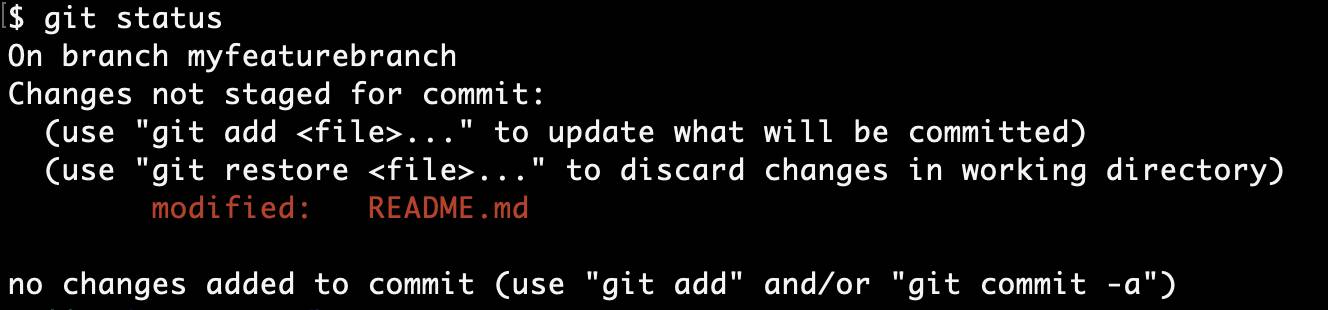
Let’s complete the process using the commands git status, git add and git commit:
- Check the status of our working tree:
git status
You’ll see the README.md file is modified in the Changes not staged for commit.
- Move the file from the working tree to the staging area:
git add README.md
- To see what happened enter:
git status
You’ll see the README.md file is in the Changes to be committed.

- Take our first snapshot:
git commit -m "My first commit"
- Let’s take another look at our repository status:
git status
- You’ll see nothing to commit, working tree clean.
Step 3: Send Changes to the Remote Repository
Right now, this commit is only local. If you check the remote repository, you won’t see your branch or the changes you just made. To see the changes on the remote, you first need to push your changes to the remote repository.
Since we created this branch locally, we’ll use GitHub Desktop to publish the branch to the remote repository.
- Open GitHub Desktop.
- Click Publish branch.
Step 4: Create a Pull Request
Now that you’ve pushed your changes to your remote repository, let’s open a pull request on GitHub.
- Go to your GitHub account on the web.
- Click the Pull request tab.
- Click New pull request.
- In the base dropdown, select main.
- In the compare dropdown, select myfeaturebranch. You should see something like this:
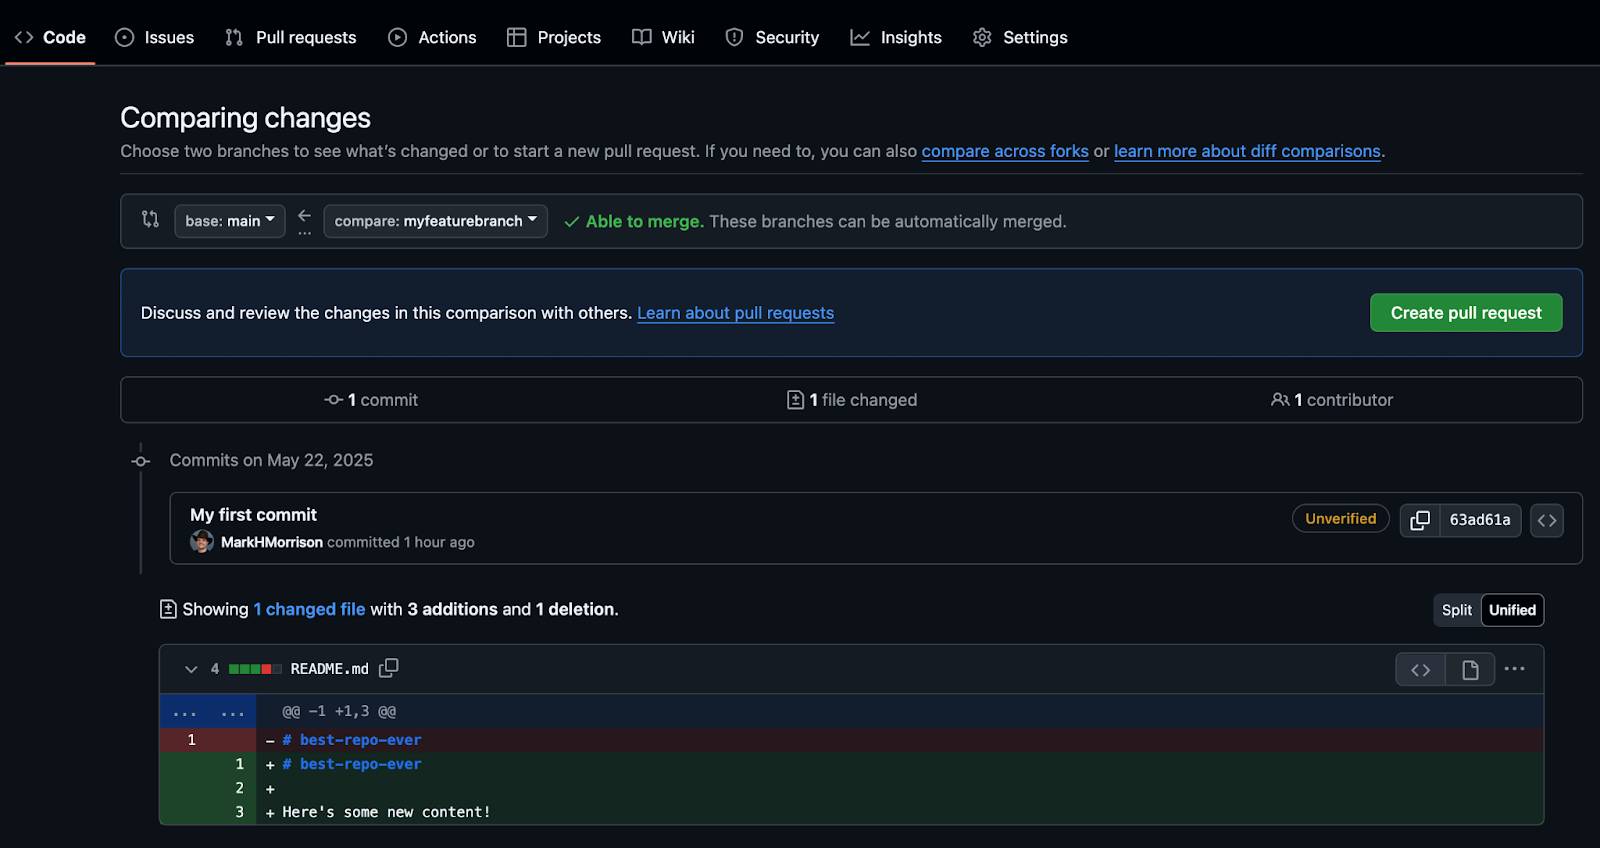
- Click Create pull request.
-
Add a title should have
My first commit.
- Add a description if you like.
- Click Create pull request.
Control Code Quality with Code Review
Pull requests are more than just a comparison of branches, they’re a way to review code and ensure quality, through both human and automated efforts.
General Conversation
Use the Conversation tab to add general comments on a pull request.
Line Comments
On the Files Changed tab, you can hover over a line to see a blue + icon. Clicking this icon will allow you to enter a comment on a specific line. These line level comments are a great way to give additional context on recommended changes. They will also be displayed in the conversation view.
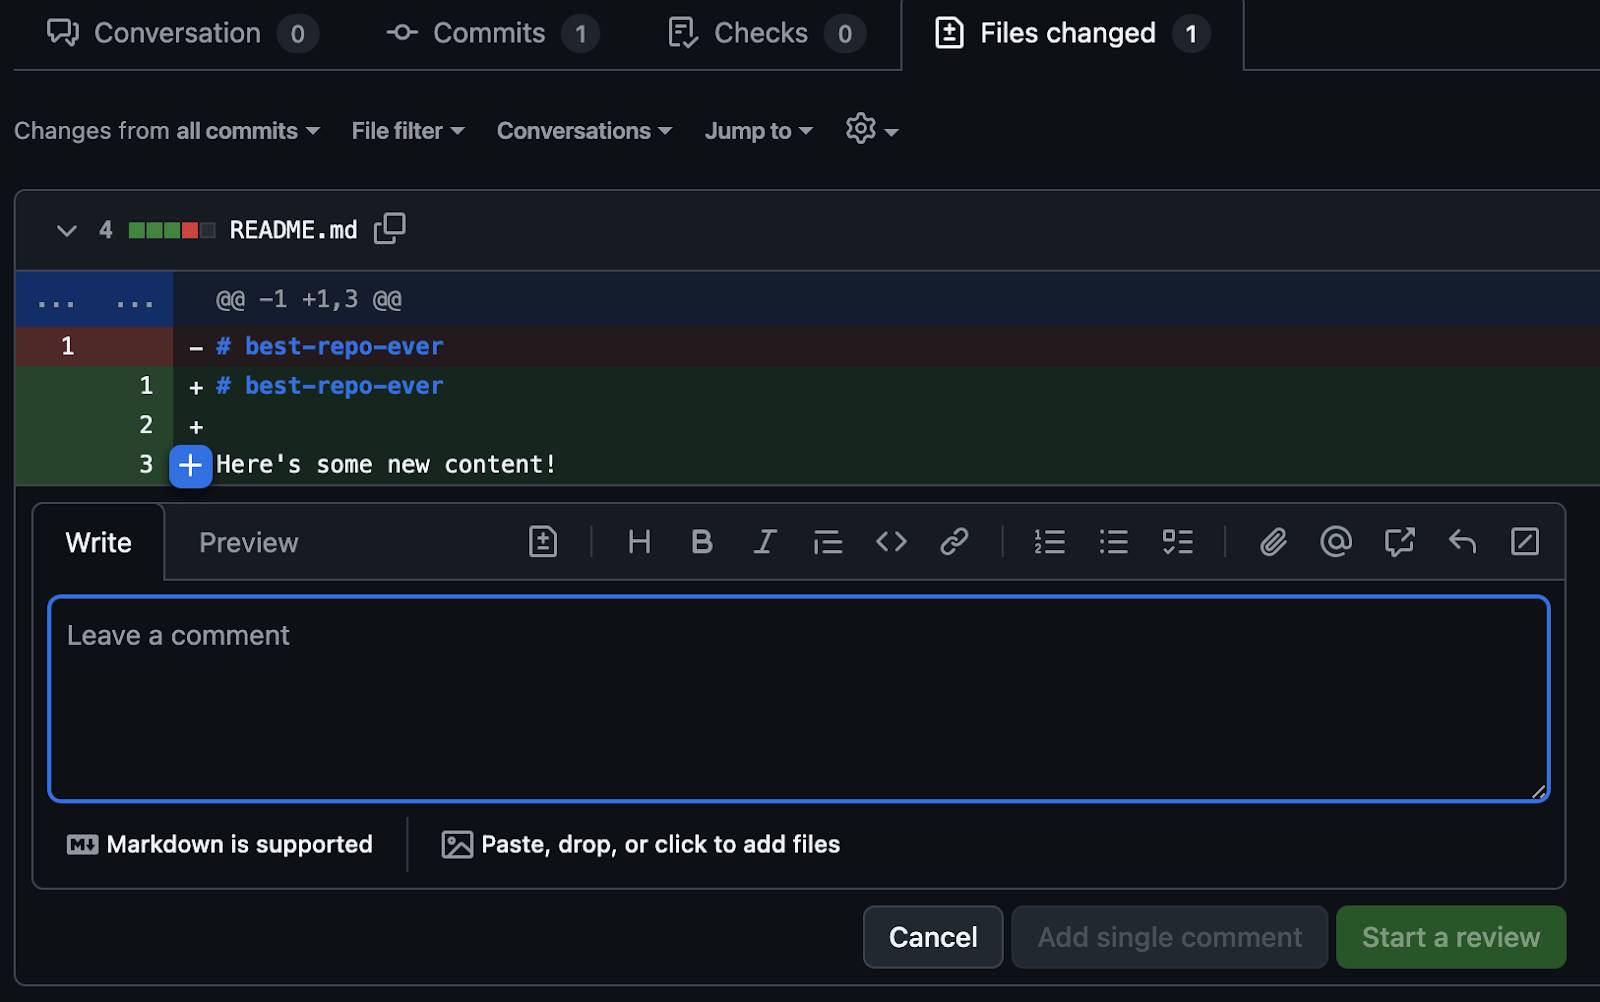
Review
When you are making line comments, you can also choose to Start a Review. When you create a review, you can group many line comments together with a summary message. When you submit the review, you can indicate whether it is just a comment, an approval, or a request for changes. Pull request reviews have special power in GitHub when used in conjunction with protected branches, you can prevent a pull request from being merged if it has not had at least one review.
Automated Tests
If you’ve integrated CI/CD with your project, you will see the status of your tests reported right on the pull request. These tests are highly customizable.
Deploy
Once a team member has reviewed and approved your pull request, and any required tests have passed, you can deploy your branch and verify your changes in production. If there are issues with your changes, you can roll them back by deploying the existing main branch back into production.
Merge Your Changes
When you merge your branch, you take the content and history from your feature branch and add it to the content and history of the main branch.
Merging is quick and easy.
- In GitHub, Click the Conversation tab.
- Click Merge pull request.
- Add a Commit message and Extended description.
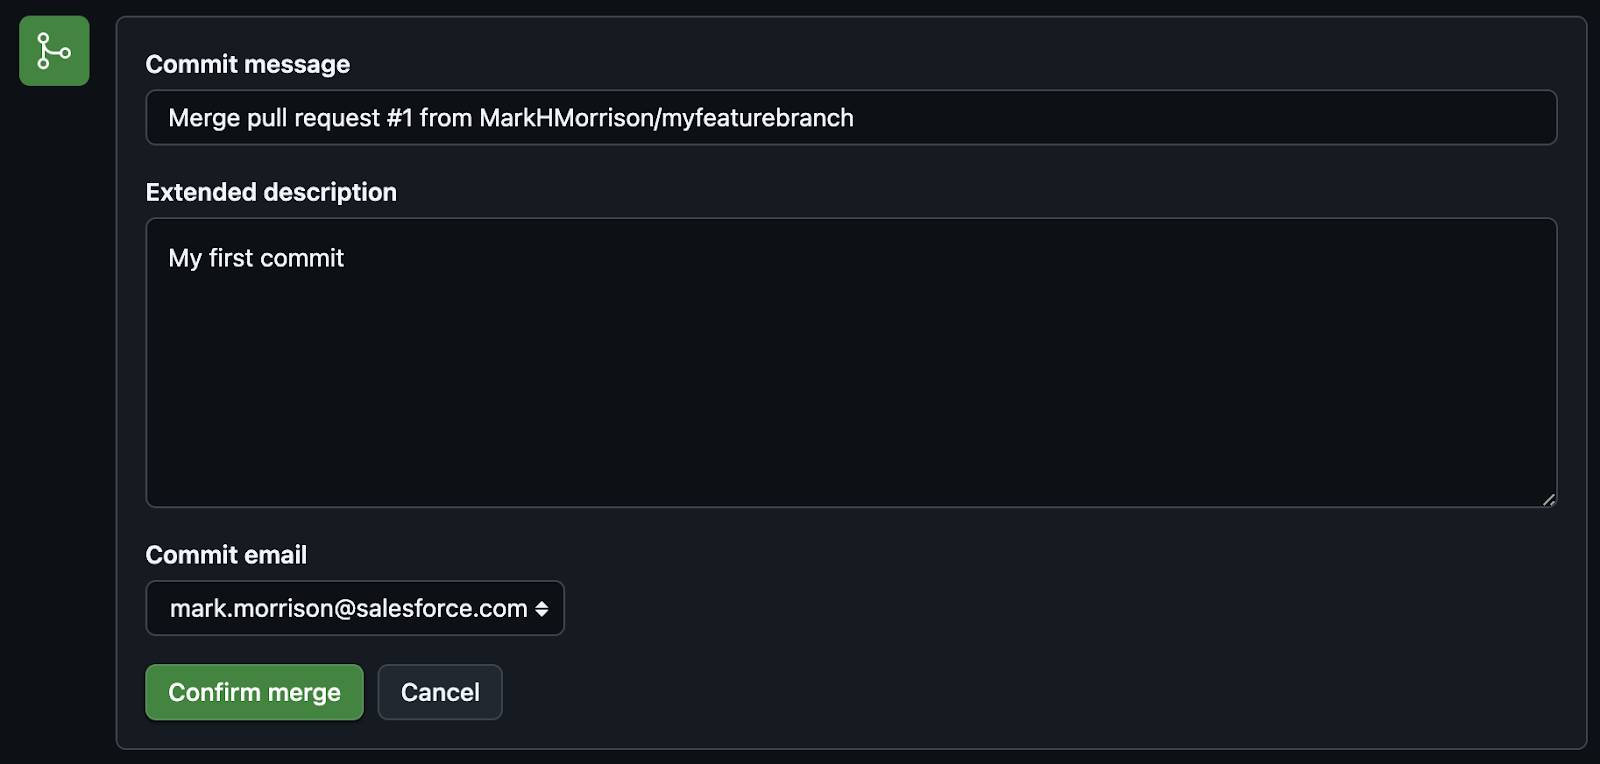
- Click Confirm merge.
Your team should establish rules about who should merge a pull request. Some options include:
- The person who created the pull request should merge, as they’ll need to resolve issues resulting from the merge.
- Assign a single person within the project team. This ensures consistency but can become a bottleneck.
- Anyone other than the person who created the pull request can merge. This ensures at least one review has taken place.
Keeping It All in Sync
After you merge your pull request, delete the branch on GitHub. To do this click Delete branch on the pull request screen.
However, merging and deleting on GitHub will not automatically update your local copy of the repository. Let’s go back to our command line application and get everything in sync.
First, we need to get the changes we made on GitHub into our local copy of the repository:
- Switch back to your default branch:
git checkout main
- Retrieve all of the changes from GitHub:
git pull