Add a Flow as an Agent Action
Learning Objectives
After completing this unit, you’ll be able to:
- Ground a subagent for maximum effectiveness with flow-based agent actions.
- Create an agent action that references a flow.
- Configure a subagent so that one agent action provides data to another agent action.

Now that you’ve created the flows that the Coral Cloud Booking Agent needs to help customers manage their booked activities, create a subagent and give it the flow-based actions it needs to help your customers.
Set Up Agentforce
First, make sure Agentforce is enabled in your Trailhead playground.
- In the Setup Quick Find, search for and select Einstein Setup.
- Verify Einstein is turned On. If it’s already on, then turn it Off and then back On again.
- Refresh your browser to reload Setup.
- In the Setup Quick Find, search for and select Agentforce Agents.
- Make sure Agentforce is On.

Add a Subagent
Before you create the subagent, consider some guidelines and best practices for configuring subagents.
- Ground your subagent with information about the relevant Salesforce objects. Describe their purposes so the agent understands how their data is used.
- Tell the subagent that it shouldn’t use any Salesforce data that isn’t provided by an action. Remember, agents have access to view all objects and fields granted to them by permissions. This statement prevents the agent from talking about data that isn’t relevant or shouldn’t be shared.
- Tell the subagent not to show the customer any ID values. Record collection variables always include the IDs of the records, so without this instruction, there’s a good chance the agent will show this data to customers, even though it’s meaningless to them. This statement protects your customers from being confused by cryptic data.
When you configure a subagent, you provide a description and instructions.
Field Name |
What to Do |
|---|---|
Description |
Provide a general idea of what the subagent is for and explain the context of the data it’s working with. |
Instructions |
Start by telling the agent what its job is, and provide specific details about things it should not do. Write out detailed instructions and be specific about how the agent should interact with the customer:
|
Now create a subagent that tells the agent what it can and cannot do with customers’ booked activities.
- Click the App Launcher (
 ).
).
- Click View All.
- Select the Agentforce Studio app.

- In the Agents list, select Coral Cloud Booking Agent.
- In the Explorer panel, click
 and select New Subagent.
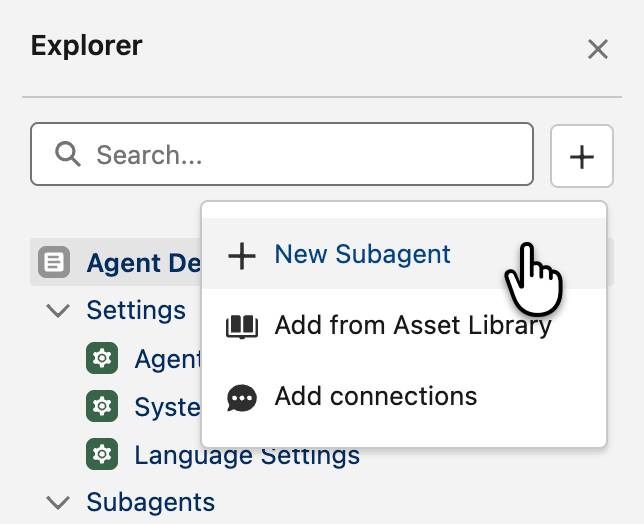
If the button is disabled, it’s because this version of the agent is committed. To create a new version that isn’t committed, click New Version.
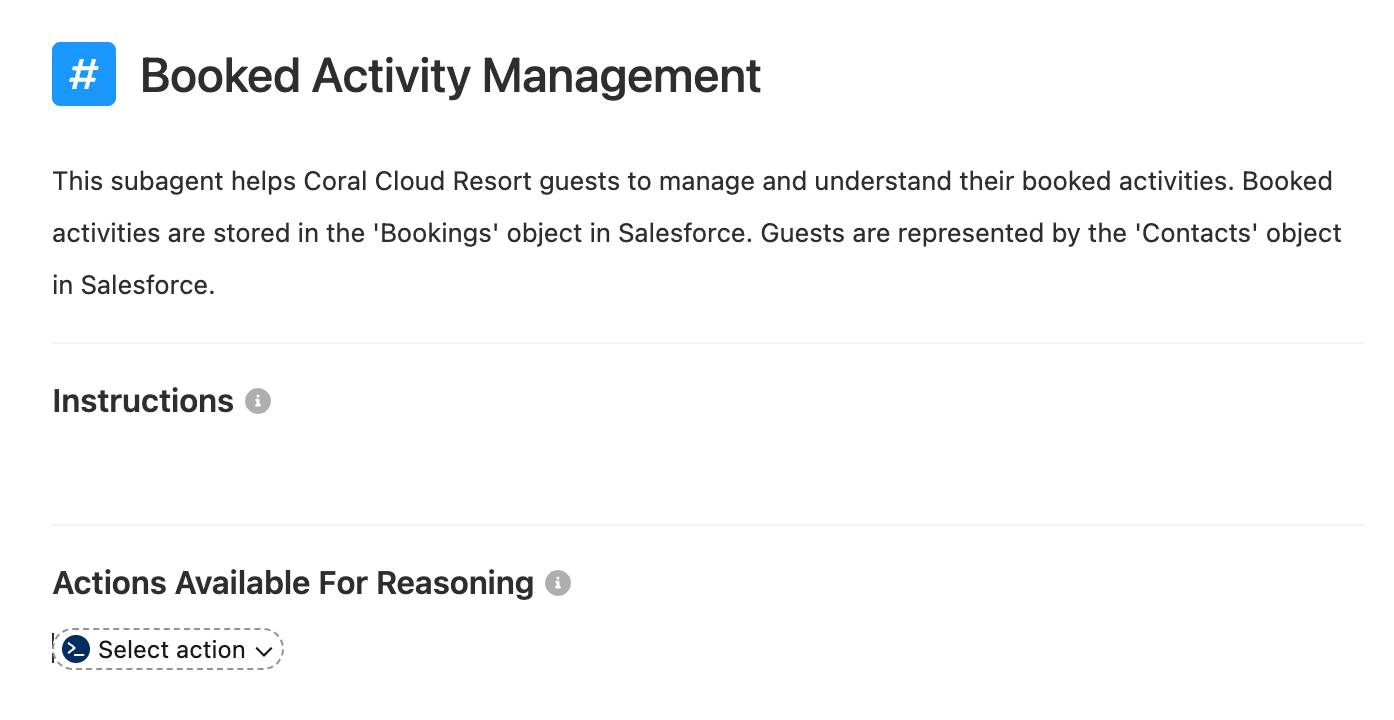
- For Subagent Name, enter
Booked Activity Management.
- For Description, enter
This subagent helps Coral Cloud Resort guests to manage and understand their booked activities. Booked activities are stored in the 'Bookings' object in Salesforce. Guests are represented by the 'Contacts' object in Salesforce. - Click Create and Open.
The builder displays the new, blank subagent.
Add Flows as Agent Actions
First, add the flows to the agent by creating an agent action for each one. Fortunately, you can create and assign these agent actions without having to leave Agentforce Builder.
Add the Get Customer Details Action to the Agent
- Under Actions Available for Reasoning, click Select action.
- Select Create a custom action.
- For Action Name, enter
Get Customer Details.
- For Description, enter
Validate a Customer’s details by passing their email and memberNumber to see if there is a related contact.
- For Reference Action Type, select Flow.
- For Reference Action, select Get Customer Details.
- Click Create and Open.
- Configure the email variable’s input settings.
- If the Inputs and Outputs sections are blank, go to another tab, then return to the Get Customer Details tab.
- Make sure the Description says
The Email Address of the customer that is validating their identity.
- Check Require input to execute action.
This setting tells the agent that it shouldn’t run this action unless it has data to send to it. Use this setting to ensure that the flow doesn’t run without the data it needs to run successfully.
- If the Inputs and Outputs sections are blank, go to another tab, then return to the Get Customer Details tab.
- Configure the memberNumber variable’s input settings.
- Make sure the Description says
The Member Number of the customer that is validating their identity. - Check Require input to execute action.
- Make sure the Description says
- Configure the contact variable’s output settings.
- Make sure the Description says
The contact that was returned in the search for records. - Check Show in conversation.
This setting tells the agent that it’s okay to send the contents of this variable to the customer. If the Show in Conversation checkbox isn’t selected for a particular output, that flow variable’s contents won’t ever be shared with the customer.
- Make sure the Description says
- Click the Booked Activity Management tab to return to the subagent canvas.
- Under Actions Available for Reasoning, click
 next to the Get Customer Details pill in the canvas.
The canvas displays the flow’s variables and how they’re assigned.
- Verify that the “email” and “memberNumber” variables are set to “Agent Populated”.
If they’re not set correctly, click next to the Get Customer Details action in the sidebar, delete the action, and return to step 1 to create the action again.
Save Your Progress
- Click Save.
- If the Assign user record window appears, follow these steps.
- Select Select User.
- In the Agent’s User Record field, select EinsteinServiceAgent User.
- Click Save.
- Select Select User.
If you see an error in the Explorer panel, don’t worry about it for now; we’ll fix it later.
Add the Get Contact’s Upcoming Bookings Action to the Agent
- Click the Booked Activity Management tab to return to the subagent canvas.
- In the Get Customer Details pill in the canvas, click
 and select Create a custom action.
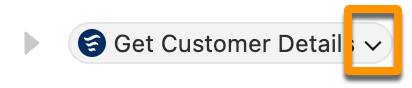
- For Action Name, enter
Get Contact’s Upcoming Bookings.
- For Description, enter
Find all the Booking records related to the guest's contact record. Only retrieve Bookings whose date hasn't occurred yet.
- For Reference Action Type, select Flow.
- For Reference Action, select Get Contact’s Upcoming Bookings.
- Click Create and Open.
- Configure the Contact_ID variable’s input settings.
- If the Inputs and Outputs sections are blank, go to another tab, then return to the Get Contact’s Upcoming Bookings tab.
- Make sure the Description says
The Id of a Contact record that you would like to find related Booking records for.
Notice that the default Description matches the description of the Contact_ID variable in the flow. Seeing a pattern?
- Check Require input to execute action.
- If the Inputs and Outputs sections are blank, go to another tab, then return to the Get Contact’s Upcoming Bookings tab.
- Configure the Contact_Bookings variable’s output settings.
- Make sure the Description says
The upcoming not-canceled bookings assigned to the contact whose ID matches the Contact_ID. - Check Show in conversation.
- Make sure the Description says
- Configure the Error_Message_Output variable’s output settings.
- Make sure the Description says
The error message to show to the customer when this flow doesn't finish successfully. - Check Show in conversation.
- Make sure the Description says
- Click Save.
- Click the Booked Activity Management tab to return to the subagent canvas.
- Under Actions Available for Reasoning, click
 next to the Get Contact’s Upcoming Bookings pill in the canvas.
The canvas displays the flow’s variables and how they’re assigned.
- Verify that the “Contact_ID” variable is set to “Agent Populated”.
If it’s not set accordingly, mouse over the Get Contact’s Upcoming Bookings action in the sidebar, click , delete the action and return to step 1 to create the action again.
Update the Contact_Bookings Output
Remember, Contact_Bookings is a record collection variable in the Get Contact’s Upcoming Bookings flow. Record collection variables must be specially configured in the subagent’s script, so update the script to prevent future errors.
- Click the Get Contact’s Upcoming Bookings tab.
If this tab isn’t present, you can skip to the next step. Clicking this tab makes the text in upcoming steps easier to find, but you can still use your browser’s Find function (Ctrl-F on Windows, Command-F on Mac) to locate the text.
- In the row of tabs, select the Canvas dropdown and select Script.

- Find the
Contact_Bookings: objectline.
- Change
Contact_Bookings: objecttoContact_Bookings: list[object].
- A few lines after the Contact_Bookings line, find the
complex_data_type_name: "lightning__listType"line.
- Change
complex_data_type_name: "lightning__listType"tocomplex_data_type_name: "lightning__recordInfoType".
- Click Save.
- In the row of tabs, change the Script dropdown back to Canvas.
Give Instructions to the Subagent
Now set the instructions for this subagent.
- In the Explorer, click the Booked Activity Management subagent.
- In Reasoning Instructions, add this paragraph:
Your job is only to help Coral Cloud Resort guests book activities, give them information about their existing booked activities, and cancel their booked activities. Do not use any Salesforce data that wasn't provided by an action's output. Do not show the customer any ID values.
- Press Enter to start a new line and add a second paragraph:
If the customer asks what their current booked activities are, run the Get_Contact_s_Upcoming_Bookings action and then present the output to the customer.
- In the previous paragraph, highlight the
Get_Contact_s_Upcoming_Bookingstext and type@.
When you type @ in the instructions, Agentforce Builder displays a contextual menu to reference specific actions, variables, subagents, and other options directly in those instructions.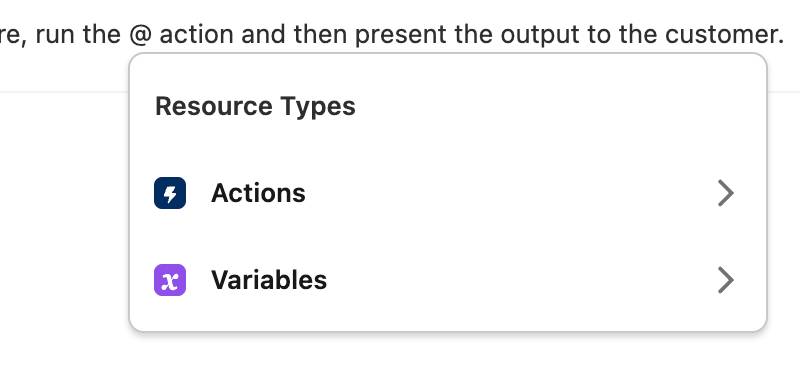
- Select Actions, then select Get Contact’s Upcoming Bookings.
You reference the Get Contact’s Upcoming Bookings action here to ensure that Agentforce runs that action.
- Press Enter to start a new line and add a third paragraph:
After showing the customer a list of their activities, ask them how you can help them.
- Press Enter to start a new line and add one more paragraph:
If the customer is not known, you must always ask for their email address and their membership number to get their Contact record by running the Get_Customer_Details action before running any other actions.
- In the last paragraph, highlight the
Get_Customer_Detailstext and type@.
- Select Actions, then select Get Customer Details.
- Save the agent.
Test the Agent
Now that the subagent is ready, you can put it to the test. Use the Preview tab in Agentforce Builder to run the agent and verify that it’s working as expected.
- While still in the Agentforce Builder, click the Preview tab.

- In the Let’s Chat panel’s “Describe your task or ask a question” box, enter
Can you show me my booked activities?and press your Return/Enter key.
- After the agent responds, enter the next prompt:
I am sofiarodriguez@example.com and my membership number is 10008155and press your Return/Enter key.
The agent shows a list of Sofia’s currently booked activities that looks something like this:
Here are your upcoming booked activities at Coral Cloud Resort:
Family Adventure Quest - August 8, 2026, 1:30 PM to 2:30 PM
Trail Running Adventure - August 11, 2026, 9:00 AM to 10:00 AM
Beach Bootcamp Challenge - August 12, 2026, 1:30 PM to 5:30 PM
Seaside Gourmet Dinner - August 12, 2026, 9:00 AM to 12:00 PM
Seaside Gourmet Dinner - August 13, 2026, 1:30 PM to 4:30 PM
Family Movie Night Under the Stars - August 22, 2026, 9:00 AM to 10:00 AM
Live Music Beach Party - August 23, 2026, 1:30 PM to 3:30 PM
Ocean Kayak Fitness Expedition - August 23, 2026, 9:00 AM to 3:00 PM
Coastal Kayak Excursion - August 28, 2026, 1:30 PM to 2:30 PM
Artisan Workshop Series - August 30, 2026, 1:30 PM to 2:30 PM
Congratulations, you created a flow that makes your agent more accurate and powerful, then gave that agent the instructions it needs to run the flow consistently. In the hands-on challenge, you add an agent action that updates your customer’s Booking records.