Create an Approval Process
Set Up a Multistep Approval Process
Your org is prepared, so you’re ready to set up the approval process for positions, as Ling Wu requested. An approval process is an automated process that approves records in Salesforce. When you build an approval process, you specify the steps necessary for approval. A given step can apply to all records or just records with certain attributes. You also specify who does the approving at each step and the actions to take when a record is approved, rejected, or recalled.
Begin creating your multistep approval process.
- From Setup, enter
Approval Processesin the Quick Find box and select Approval Processes.
- Select Position from the Manage Approval Processes For dropdown.
- Click Create New Approval Process and select Use Standard Setup Wizard from the picklist, then fill in the details.
- For Process Name, enter
New Position Approval.
- For Description, enter:
All positions must be approved by the recruiter's manager and two to three other approvers. These approvers are tracked in approver fields on the Position object.
- Click Next.
- In the Use this approval process if the following dropdown, select criteria are met.
- Leave everything as is and click Next.
- In the Next Automated Approver Determined By dropdown, select Manager.
- Select Use Approver Field of Position Owner.
- Select Administrators OR the currently assigned approver can edit records during the approval process.
- Click Next, then Next.
Select fields to display on the approval page layout.
- Select these fields from the Available Fields list.
-
Department
-
Education
-
Job Description
-
Location
-
Pay Grade
-
Salary Range
-
Skills Required
- Click
 to add them to the Selected Fields list.
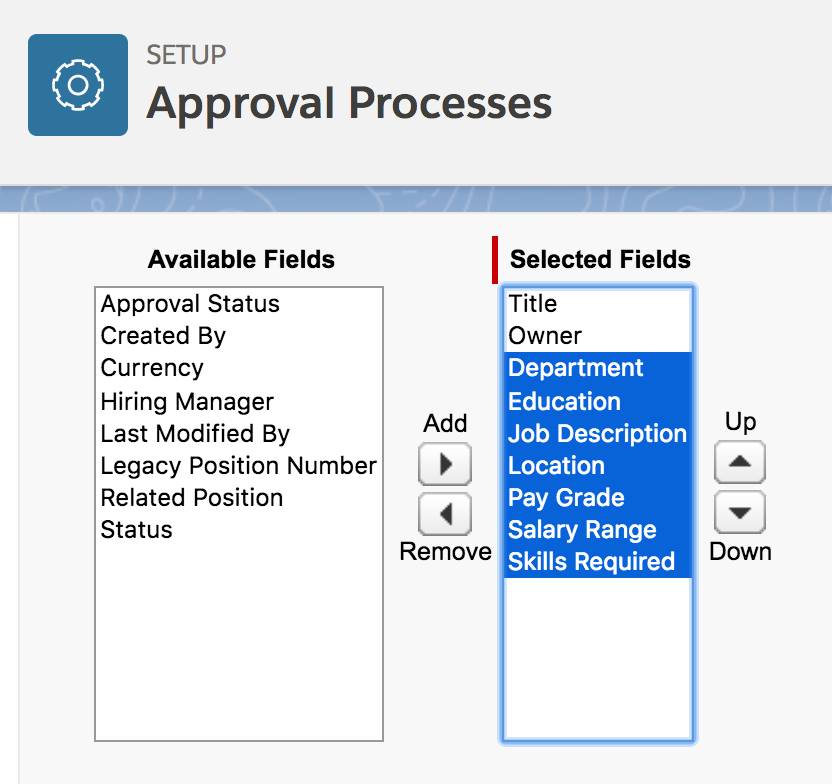
- Select Display approval history information in addition to the fields selected above.
- Select Allow approvers to access the approval page only from within the Salesforce application (Recommended).
- Click Next.
- As Submitter Type, select Owner from the Search dropdown.
- Ensure Position Owner is visible in the Allowed Submitters box.
- Select Allow submitters to recall approval requests.
- Click Save.
- Select I'll do this later. Take me to the approval detail page to review what I've just created.
- Click Go!
Create Approval Steps
You’ve created the basic approval process. Next, create initial submission actions.
- Under the Initial Submission Actions related list, click Add New, then select Field Update.
- For Name, enter
Approval Status to Pending.
- For Field to Update, select Approval Status.
- Under Specify New Field Value, select A specific value, then select Pending.
- Click Save.
Now create approval steps.
- Click New Approval Step under the Approval Steps related list.
- For Name, enter
Manager of Position Owner.
- Click Next.
- Select All records should enter this step.
- Click Next.
- Select Automatically assign using the user field selected earlier (Manager).
- Click Save.
- Select No, I'll do this later. Take me to the approval process detail page to review what I've just created.
- Click Go!
Create the second step.
- Click New Approval Step under the Approval Steps related list.
- For Name, enter
Position Approver 1.
- Click Next.
- Select All records should enter this step.
- Click Next.
- Select Automatically assign to approver(s).
- Select Related User from the dropdown that appears, then select Approver 1 from the secondary dropdown.
- For When multiple approvers are selected, select Approve or reject based on the FIRST response.
- For What should happen if the approver rejects this request? select Perform all rejection actions for this step AND all final rejection actions (Final Rejection).
- Click Save.
- Select No, I'll do this later. Take me to the approval process detail page to review what I've just created.
- Click Go!
Create the third approval step.
- Click New Approval Step under the Approval Steps.
- For Name, enter
Position Approver 2.
- Click Next.
- Select All records should enter this step.
- Click Next.
- Select Automatically assign to approver(s).
- Select Related User from the dropdown that appears, then select Approver 2 from the secondary dropdown.
- Click Save.
- Select No, I'll do this later. Take me to the approval process detail page to review what I've just created.
- Click Go!
Create the fourth approval step.
- Select New Approval Step under the Approval Steps related list and complete the details.
- For Name, enter
Position Approver 3.
- Click Next.
- Select Enter this step if the following criteria are met and enter the criteria.
- Field: Position: Salary Range.
- Operator: equals
- Value: 90K-120K, 120K+ (Click
 to find it.)
- Click Next.
- Select Automatically assign to approver(s).
- Select Related User from the dropdown that appears, then select Approver 3 from the secondary dropdown.
- Click Save.
- Select No, I'll do this later. Take me to the approval process detail page to review what I've just created.
- Click Go!
Create the Final Actions
Now create the final actions: approval or rejection, along with their associated email alerts.
- Under the Final Approval Actions related list, click Add New and select Field Update.
- For Name, enter
Approval Status to Approved.
- For Field to Update, select Approval Status from the picklist.
- Under Picklist Options, select A specific value, then choose Approved from the dropdown.
- Click Save & New.
Fill in the details of the second field update.
- For Name, enter
Status to Open.
- For Field to Update, select Status from the dropdown.
- Under Picklist Options, select A specific value, then select Open from the dropdown.
- Click Save.
Set up email alerts.
- Under the Final Approval Actions related list, click Add New and select Email Alert.
- For Description, enter
Email position owner about approval.
- Click
 next to the Email Template field.
- Change the Unfiled Public Classic Email Templates folder to Position Request Responses folder.
- Select Position Approved.
- For Recipient Type, select Owner.
- In the Available Recipients column, select Position Owner then click
 to move it to the Selected Recipients column.
- Click Save.
Now create final rejection actions.
- Under the Final Rejection Actions related list, click Add New and select Field Update.
- For Name, enter
Approval Status to Rejected.
- For Field to Update, select Approval Status from the dropdown.
- Under Picklist Options, select A specific value, then select Not Approved from the dropdown.
- Click Save & New.
Fill in the details for the next field update.
- For Name, enter
Status to Closed.
- For Field to Update, select Status from the dropdown.
- Under Picklist Options, select A specific value, then select Closed from the dropdown.
- Click Save.
Now set up an email alert.
- Under the Final Rejection Actions related list, click Add New and select Email Alert.
- For Description, enter
Email position owner about rejection.
- Click
 next to the Email Template field.
- Change the Unfiled Public Classic Email Templates folder to Position Request Responses folder
- Select Position Rejected.
- For Recipient Type, select Owner.
- In the Available Recipients column, select Position Owner then click
 to move it to the Selected Recipients column.
- Click Save.
Set up another field update.
- Under the Recall Actions related list, click Add New, and select Field Update.
- For Name, enter
Approval Status to Recalled.
- For Field to Update, select Approval Status from the dropdown.
- Under Picklist Options, select A specific value, then select Recalled from the dropdown.
- Click Save.
- On the Approval Processes page, click Activate.
- Click OK on the popup that appears.
Your approval process is ready! If you were working in your production org, you could test the process now. We won’t test it in your Trailhead Playground. Instead, move on and create a process for approving new positions.