Work with Your Data
Learning Objectives
After completing this unit, you’ll be able to:
- Locate the information that you need on record pages.
- Select the create record or edit record action that’s most suited to your goal.
- Find your way around a Lightning console app.
Get Oriented to Working with Records in Lightning Experience
In Salesforce Classic, record details, related lists, and the record feed all display on one long page. This layout can lead to tons of scrolling, especially for records with a lot of fields and other data. Lightning Experience streamlines records by balancing things out across different tabs. This new approach cuts down on scrolling and makes it faster to find and focus on the desired information. So let’s see how your records look in Lightning Experience.

Wow, there are a lot of differences to take in here. And because the goal of Lightning Experience is to make it easier and faster for you to do your job, the changes you see are more than skin deep.
- By default, Leads and Opportunities open in what we call a workspace. The workspace is optimized for action and includes everything sales teams need to qualify and convert leads or close deals.
- Accounts and Contacts include many of the same elements as workspaces. But when you’re working with accounts and contacts, you want to find information fast. So these records are optimized for quick reference and at-a-glance insights.
Now let’s take a closer look at the information you’re likely to see on most records, regardless of object.

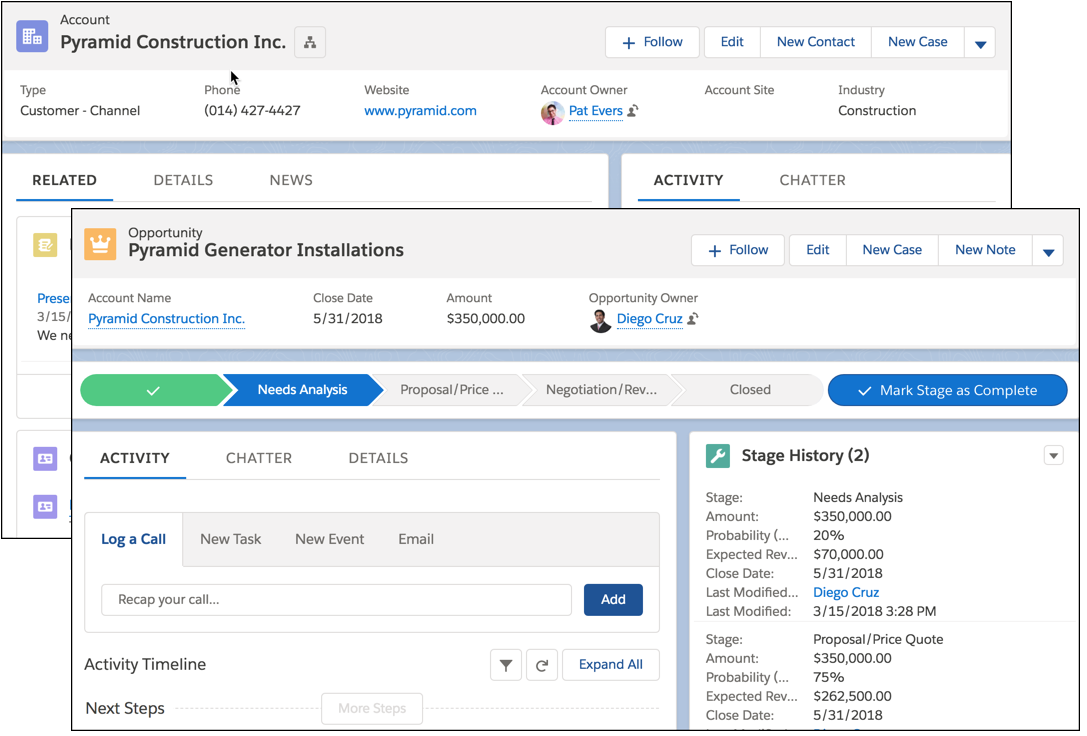
- Highlights Panel (1)—See a summary of a record’s most important details at the top of the page. The record name is always here. The other fields you see are determined by your admin.
- Details (2)—All of a record’s fields are grouped together on the Details tab.
- Related Lists (3)—Remember scrolling and scrolling to the bottom of records in Salesforce Classic to find related lists? Click right to them in Lightning Experience, because they’re grouped together, either on the left side of the page (for opportunities and leads) or on the Related tab. We look more closely at related lists in a little bit.
- Activities and Chatter (4)—You can log activities and collaborate on records, just like in Salesforce Classic. We walk through these reimagined features in the Lightning Experience Productivity module.
And here’s a Lightning Experience time-saver that you’re going to love—quick view hovers (5). Simply hover your mouse over any record link on the page and see a slew of details and related information without navigating away. Or quickly switch to a new record from the quick view.
Find Related Information
With Lightning Experience, all the scrolling to find related lists at the end of records is a thing of the past. Now related information appears in condensed related list cards. When related lists are located in a wide region on the page, as is the case for accounts and contacts, cards display on the Related tab (1). When related lists are located in a narrow region on the page, like on the lead and opportunity workspace and for groups and people, cards are grouped together on the page, often on the right-hand side (2).
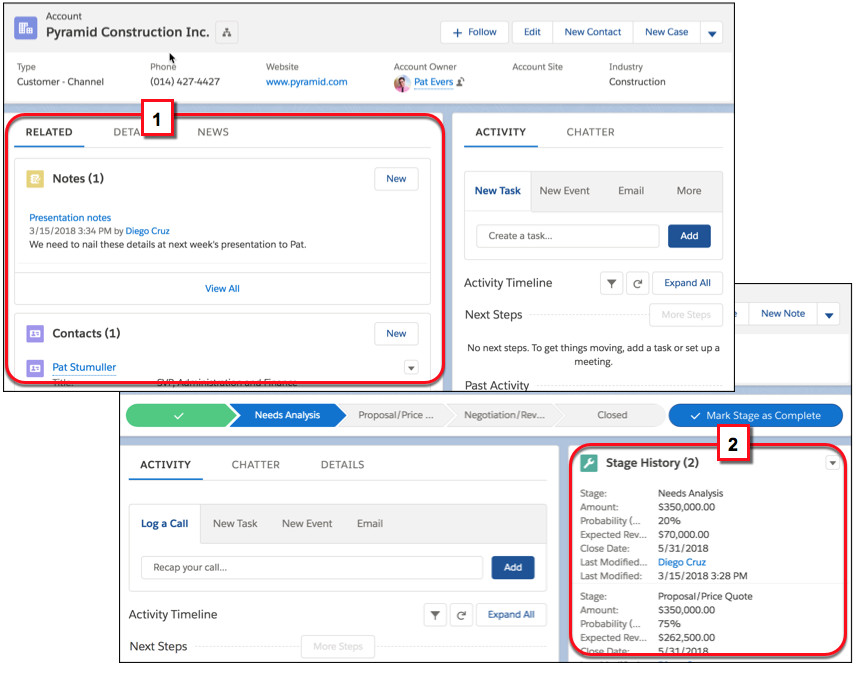
- When related lists are in a wide region on the page, each related list card displays up to six records. In a narrow region, related list cards display up to three records. For easy scannability, you see a highlight of up to four fields for each record in the list.
- If the related record that you’re looking for is listed in the card, drill in on its details by clicking its name (1).
- To see the full related list, with all its records and all its fields, click View All (2).
- Related list buttons (3) are located in the upper-right corner of each related list card.

Customize the Related Lists You See on a Record
When you got started with Salesforce Classic, you may have spent time customizing your objects’ record pages so you see just the related lists that you need to do your job. Happily, these settings apply in Lightning Experience too. So the collection and arrangement of related lists on your records should be just the way you like them.
But it’s possible that your admin made page layout changes for your company’s Lightning Experience rollout and overwrote your personal related list customizations. Not to worry. You can quickly adjust things to your liking by selecting Customize My Pages from the Display & Layout section in your personal settings.
A few related lists from Salesforce Classic, such as HTML Email Status, Content Deliveries, and Live Chat Transcripts, aren’t available in Lightning Experience. If you can’t find a related list that you use in Salesforce Classic, check What are the Gaps Between Lightning Experience and Salesforce Classic in Salesforce Help.
Take Action on Records
Salesforce Classic lumps Chatter actions, activity actions, and quick create actions together in the Chatter publisher, while buttons related to the record itself appear in the details section. To optimize your workflow, Lightning Experience uses a different approach, grouping actions and buttons together by function.
Actions on records in Lightning Experience appear in one of three places.

- The Chatter tab (1) provides standard Chatter actions: Post, Poll, and Question (and if you have Groups, the Announcement action).
- The Activity tab (2) includes all activity-related actions, including New Task, New Event, Log a Call, and Email.
- The rest of the actions that you’re used to finding in the Chatter publisher in Salesforce Classic—and all the buttons that you’re used to finding in the details section—are located in the record’s action menu (3). Find the Chatter Follow button here too.
What about custom links? As in Salesforce Classic, they’re included with the record’s details, at the bottom of the page on the Details tab.
Create and Update Records
You create records and update records all the livelong day. Taking these routine actions is largely the same in Lightning Experience. Here’s a quick review.
Need to Spin Up a New Record?
You have tons of options, all just a click or two away from whatever page you’re on.
Create Records for a Specific Object
-
Quick and Dirty: Use the quick create actions from the Global Actions menu (1) to start a record with just the essential details. You can edit the record later to add other information.

-
All the Details: Use the shortcuts in the navigation bar (2) or click New on object home pages (3) to populate all the fields for a record when you create it.

Create Related Records
- Use a create action from a record’s action menu (4) or click New on related lists (5).

Need to Update the Details on Existing Records?
You have the same options that you’re used to in Salesforce Classic, with a few surprises.
Edit Records You’re Viewing
-
All the Fields: Click Edit in the record’s action menu (6). Depending on your org, the option may be in the dropdown menu. You don’t have to switch to the Details tab first.

-
Just Some Specific Fields with Inline Edit: On the Details tab, click the
 icon (7) next to the desired field.
And here’s something you’ll appreciate! You can actually edit any of the fields on the record at this point, just in case you notice other details that also need updating.
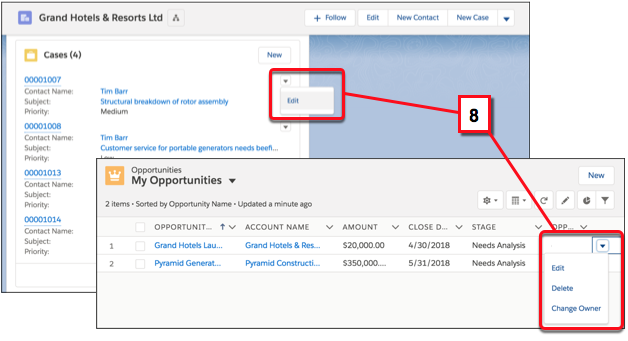
Edit Records from Other Locations
- In list views or related lists, select Edit from the dropdown menu for the desired record (8).
Tip
There’s a small but important difference in Lightning Experience when using inline edit to add text to a Description field or other long text area. Pressing Enter commits the text that you typed. To add new lines to the field, press Shift + Enter.
Console Style: Get Oriented to Working in Lightning Console Apps
Lightning console apps are easy to work with because they’re designed for fast-paced environments like call centers and contact centers. When working with console apps, keep two things in mind.
- Console apps let you see multiple records—and related records—on one screen with tabs. Tabs help you work with less scrolling and context-switching so your workflow isn’t interrupted.
- Console apps help you work directly off lists with split view. Split view lets you keep the lists you need on hand while you work on a bunch of different records.
With console apps, you can jump back-and-forth between lists and records without losing track of what you’re working on. To open a Lightning console app, use the App Launcher.
Here’s how to work with a console app.

- To select objects in an app, use the item menu in the navigation bar (1).
- Records open as workspace tabs (2). When you click related records in a workspace tab, those records open as subtabs (3). In this example, there are two workspace tabs open for cases 00001000 and 00001010. Under the 00001010 workspace tab, there are three subtabs open, including related account and contact records.
- Split view (4) helps you manage multiple records and related items at the same time. You can keep a list view open on one side of the screen, and keep working with workspace tabs and subtabs on the other side. Close or open split view whenever you want—click anywhere on the vertical divider (5) between the split view pane and the record page.
- The utility bar is a fixed footer that provides fast access to productivity tools, like Notes or History (6). In the History utility, you can easily access your recently opened records. Utilities open in docked panels that stay open as you navigate around.
The way information is organized in workspace tabs depends on the object, and the way your admin has configured things. Some objects—like cases in the Service Console app and accounts, contacts, leads, and opportunities in the Sales Console app—take advantage of a handy three-column layout that lets you see everything at once.
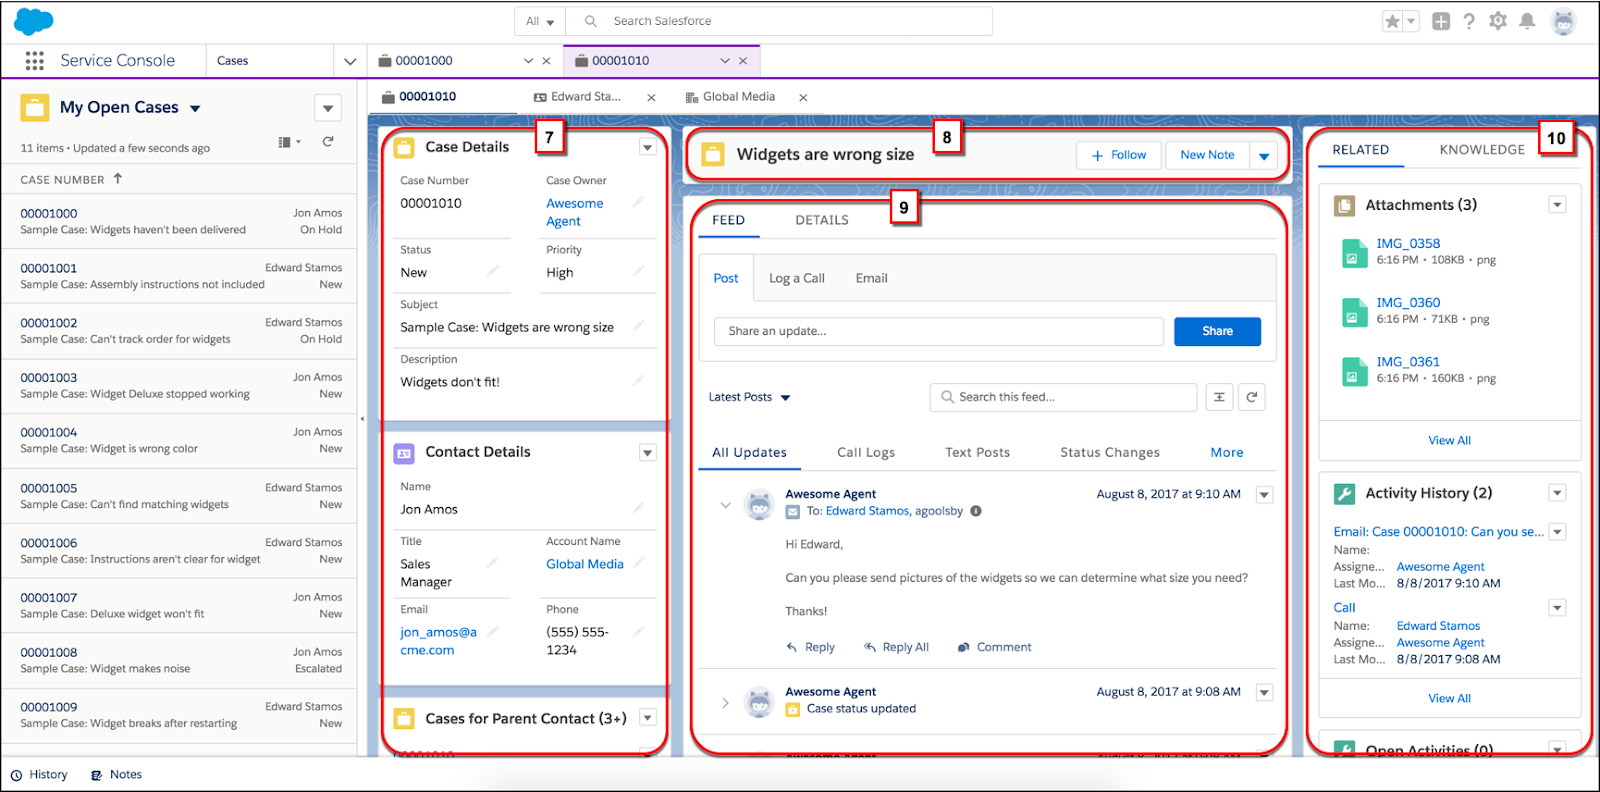
- In the first column, record details are displayed using Related Record and Related List components (7).
- The second column includes a Highlights Panel component that’s front and center and shows key information at a glance (8). The news-like feed lets anyone see record updates and collaboration (9).
- The third column includes more related lists or useful Knowledge articles when a knowledge base is set up (10).
Resources
- Salesforce Help: Find Your Way Around Records in Lightning Experience
- Salesforce Help: Create and Update Records
- Salesforce Help: Lightning Service Console
- Salesforce Help: Lightning Sales Console