Install and Configure Distributed Marketing
Learning Objectives
After completing this unit, you’ll be able to:
- Install the managed package.
- Describe the different license types and permissions for Distributed Marketing.
- List features in the Distributed Marketing apps.
- Configure account and system user authentication.
Install the Managed Package
You understand how Distributed Marketing and Journey Builder work together. You reviewed the requirements and confirmed that you meet the requirements for rolling out Distributed Marketing. You can now install Distributed Marketing in Salesforce through a managed package. It’s super easy to install, and then you complete a few steps for your initial configuration.
Navigate to the Install Managed Package page for Distributed Marketing on Salesforce Help. From here, you simply follow the steps to log out of Marketing Cloud Engagement, paste in the URL for the managed package, and select whom to install the package for. Make sure that you’re using a supported web browser. We recommend that you install this for admins only or for specific profiles so that you are installing for licensed users only.

License Types and Permissions
Access to Distributed Marketing is controlled through custom permissions and permission set licenses. You can assign the custom permissions in your Salesforce org using installed permission sets or using your own custom permission sets or profiles. The permission set licenses are provisioned in your account and can be assigned using installed permission sets.
This permission set.... |
Includes... |
|---|---|
DMAdministrator |
Everything included in DMStandard plus Visualforce pages for Distributed Marketing administration |
DMAdministrator License |
Administrator (mcdm_15 namespace) custom permission (consumes one Distributed Marketing license) |
DMStandard |
Access to Distributed Marketing custom objects and Visualforce pages for standard Distributed Marketing functionality |
DMStandard License |
Standard (mcdm_15 namespace) custom permission (consumes one Distributed Marketing license) |
DMApprover |
Access to Distributed Marketing custom objects needed to approve Distributed Marketing content (only needed if you are using approvals with Distributed Marketing; doesn’t include access to DMStandard or DMAdministrator functionality) |
Permissions
-
Administrator (mcdm_15 namespace): This permission grants access to admin functions, such as linking journeys to campaigns and managing org defaults. It also grants access to all of the standard permission functionality, including reviewing, personalizing, and sending content.
-
Standard (mcdm_15 namespace): This permission grants access to standard user functions, such as personalizing content and approving campaign members for messages.
Assign Permissions
Now that you understand the different permission sets and permissions, you can assign them by following the steps in the Assign Permissions topic on Salesforce Help. To complete setup and installation, assign both of the administrator permission sets to your Distributed Marketing admins. After you set up Distributed Marketing, assign both of the standard permission sets to your Distributed Marketing users. If you’re using approvals, assign DMApprover to users who approve Distributed Marketing content. (They do not need a license.)
Applications
After you install Distributed Marketing, you’ll notice new Distributed Marketing applications in the App Launcher menu if you have the appropriate permissions: Distributed Marketing Administration and Distributed Marketing Settings. Keep an eye on Marketing Cloud Engagement release notes to stay up to date with changes to these apps.
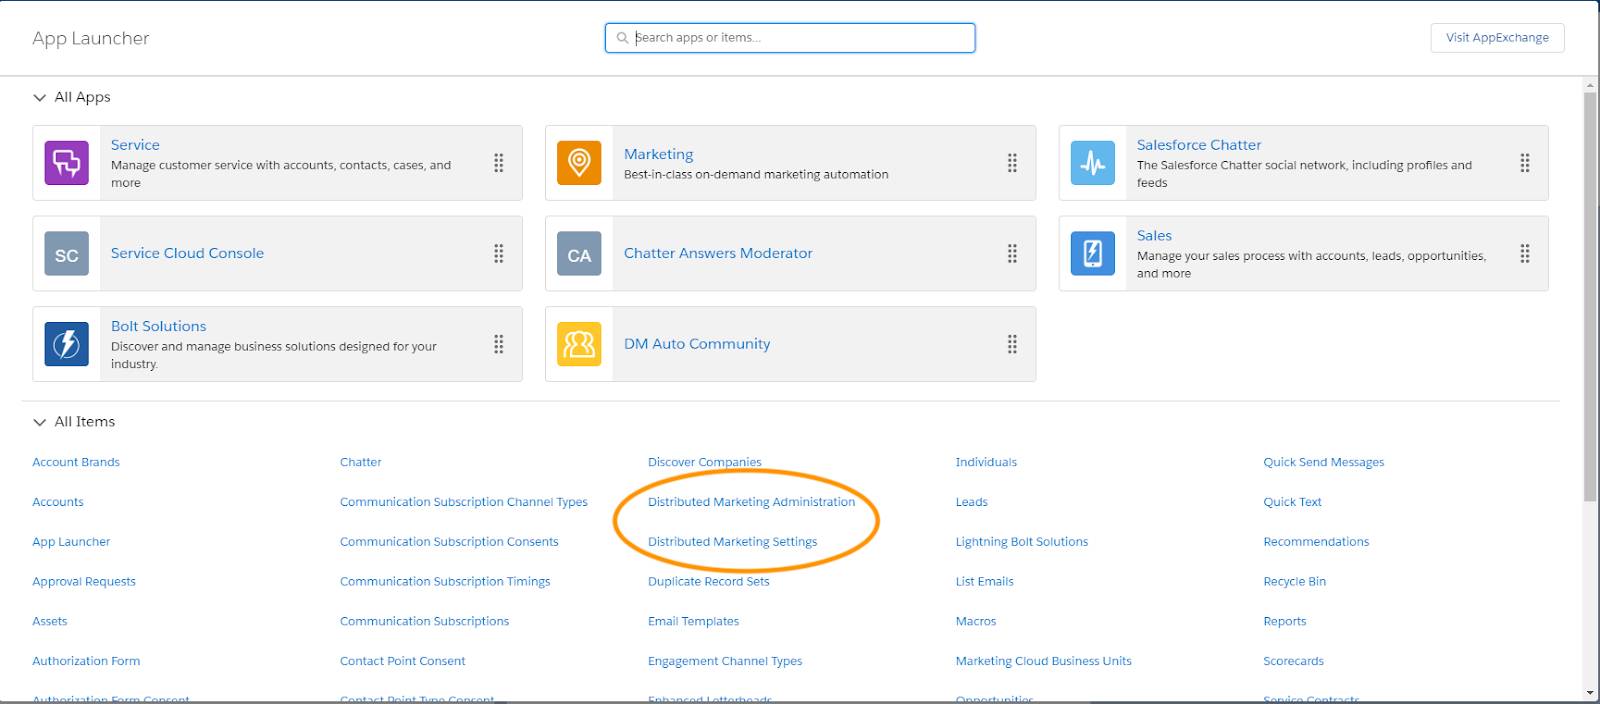
Distributed Marketing Administration
This app is only for our Salesforce and Distributed Marketing admins. To access this page, you need the DMAdministrator and DMAdministratorLicense permission sets or equivalent. You use this app to do a few things.
- Connect your org with your Marketing Cloud Engagement account.
- Register and manage Marketing Cloud Engagement business units with Distributed Marketing.
- Customize the default fields to display in the pending campaign member table.
- Add single-message journeys to use in Quick Send, a feature for sending single messages directly from contact and lead records.
- Manage any custom personalization interactions you set up.
- Manage compliance and approvals settings.
We talk more about each of these settings in later units.

Account Authentication
The final step in installing Distributed Marketing is configuring a secure connection between your Marketing Cloud Engagement account and your Sales, Service, Financial Services, or Experience Cloud org. The secure connection facilitates API calls to Marketing Cloud Engagement so that you can distribute content to your business users, add their contacts to journeys, and more. We use named credentials with named principal identity type and OAuth 2.0 protocol to authenticate.
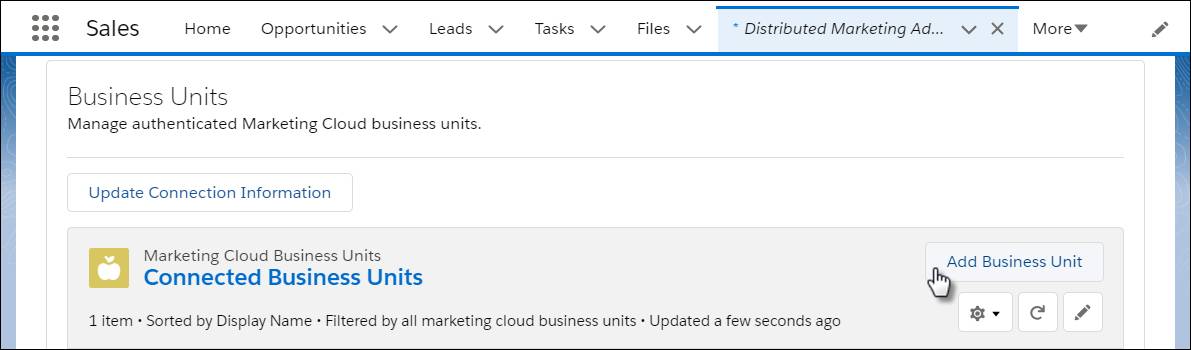
Add Business Units
Marketing Cloud Engagement business units allow you to control access to and sharing of Marketing Cloud Engagement information, such as email content and images. If you use Marketing Cloud Engagement business units to manage content by categories—such as brand, line of business, or region—you can add them to Distributed Marketing to support unique groups of business users. As you set up Distributed Marketing, you determine which business units Distributed Marketing can access by logging into those business units with the credentials of a unique system user.
To authenticate a Marketing Cloud Engagement business unit with your org, navigate to the Distributed Marketing Administration app in Salesforce. Select Add Business Unit and follow the steps provided by the Distributed Marketing installation wizard to add up to 200 unique Marketing Cloud Engagement business units. Each business unit must have its own unique system user. To avoid issues with permissions and user changes, we recommend that you choose one dedicated user account to use exclusively for system authentication.
We get that not all content should be shared equally. While Distributed Marketing defaults to public sharing, you can apply sharing rules to ensure that business users see only content from certain business units. And you can use campaign sharing to further manage the content that users have access to for campaign sends. In Salesforce Setup, you set up business unit access for both administrators and standard users of Distributed Marketing. Check out the Use Business Units with Distributed Marketing topic on Salesforce Help to learn more.
You installed Distributed Marketing, set up permissions, and registered a business unit with Distributed Marketing. Next, we walk through the initial setup process and look at the settings you use to manage the user experience with Distributed Marketing.
Resources
- Salesforce Help: Business Units in Marketing Cloud Engagement
- Salesforce Help: Digging Deeper into OAuth 2.0 in Salesforce
- Salesforce Help: Installation Overview
- Salesforce Help: Marketing Cloud Engagement Release Notes