Combine Journey Builder and Advertising
Learning Objectives
After completing this unit, you’ll be able to:
- Add an Advertising Audience into a journey.
- Create an ad within Journey Builder using Advertising Campaigns.
An Ad Agency Within Journey Builder
Journey Builder plus advertising equals a match made in marketing heaven. Now anyone on your marketing or digital team can create Facebook advertising audiences and campaigns directly within Journey Builder. This allows your Marketing team to easily build cross-channel journeys that extend the reach of email campaigns. Let’s review how Cloud Kicks can use these features within Journey Builder.
Ad Audience
Linda Rosenberg, the Marketing Cloud Engagement admin, has been asked to help the Marketing team update a welcome journey to target new customers who haven’t engaged with email after two sends. She locates the welcome journey and starts by creating a new version. She then drags the Ad Audience activity onto the Journey Builder canvas after the second email attempt with no engagement, and then double-clicks the icon to configure her audience.
She enters an Audience name, Welcome Campaign Audience, and a description that helps the team identify their source. She then selects the correct Destination, Ad Account, and then Done.
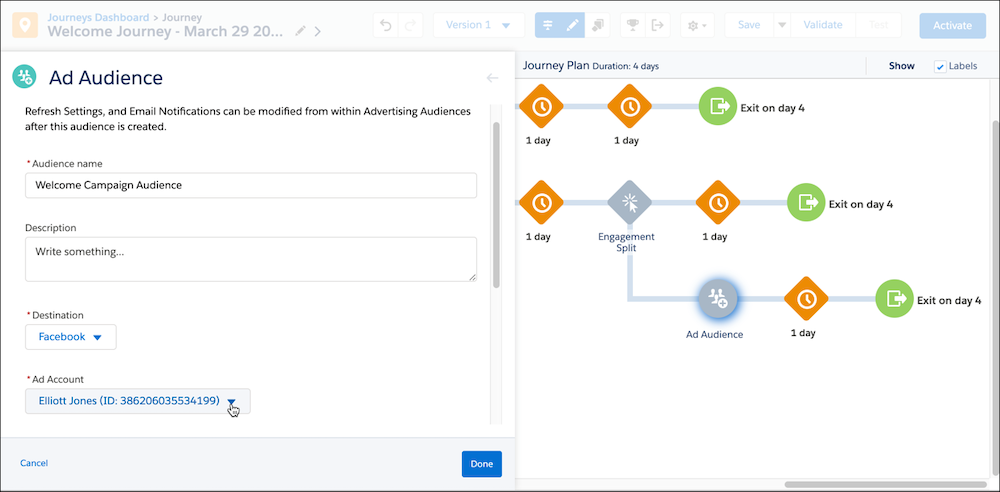

After testing, she activates the new welcome journey and her audiences get added into the selected channel. If Linda needs to update the audience at a later date (refresh settings, and so forth), she can update within Advertising Audiences.
Creating Campaigns in Journey Builder
Teams can also create an Ad Campaign directly in Journey Builder. Elliott is asked to create a new ad campaign for Cloud Kicks’s existing anniversary journey. He locates the running Anniversary journey and makes a new version. He then adds an engagement split after the initial Anniversary email send, then drags the Ad Campaign icon under the nonengagement split. Once he clicks Ad Campaign he follows these steps to continue configuration.
Create Audience
- Provide an Audience Name and select a configured Ad Account.
- Enter the Data Origin from these options: User provided only, Partner provided only, or Both user and partner provided.

3. Add a Description and a desired Retention Period and click Next.
Configure Creative
- Choose the correct Facebook page and enter a creative name.
- Enter the desired text, link URL, and a headline.
- Enter a display link and link description.
- Next Select Image to upload any imagery or creative for the ad.
- If desired, add a call-to-action button.
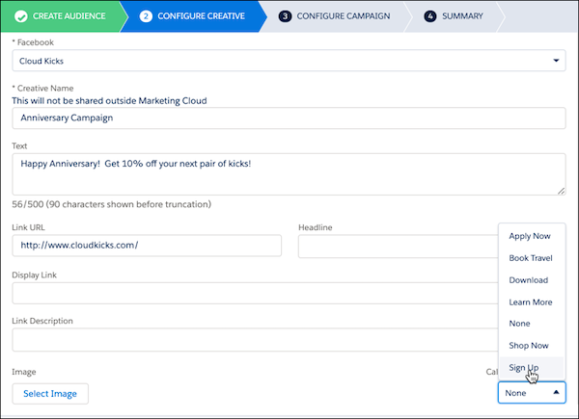
6. Once completed, click Next.
Configure Campaign
- Confirm the Advertising Campaign Name.
- Set a Total Spend amount and a Daily Budget amount for the campaign. (Recommend a minimum total budget of $100, with a minimum audience size of 1,000).
- Click Next.
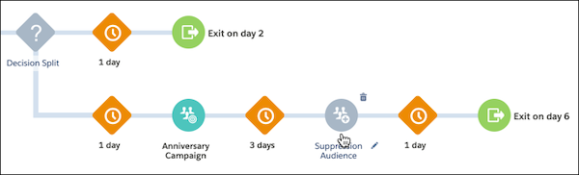
Elliott reviews the campaign summary for accuracy and clicks done. Satisfied with the setup, Elliott returns to the Journey Builder canvas to add an important step to the journey. He drags an Ad Audience activity after the wait period to ensure an exit audience is created for suppression.
Customers that exit journeys aren’t automatically removed from that Advertising Audience, so it’s important to add in this suppression step to avoid retargeting the same customers.
Elliott reviews his work and confirms it is ready to test. After testing and activation, a data extension is created for the Advertising Audience, which is then used in Facebook. All of this happens automatically. There is, however, a delay after the initial launch of the journey as people enter and the audience builds in size.
Elliott’s campaign starts once there are at least 20 matched contacts (though 1,000 is recommended) and runs as long as it has a budget remaining. Once the journey is running, you can monitor the progress of the campaign by viewing key metrics without leaving the journey.
The following are some additional tips and considerations when using Advertising Campaigns within Journey Builder.
-
Ad creative: Don’t overlay too much text on an image, less than 20% text on the image is a great rule of thumb.
-
Bid higher on journey-based audiences: The higher you bid, the more likely you are to win the auction. When you are guiding a customer through a journey, it’s important to be seen by as many customers as possible.
-
Keep an eye on your advertising account’s history: Similar to how email clients judge deliverability, some platforms base your bid on your reputation, relevance, and volume.
-
Budget updates: You can adjust the budget up or down by making a new version of the journey and updating the Ad Campaign step.
The Cloud Kicks team celebrates when the first campaign starts delivering, and they start discussing how else they can use campaigns within Journey Builder.
Resources
- Salesforce Help: Journey Builder Advertising
- Salesforce Help: Get Started with Journey Builder
- Trailhead: Manage Campaigns with Journey Builder