Create a User and Setup Approvals
Learning Objectives
In this badge you’ll:
- Customize the page layout for a travel approval app.
- Enable Chatter on the travel approval app to allow for in-app collaboration.
There are a number of ways to adjust the user interface in your Salesforce org to meet your needs. Many customizations can be made through configuration menus and drag-and-drop page layout editors—all with no coding required. This badge focuses on the non-coding approach to modifying the user interface, as you customize an app that tracks company travel.
Note that if your company has advanced user interface requirements beyond what can be accomplished with standard configuration, your developers can create custom interfaces or components.

Launch Your Trailhead Playground
You complete this hands-on badge in your own personal Salesforce environment, called a Trailhead Playground. Get your Trailhead Playground now by first logging in to Trailhead, and then clicking Launch at the bottom of this page. Your playground opens in a new browser tab or window. Keep the playground window open while you do this badge. After you complete the badge in your playground, come back to this window and click Verify step at the bottom of this page.
Note: For the best experience, you must use the Trailhead Playground you created for Build a Data Model for a Travel Approval App.
Create a User
Before you begin customizing the travel app, first create a new user, Eric Executive, and set him up as manager. This involves assigning roles and profiles so that Eric has the correct permissions to approve travel requests.
- In your Trailhead Playground, click
 and then select Setup.
- In the Quick Find box, search for and select Users.
- Click New User and enter these details.
Field |
Value |
|---|---|
First Name |
Eric |
Last Name |
Executive |
Alias |
eexec |
(use your real email address) |
|
Username |
Usernames must be unique across ALL of Salesforce. Choose a username like:
|
Nickname |
eric.exec |
Role |
CEO |
User License |
Salesforce |
Profile |
System Administrator |
- Click Save.
Enable Approval Settings
Now set Eric Executive as your manager, but first ensure you are logged in as yourself. Later in your approval process, travel approval requests are routed to your manager as a first-level approval step.
- From Setup, in the Quick Find box, search for and select Users.
- Select your user account in the list provided. (Click on your name in the All Users list.)
- Click Edit.
- Scroll down to Approver Settings. Set your manager as Eric Executive by clicking
 and selecting Eric Executive from the list.
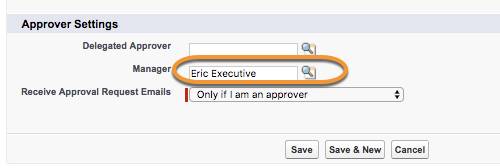
- Click Save.
You’re off to a good start. Move on to the next unit and create and Customize a List View.