Get Your Orgs Ready
Learning Objectives
After completing this unit, you’ll be able to:
- Explain how to set up a test drive.
- List the types of orgs involved in a Trialforce setup.
- Describe the process of configuring the orgs for a Trialforce setup.
Explore Free Trials with the Volunteer Tracker App
Let’s investigate the different types of free trials Salesforce makes available. Suppose we have a great product called Volunteer Tracker that does just what the name says: It tracks volunteers for an organization. Let’s see what kinds of experiences we can create for our prospective customers. We’ll deploy a trial of each kind for our app: an installable trial, a test drive, and a Trialforce trial.
First Things First: Set Up Licensing
We mentioned earlier that the license makes all the difference between a trial and the full version of an app. Before you set up a trial, you must associate it with a license. Do this by linking the managed package for your agent or app with your Partner Business Org (PBO) which has the License Management App (LMA) installed, or with the org where you installed your License Management App (LMA). Log in to the Salesforce Partner Community, then complete these steps.
- Click Publishing to launch the Partner Console.
- Click Technologies.
- Click Solutions.
- Locate the package version that you want to register, and click Register Package.
- Log in to your PBO or your org where the LMA is installed to edit the default license settings.
- Select whether your default license is Free, Trial, or Active. For Free Trial, enter up to 90 for the number of days.
- Select whether your license is applied Per seat or Site-wide. For number of seats, enter the number of seats to assign to the license.
- Save your changes.
Enable Direct Install from Your AgentExchange Listing
Installing our app into a customer’s org is simple. Begin from the Publishing Console in the Salesforce Partner Community. Click Publishing to access the Partner Console.
- Log in to the Salesforce Partner Community.
- Click Publishing to launch the Partner Console.
- Click Listings.
- Find your listing and click it.
- Click Link Your Solution.
- For Installation Method, for installable trials, installing directly from AgentExchange usually works best.
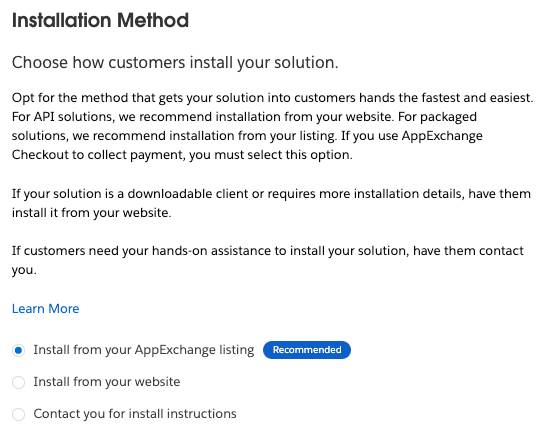
That’s it. If you select the “Install from your AgentExchange listing” installation option, a customer sees a Get It Now button on your AgentExchange listing. Clicking Get It Now takes the customer through a wizard to select whether to install your app into a production or sandbox org.

The app is installed to the org, and customers can try it out with their own data. Easy-peasy.
Set Up Lead Tracking
Now head over to your app’s listing page to set up lead tracking.
- In the Partner Console, click Listings.
- Click your app’s listing.
- Click Grow Your Business.
- In Leads, enter the org ID of your lead collection org.
- Check Install the solution. This enables lead tracking when the prospect installs their solution in a sandbox or production org.
- Select any other details pertinent to your trial and lead tracking.

7. Now our trials will feed us leads! Let’s set up the trials.
8. Click Save & Exit.
Take Volunteer Tracker for a Test Drive
Test drive is the easiest way to show Volunteer Tracker to customers who don’t use Salesforce. They start a test drive of the app from its AgentExchange listing.
The test drive lives in its own org, and every customer who uses it is logged in automatically as an evaluation user. Customers can’t change any of the data in the org, and they don’t need a password. Several customers can use a test drive at the same time—since no one can change data, there’s no risk of interference.
You use Environment Hub and a preconfigured Trialforce template to create a test drive org. Later on, you log in to the test drive org with the admin user to install your solution. You also use the admin user to create the read-only evaluation user.
Before you create a Test Drive, make sure you’ve linked a managed package for your solution to your listing. We explain how to do this in the ISVforce Guide.
Create a Test Drive Org
- Log in to your Partner Business Org (PBO).
- Go to Environment Hub.
- Click Create Org.
- For Purpose, select Test Drive/Demo.
- For Create Using, select Trialforce Template ID.
- For Trialforce Template ID, enter
0TT5Y000004aUeY.
- Provide a name for the org.
- Provide a first name, last name, and username for the org’s admin user.
- Agree to the terms and conditions, and then click Create.
In a few minutes, we email you login instructions for the test drive org.
- Follow the login instructions, and set a password for the admin user.
Salesforce creates a Developer Edition org for the test drive. This org has two users: an admin user and an evaluation user. Salesforce sends the admin user an email. When you receive the email, you’re ready to configure the org.
Configure the Test Drive Org
To configure your test drive org, start from the email we sent.
- Log in to your test drive org.
- Install your solution.
- In Setup → Users, edit the Eval Test user.
- Confirm that the Test Drive Eval Profile is assigned.
- For email address, use your email with +evaluser appended. Example: johndoe+evaluser@example.com.
- Wait for an email confirmation.
- Reset the Eval Test user password.
- Complete any additional configuration that the evaluation user requires. For example, enable read-only access to your solution’s custom Apex classes or Lightning components.
- Double-check that the evaluation user has only the access they need, including read-only access to your test drive org and minimal access to objects.
- Secure your test drive org by:
- Removing any sensitive data from your test drive org.
- Ensuring that each password you specify for the admin and evaluation test accounts is unique.
- Setting up multi-factor authentication for admin account logins.
- Deleting the test drive org if you disable test drives on a listing.
Your test drive org is ready to go. Now it’s time to link it to your listing.
Connect the Test Drive Org to Your Listing
Begin the process from the Partner Console.
- Click Listings.
- Select your listing.
- Click Grow Your Business.
- In Test Drives, toggle on Offer test drives.
- Provide your test drive org ID and your evaluation user’s username and password.

6. Click Save & Exit.
Your customers can now take your product for a spin. Go to your AgentExchange listing and try it out by clicking Try It on your listing.

Volunteer Tracker on Trialforce
Trialforce is pretty cool. As our most flexible free trial, it lets you create several different experiences for different types of prospects and customers, running each one in its own trial org. And conversion is easy since customers who buy your product just start using the trial org as a production org.
Trialforce isn’t magic, though. You have to know a few things and configure some orgs to get it to work. But don’t worry. We’re here to show you how.
For each experience you provide in Trialforce, you create a template that holds configuration data and sample data. The data in this template gets deployed to a trial org when a prospect starts a Trialforce trial.
Where do these templates live, and how do they get deployed to trial orgs? Trialforce manages templates using a few org types.
- A Trialforce Source Org (TSO) holds the configuration and sample data for a template. This is where you install your solution. You make one of these orgs for each experience you create, configuring it exactly as you want your prospects to see it. You create a template in the TSO that contains your configuration and sample data.
- Your Environment Hub can create a TSO for your trial. This is the easiest way to make a TSO.
- A Trialforce Management Org (TMO) is what you use to create and manage your TSOs if you want custom branding for your trial. The Environment Hub can’t create branded TSOs. Instead, you request a TMO by creating a case with Support. We get into the details shortly.
We show you how to create a template for a TSO in the next unit. For now, let’s set up these orgs.
Create a Trialforce Source Org Directly from the Environment Hub
- Log in to your Environment Hub, which is installed in your business org.
- Click Create Org.
- For Purpose, select Trialforce Source Organization.
- For Edition, select either Enterprise TSO or Professional TSO.
- Enter the required information and click Create.
After you create your TSO, log a support case in the Salesforce Partner Community to get your trial template approved for use with the Signup Request API. For product, specify Partner Programs & Benefits. For topic, specify ISV Technology Request. We’ll get into the details of what the Signup Request API is in a subsequent unit.
Request a Trialforce Management Org
In order to create a branded TSO, you first need a TMO.
- Log in to Salesforce Help with the username that you used to register for the Salesforce Partner Community.
- Click Contact Support.
- Click Create a Case.
- Fill in the required details.
- For Subject, enter
Trialforce Management Org (TMO) Request.
- For Description, note that you’re a Salesforce partner and you’re requesting your TMO.
- When prompted to select a product, click Pick a different product / topic.
- For Product, select Partner Programs & Benefits.
- For Topic, select ISV Technology Request.
- Select an instance type and severity level.
- Click Create a Case.
Create a Branded Trialforce Source Org Using Your Trialforce Management Org
After your TMO is enabled, create source orgs. You have to be in Classic to do this.
- In Classic, go to the Setup menu.
- In the Quick Find box, enter
Source.
- In the Build menu, click Trialforce Management.
- Click Source Organizations.
- Click New, then enter and save the required information.

However you create it, you need one TSO for each different Trialforce experience you create.
Hopefully, all this talk about TSOs and TMOs isn’t TMI (too much information)! In the next unit, we focus on creating an effective Trialforce experience.
Resources