Track Progress with Reports and Dashboards
Learning Objectives
After completing this module, you’ll be able to:
- Create a list view to show whether users have verified their email address or mobile number.
- Create a report type to customize Identity Verification History reports.
- Create reports based on Verification History and Identity Verification Methods report types to track an org’s usage of identity verifications methods.
- List passwordless login verification methods.
- Create a dashboard to track identity verifications by email and SMS messaging.
Analyze Identity Verification Activity
Northern Trail Outfitters wants to create reports and a dashboard to track identity verification activity. Joel found some instructions to:
- Create a user list view of active customers to manage identity verifications by user.
- Create a custom report type and reports to gather information about the Experience Cloud site’s identity verification activity.
- Create a graphical representation of the reports with a dashboard.
Create a User List View to Manage Identity Verifications by User
You can see which users have verified their email address or mobile phone number from the Users page in Setup. But it’s a long list. Let’s create a list view to filter user information to track only user identity verifications and related information. It'll make it easier for us to manage and control verified identities by user.
- From Setup, enter Users in the Quick Find box, and click Users.
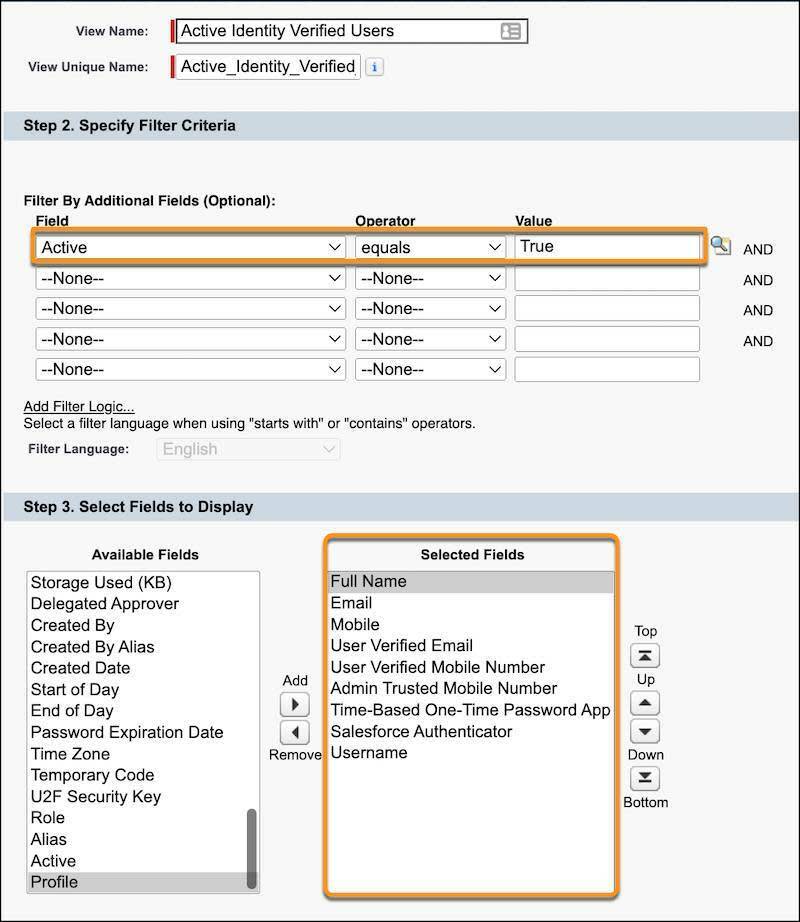
- Click Create New View and name the view Active Identity Verified Users.
- Under Specify Filter Criteria, select Active equals True.
- Under Select Fields to display, add and remove fields until you get this list.
- Full Name
- Email
- Mobile
- User Verified Email
- User Verified Mobile Number
- Admin Trusted Mobile Number
- Time-Based One-Time Password App
- Salesforce Authenticator
- Username
Your view should look like this.
- Click Save.
Your list of users is now filtered so it’s easy to see which active users have verified their identity, and by which method.

Create a Custom Report Type for Identity Verification History
Set up a custom report type to define the reports and fields to make available for identity verification reports and dashboards. The field layout determines which fields the report type contains.
- From Setup, enter Report Types in the Quick Find box, and click Report Types.
- Click Continue.
- Click New Custom Report Type.
- For Primary Object, select Identity Verification History.
- For Display Label, enter Identity Verification History, and enter a description.
- For Store in Category, select Administrative Reports.
- For Deployment Status, select Deployed.
- Click Next, and then click Save.
- Click Edit Layout.
- Click Lookup Fields.
- Add fields related to the Login History object.
- Under Add Fields via Lookup, click Identity Verification History.
- Click Login History.
- Select Status.
- Next to User, click View Related Fields. Select Email, Last Login, and Mobile. Next to Profile, click View Related Fields and select Name.
- Click Save.
- Under Add Fields via Lookup, click Identity Verification History.
- Add fields related to the Username object.
- To return to the list of lookup fields, under Add Fields via Lookup, click Identity Verification History.
- Click Username.
- Select Active, First Name, Full Name, and Last Name.
- Click Save.
- To return to the list of lookup fields, under Add Fields via Lookup, click Identity Verification History.
- Click Close.
- Click Preview Layout to see which fields are available from this report type and then click Save.

Create a Report Based on the Identity Verification History Report Type
After creating an Identity Verification History custom report type, we can create reports to track various identity verification statistics. Let’s create a report to track verification history and user activity.
- From the App Launcher (
 ), find and select Reports.
- Select New Report.
- Select Identity Verification History, and click Start Report.
- Under Groups, Group Rows, click Add group, and then select Method and Source IP.
- Under Columns, click Add column, and then select User Activity.
- Add a filter to exclude logins with password.
- Click Filters, click Add filter, and then select Method from the dropdown.
- In the Filter by Method modal, for Operator select not equal to. For Values, select Password. Then click Apply.
- Make sure the time range is set to All Time: in the Filters column, to change the default time setting, click on the Time filter to open the Filter by Time modal. For Range, select All Time, then click Save.
- In the upper right corner of the Report Builder window, click Save. Rename the report Passwordless Logins by Source IP, and click Save.
Create a Report Based on the Identity Verification Methods Report Type
You can make a variety of reports based on the Identity Verification Methods report type. Let’s create a report to track users by username. The Identity Verification Methods is a standard report that lists all the methods that can be used to verify user identities. You can edit the report to track the desired statistics.
- From the App Launcher (
 ), find and open Reports.
- Select New Report.
- Under Category, select All.
- Find and select Identity Verification Methods, and click Start Report.
- Under Groups, Group Rows, click Add group, and then click Username.
- Under Columns, click the X to deselect each column name except User Verified Mobile Number and User Verified Email.
- In the upper right corner of the Report Builder window, click Save. Rename the report Identity Verifications by Username, and click Save.
Create an Identity Verification Dashboard
Northern Trail Outfitters wants an at-a-glance summary of all activity related to identity verifications. And Salesforce has the perfect graphical tool for tracking mobile first identity (MFI) progress with a few clicks. Joel followed these steps to create his own dashboard from the reports he created based on his Verification History and Identity Verification Methods report types.
- From the App Launcher (
 ), find and select Dashboards.
- Click New Dashboard.
- Name your dashboard, NTO Identity Verification, and enter a description.
- Click Create.
- Click + Widget and select Chart or Table.
- From Select Report, choose Passwordless Logins by Source IP, and then click Select.
- From Display As, click Stacked Horizontal Bar Chart. (Hover over the charts to see their names.)
- For Y-Axis, choose Method. For X-Axis, choose Record Count. For Stack By, choose Source IP.
- Click Add.
- Click Save, and then Done.
Joel got in the data-visualization groove and added a few of his own dashboard components. He created a Lightning table to list identity verifications by username. Then he created a report to show what prompted the identity verifications and named it Identity Verifications Triggered By. He used the report to create a stacked horizontal chart to show the breakdown of identity verifications by what triggered the verifications using:
-
Identity Verification Triggered By for name of the report
-
Stacked Horizontal Bar for the chart
-
Location: City for Y-Axis, Record Count for X-Axis, and Triggered By for Stack By
- Identity Verification Triggered By for Title
Joel added and rearranged his dashboard to look something like this.

Admins and execs are going to love to see passwordless logins adoption at a glance. Good job!
You’ve learned what little effort it takes to give your customers easy access to your site. You’ve learned how to brand and customize your login experience to address your market’s needs. Prepared with your newfound skills (and pretty charts), you can envision your progress at glance. All this with tools that you already own.
With mobile-first identity, customers will be happy with a sign-up process that is as easy to use as a ride-sharing app. You’ll soon build up your customer base by reaching customers wherever they are—at work, at home, on the road, on the train, or on the ferry. On the run.
Resources
- Trailhead module: Reports & Dashboards for Lightning Experience
- Salesforce Help: Methods for Verifying Your Identity
- Salesforce Help: Monitor Identity Verification History