Configure Your Flow
Learning Objectives
After completing this unit, you’ll be able to:
- Connect a signup form to a Salesforce Flow.
- Configure the Flow.
- Describe how mapped form data flows from Salesforce CRM into Data 360.
Connect the Form
So far, you have created the campaign and built the signup form. But when someone fills out the form and clicks Submit, nothing happens in Salesforce. That’s because the form isn’t connected to a Flow yet, and the Flow is what does the work.
Marketing Cloud Next generated a Flow automatically when you created the Signup Form, but it’s not configured. Join Maria in this unit as she accesses Flow Builder to finalize the lead generation pipeline. You learn how to map form data to specific Salesforce Lead fields, set up duplicate detection, and manage consent to ensure that each submission generates a single, accurate record every time.
How a Form Connects to a Flow
Every signup form in Marketing Cloud Next is associated with a single Salesforce Flow. When a visitor submits the form, the Flow fires automatically and processes the submission. The Flow is generated for Maria when she creates the campaign, she doesn’t build it from scratch. She opens it from the campaign canvas and configures it.
Here’s what Maria finds inside the Flow when she opens it.
-
Create Records maps form fields to a Salesforce object and creates a new record.
-
Check for Matching Records prevents duplicate Lead records.
-
Create Consent captures the visitor’s marketing consent in Salesforce.
Maria configures each of these elements in order.

Map Data with Data Sources
Before we start mapping fields, let’s quickly go over how your form data actually gets into Salesforce. When someone selects “Submit” on your form, Marketing Cloud Next doesn’t send it straight to a Lead record. Instead, it temporarily holds the submission in a Data Source. Think of the Data Source as a bridge. When you configure the Create Records element in the Flow, you’re just telling it exactly where to grab the data from that Data Source and where to put it on the Salesforce record.
Here’s a simple way to look at the flow.
-
Form field: What your visitor types such as First Name
-
Data Source: The temporary container where the value sits
-
Salesforce field: The final destination on the Lead record such as Lead.FirstName
The Data Source is the translator. You don’t need to build it from scratch. It was generated automatically, but you need to configure the Flow to use it correctly.
Open Flow Builder
Marketing Cloud Next created the flow when Maria built the Signup Form, and it’s already connected to that form. Now, complete these steps to configure it.
- From the previous unit, you’re still on the Ursa Major Solar Event Signup campaign canvas.
- In the Next Steps section, select Open Flow.
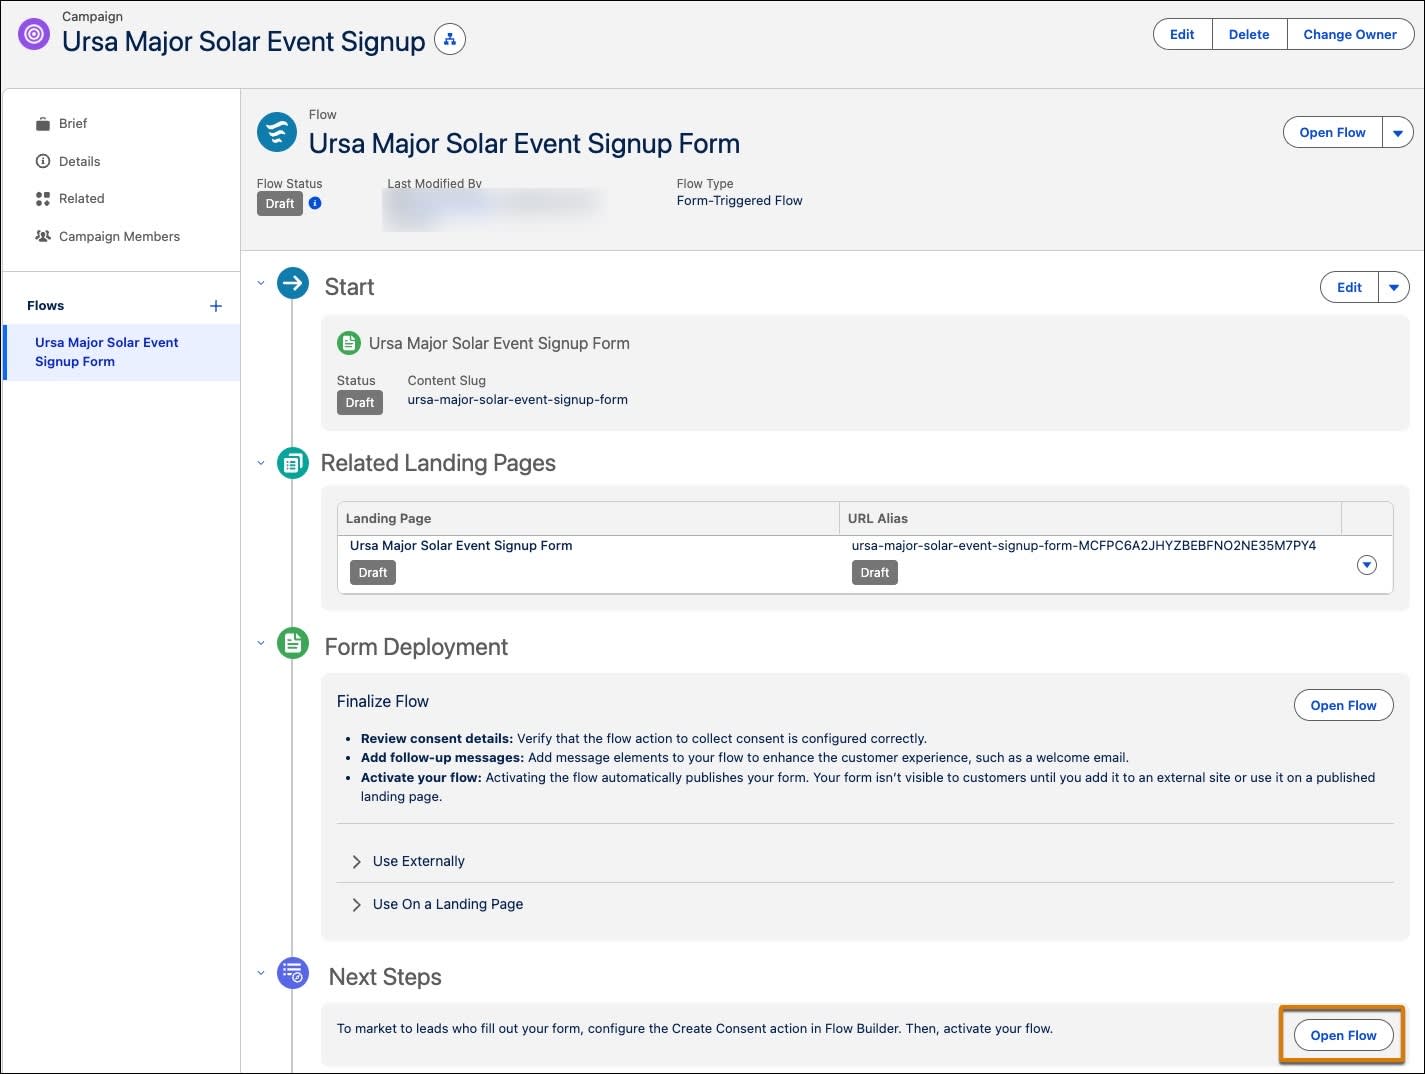
Flow Builder opens with several connected elements.
Configure Create Records Element
The Create Records element maps form fields to Salesforce object fields and creates a new record on every valid submission.
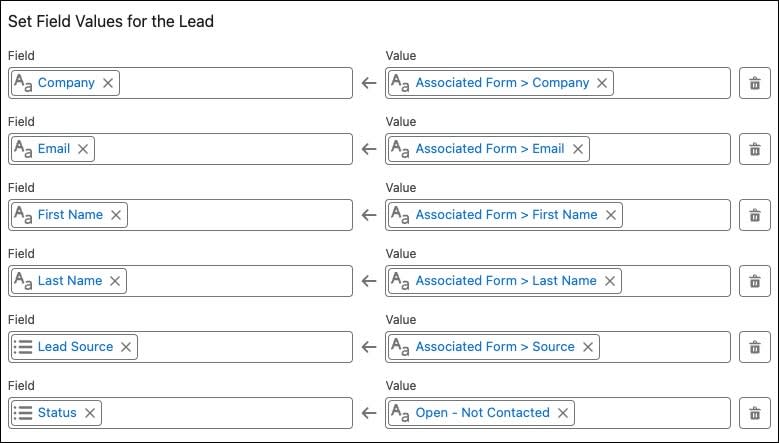
Add Field Mapping
The form includes a hidden field called LeadSource that captures the utm_source parameter. That field needs to map to the Lead object so the traffic source is recorded.
- In Flow Builder, select the Create Record Create Records element.
- In the section Set Field Values for the Lead, select + Add Field.
- Add the details.
- Field: Lead Source
- Value: AssociatedForm>Source
- Field: Lead Source
- Select + Add Field.
- Add the details.
- Field: Status
- Value: Open - Not Contacted
- Field: Status
- Select Save.
When the Create Records element creates a Lead record in Salesforce CRM, the Data Kit automatically syncs that record to Data 360. There, Identity Resolution matches it to a Unified Individual profile, so the marketing team can act on that data across channels. No extra configuration needed on your end.
Enable Check for Matching Records
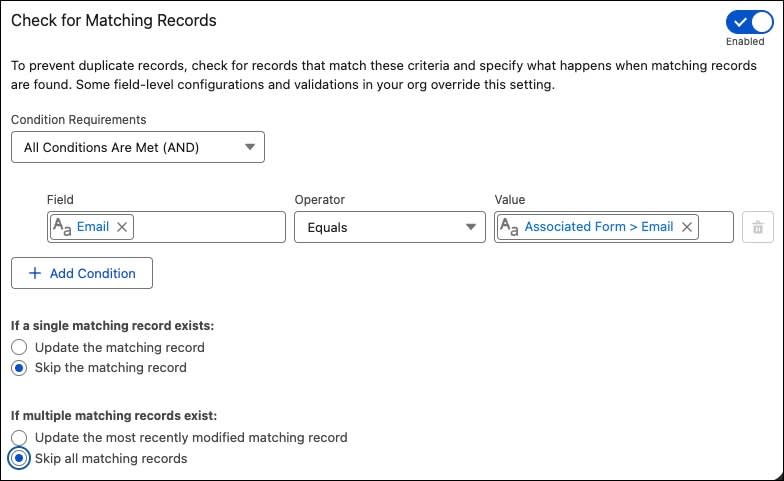
What happens if the same person submits the form twice? Without duplication, Salesforce creates two Lead records with the same email address, which can clutter the database and confuse the sales team. The Check for Matching Records option prevents that.
- In Flow Builder, select the Create Record Create Records element.
- Enable Check for Matching Records.
- For matching criteria, add details:
- Field: Email
- Value: AssociatedForm>Email
- Field: Email
- For If a single matching record exists, select Skip the matching record.
- For If multiple matching records exist, select Skip all matching records.
- Select Save.
Now if someone submits the form twice with the same email address, Salesforce recognizes the duplicate and skips creating a second Lead record.
Configure the Create Consent Element
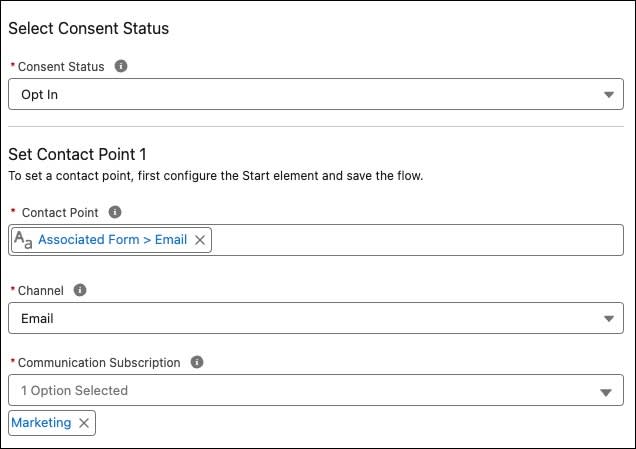
The form includes a required checkbox for marketing consent. This needs to be captured. The Create Consent element handles this automatically.
- In Flow Builder, select the Create Consent Consent Request element.
- Verify and update the fields.
- Consent Status: Opt In
- Contact Point: Associated Form > Email
- Channel: Email
- Communication Subscription: Marketing
- Consent Status: Opt In
- Select Save.
When a visitor submits the form, Salesforce creates a Contact Point Consent record tied to their Lead, a permanent record that the visitor opted in to receive marketing emails from Ursa Major Solar.
Save and Activate the Flow
With all the elements configured, Maria saves and activates the Flow.
- In Flow Builder, select Activate.
- On the Activate this flow? confirmation screen, select Activate. (It may take a moment to activate.)
The Flow is now live. The moment a visitor submits the form, the Flow fires, creating a Lead record, checking for duplicates, and capturing consent, all automatically.
Next Up
In this unit, you have connected the form to the Flow. Every submission from the advertisement campaign will now create a properly connected Lead record in Salesforce—clean, enriched, and compliant. In the next unit, preview the landing page and test it.
To pass the challenge and move on to the next unit, select Check Challenge to Earn 500 Points.