Configurar la conexión de mensajería
Objetivos de aprendizaje
Después de completar esta unidad, podrá:
- Explicar cómo se enrutan las conversaciones mediante la conexión de mensajería y los flujos de Omni-Channel.
- Configurar un canal de servicio, una configuración de enrutamiento y una cola.
- Crear flujos de Omni-Channel entrantes y salientes para el servicio de mensajería.
- Describir cómo el subagente de distribución transfiere la conversación a un representante de servicio al cliente.
Empiece donde los clientes chatean
El plan de implementación de Warren en Northern Trail Outfitters (NTO) comienza con la mensajería, que es el canal al que sus clientes recurren en primer lugar. Pero antes de que Warren pueda añadir una ventana de chat al sitio web, tiene que resolver una pregunta fundamental: cuando un cliente envía un mensaje, ¿cómo llega hasta el agente? Y cuando el agente de IA no puede ayudar, ¿cómo llega entonces la conversación a un representante de servicio al cliente? Ese es el trabajo de la conexión de mensajería y su enrutamiento.
Para el agente de servicio que NTO está implementando, Warren va a crear un canal de chat web mejorado que se puede integrar en su sitio web.
Cómo funciona el enrutamiento
Agentforce puede usar Omni-Channel para enrutar conversaciones con el agente. La conexión de mensajería se basa en dos flujos de Omni-Channel.
-
Flujo de entrada: cuando se inicia una nueva conversación, este flujo la envía al agente de IA.
-
Flujo de salida: cuando el agente necesita escalar un caso, este flujo enruta la conversación desde el agente de IA hasta una cola de representantes de servicio.
Configurar los requisitos previos
Warren configura tres requisitos previos para que puedan funcionar los flujos de Omni-Channel.
- Canal de servicio
- Configuración de enrutamiento
- Cola
Crear un canal de servicio
El canal de servicio vincula la configuración de enrutamiento y los flujos de Omni-Channel mediante el objeto Messaging Session (Sesión de mensajería).
- En Setup (Configuración), introduzca
Service Channels(Canales de servicio) en el cuadro Quick Find (Búsqueda rápida) y, a continuación, seleccione Service Channels (Canales de servicio).
- Si ya tiene un canal de servicio de mensajería, vaya al siguiente paso. Si no es así, haga clic en New (Nuevo).
- Como nombre del canal de servicio, Warren introduce
NTO Help Center(Centro de ayuda de NTO).
- En el objeto de Salesforce, seleccione Messaging Session (Sesión de Mensajería).
- Como nombre del canal de servicio, Warren introduce
- Guarde el canal de servicio.

Crear una configuración de enrutamiento
La configuración de enrutamiento define cómo se asignan las sesiones de mensajería de la cola a los representantes de servicio.
- En Setup (Configuración), en el cuadro Quick Find (Búsqueda rápida), escriba
Routing(Enrutamiento) y, a continuación, seleccione Routing Configurations (Configuraciones de enrutamiento).
- Haga clic en Nuevo.
- En el nombre de la configuración de enrutamiento, introduzca
Messaging Routing(Enrutamiento de mensajes).
- En la prioridad de enrutamiento, introduzca
1.
- En el modelo de enrutamiento, seleccione Least Active (Menos activo).
- En el tipo de capacidad, seleccione Inherited (Heredada).
- En el porcentaje de capacidad, introduzca
25.
- En el nombre de la configuración de enrutamiento, introduzca
- Guarde la configuración de enrutamiento.

Crear una cola
Cuando el flujo de Omni-Channel entrante no puede enviar una conversación al agente, o cuando el agente escala una conversación, la conversación se envía a esta cola. La cola asigna la sesión de mensajería al representante de servicio según los ajustes de la configuración de enrutamiento.
- Desde Setup (Configuración), en el cuadro Quick Find (Búsqueda rápida), escriba
Queues(Colas) y, a continuación, seleccione Queues (Colas).
- Haga clic en Nuevo.
- En el campo de etiqueta, introduzca
Messaging(Mensajería).
- En el campo de configuración de enrutamiento, introduzca
Messaging_Routing.
- En los objetos compatibles, seleccione Messaging Session (Sesión de Mensajería).
- En los miembros de la cola, selecciónese usted mismo como representante de servicio.
- Guarde la cola.
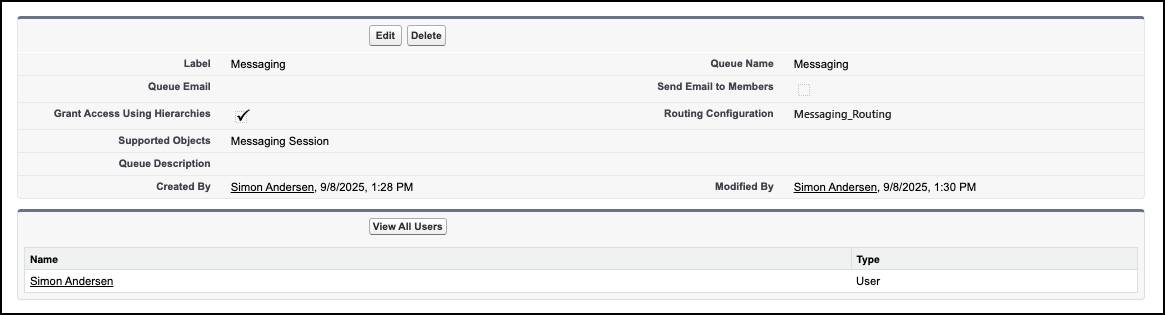
Ahora que ya lo tiene todo listo, Warren puede crear los flujos de entrada y salida en Flow Builder.
Cómo funciona el flujo de salida
Los agentes de Agentforce Service usan el subagente Escalation (Distribución) y un flujo de salida de Omni-Channel para escalar conversaciones a destinos como representantes de servicio y colas.
Al igual que cualquier subagente, el subagente de distribución tiene instrucciones que indican al agente cuándo actuar. Por ejemplo, el agente puede escalar la conversación cuando:
- Un cliente solicita explícitamente hablar con una persona.
- El tono de la conversación se vuelve negativo.
- La solicitud está fuera del ámbito de lo que el agente puede gestionar.
Cuando se cumplen esas condiciones, el agente de IA activa el flujo de salida.
El flujo comprueba si hay representantes de servicio disponibles en la cola de mensajería. Si hay alguien disponible, actualiza la sesión de mensajería y aplica la acción Route Work (Enrutar trabajo) para reenviar la sesión y el historial de conversación a esa cola. A continuación, un representante de servicio puede retomar la conversación exactamente donde la dejó el agente. El resultado es una transferencia sin interrupciones: el agente gestiona lo que está a su alcance y el cliente no tiene que repetirse cuando interviene un representante de servicio.
Si no hay representantes disponibles y no se puede distribuir el caso, el agente reanuda la conversación mediante el subagente de distribución, conservando así el contexto previo a la distribución. La distribución solo se intenta una vez por sesión.
Crear el flujo de Omni-Channel saliente
Warren crea un flujo de Omni-Channel saliente para enrutar las conversaciones distribuidas desde el agente de IA a una cola de mensajería destinada a los representantes de servicio de Northern Trail Outfitters. Si no sabe cómo crear un flujo saliente, consulte Transfer Conversations from an Agent with an Omni-Channel Flow (Transferir conversaciones desde un agente con un flujo de Omni-Channel) en la ayuda de Salesforce.
Para una presentación paso a paso de un flujo de distribución saliente, consulte el capítulo Deploy Your Agent to Channels (Implementar el agente en canales) de la Agentforce Implementation Guide (Guía de implementación de Agentforce).

Añadir la conexión de mensajería
Ahora que Warren ha creado el flujo de salida, puede comenzar a configurar la conexión de mensajería para el agente de servicio en Agentforce Builder. La conexión de mensajería incluye instrucciones en segundo plano y formatos de respuesta adaptativa que ayudan al agente a razonar y responder en los canales de Enhanced Web Chat (Chat web mejorado).
- En App Launcher (Iniciador de aplicación), introduzca
Agent(Agente) y, a continuación, seleccione la aplicación Agentforce Studio.
- En la ficha Agents (Agentes), haga clic en el nombre de su agente.
- En el panel Explorer (Explorador), haga clic en + junto a Connections (Conexiones). A continuación, seleccione Add Connection (Añadir conexión).
- En la ventana Add Connections (Añadir conexiones), seleccione la conexión Messaging (Mensajería). A continuación, haga clic en Add to Agent (Añadir al agente).
Conectar el flujo de Omni-Channel saliente
Para conectar el flujo saliente al agente, Warren lo añade como flujo de distribución en la configuración de la conexión de mensajería del agente.
- En Agentforce Builder, en el panel Explorer (Explorador), seleccione la página Settings (Configuración) de la conexión Messaging (Mensajería).
- En el lienzo, en la sección Escalation (Distribución), seleccione el flujo Route Messaging Session to Queue (Enrutar sesión de mensajería a la cola) que ha creado. Si el flujo no aparece en la lista, actívelo e inténtelo de nuevo.
- Edite el mensaje de distribución que el agente envía antes de transferir una conversación para que los clientes sepan qué esperar. Introduzca
One moment while I check if there are any Northern Trail Outfitter reps available(Un momento mientras compruebo si hay algún representante de Northern Trail Outfitters disponible).
- Haga clic en Save (Guardar).
- Haga clic en Commit Version (Confirmar versión).
- Haga clic en Activate (Activar). Si no activa el agente, no aparecerá como opción de enrutamiento en Flow Builder al crear el flujo entrante.
Cómo funciona el flujo entrante
Ahora que ya sabe cómo funciona el flujo saliente, prestemos atención al flujo entrante. El flujo entrante usa la acción Route Work (Enrutar trabajo) para dirigir una conversación y sus registros asociados, como registros de sesiones de mensajería y de correo electrónico, a un agente.
Warren tiene pensado crear un flujo de Omni-Channel entrante que enrute las sesiones de mensajería del sitio web de la empresa al agente de servicio de NTO. Cuando un cliente interactúa con un agente en un canal, se crea un registro de sesión de mensajería asociado a la conversación. A continuación, el flujo de Omni-Channel entrante enruta el registro desde el canal hasta un agente.
El flujo recibe el registro de sesión de mensajería y los detalles recopilados a partir de un formulario previo al chat. A continuación, comprueba si el usuario de mensajería es un contacto existente. Por último, utiliza la acción Route Work (Enrutar trabajo) para enrutar la sesión hasta el agente. Si no es posible enrutarla hasta el agente, el flujo envía la sesión de mensajería a la cola de mensajería.
Crear un flujo de Omni-Channel entrante
A continuación, Warren se prepara y comienza a trabajar en el flujo entrante para el agente de NTO. Conecta el agente a Messaging (Mensajería) mediante Enhanced Chat v1. No obstante, si no usa Enhanced Chat v1, puede conectar su agente a un tipo de canal de mensajería diferente.
Para una presentación paso a paso de un flujo entrante, consulte el capítulo Deploy Your Agent to Channels (Implementar su agente en canales) de la Agentforce Implementation Guide (Guía de implementación de Agentforce).

Personalizar las instrucciones de conexión y los formatos de respuesta
Una vez configurados los flujos de enrutamiento, puede definir con más detalle cómo se comunica su agente en el canal de mensajería. Las instrucciones de conexión le permiten orientar cómo razona y responde su agente en este canal específico; por ejemplo, puede indicarle que use un formato de respuesta determinado o que siga directrices concretas para las interacciones de mensajería. Los formatos de respuesta adaptativa le permiten personalizar la manera en que el agente estructura sus respuestas para el canal.
Para obtener más información, consulte Manage Connection Instructions and Response Formats (Gestionar instrucciones de conexión y formatos de respuesta) en la Ayuda de Salesforce.
Preparar al equipo de servicio para las conversaciones distribuidas
NTO quiere dotar a sus representantes de servicio al cliente de las herramientas que necesitan para gestionar las conversaciones de mensajería que se distribuyen. Al añadir a los representantes como recursos de servicio, pueden recibir sesiones de mensajería y tener estados de presencia que indican su disponibilidad.
Ayude a los representantes a supervisar conversaciones y unirse a ellas añadiendo la barra lateral de Omni-Channel y una página de registro de sesiones de mensajería personalizada a la aplicación Service Console (Consola de servicio).
- Para que los representantes de servicio puedan recibir sesiones de mensajería, añada a cada representante como recurso de servicio.
- Para indicar si un representante de servicio está disponible o no para recibir sesiones de mensajería, cree al menos dos estados de presencia que los representantes puedan configurar en Service Console (Consola de servicio).
- Para que los representantes de servicio puedan aceptar y gestionar sesiones de mensajería en la aplicación Service Console (Consola de servicio) con la barra lateral de Omni-Channel, añada la barra lateral con sesiones de mensajería a la interfaz de Service Console (Consola de servicio) y conceda acceso a ella a los representantes.
Lo siguiente: pruebas en el sitio web
Ahora que Warren ha configurado la conexión de mensajería y todo el enrutamiento, puede integrar el agente en el sitio web de NTO. En la siguiente unidad, Warren crea un sitio de Experience Cloud para probar el agente.