Configure Product Search
Learning Objectives
After completing this unit, you’ll be able to:
- Describe indexing product data in Product Catalog Management.
- Index product data.
- Configure product search settings.
Before You Start
Before you start this module, make sure you complete this content. The work you do here builds on the concepts and work you do in that content.
-
Agentforce Revenue Management Foundations
-
Agentforce Revenue Management Design
-
Product Catalog Management: Quick Look
-
Product Catalog Management with Agentforce Revenue Management
Also, consider completing the following recommended content.

A Quick Recap
In the Product Catalog Management with Agentforce Revenue Management badge, you learned about creating the building blocks of a product catalog: attributes, attribute categories, product classifications, categories, and subcategories. You then used those foundations to create simple products and product bundles.
In this badge, explore how you can use the capabilities of Product Catalog Management to further enhance your product catalog.
Build Product Index
From time to time, organizations launch new products to cater to market needs and trends. This causes the product catalog to grow over time, and without a user-friendly search functionality, locating these products in a huge catalog becomes time-consuming.
Product search and discoverability depend on indexed product data. With Product Catalog Management, use either of these three options to enable product searchability for customers and sales reps.
- A basic search based on text-indexed fields on the Product2 entity.
- Enhanced product browsing and search based on indexed product catalog data.
- Semantic search that helps improve search performance by interpreting search intent.
To learn more about each of these search options, see Search Options in Product Catalog Management in Salesforce Help.
First, take a look at indexing product information.
Product Catalog Management supports two index rebuild options.
-
Full index rebuild: This option rebuilds all indexed data and is recommended after you make significant structural changes to product data.
-
Partial index rebuild: This option rebuilds index only for the changed data and is recommended for updating recent changes to product data.
For brand new orgs, there’s no index snapshot available and you create a full index afresh. Subsequently, when you make changes to the product catalog, you rebuild the index to reflect the changes. For a full list of changes that require a partial or a full index rebuild, see Manage Your Product Index in Salesforce Help.
A Business Scenario
Manoj Wilson is a product designer at InfinitraBytes, a leading provider of electronic products and solutions.

Manoj and his team are on a mission to modernize the product-browsing experience. They’re moving away from outdated spreadsheets, where all product information is currently held, to the modern Product Catalog Management solution.
In the Product Catalog Management with Agentforce Revenue Management badge, you followed Manoj as he designed the InfinitraBytes product catalog by creating products, product attributes, and the required categories and subcategories. In this module, you work with him to further enhance the product catalog. But first, set up your own Salesforce org.
Sign Up for a Developer Edition Org with Agentforce Revenue Management
To complete this module, you need a special Developer Edition org that contains Revenue Management and our sample data. Get the free Developer Edition and connect it to Trailhead now so you can complete the challenges in this module. Note that this Developer Edition is designed to work with the challenges in this badge, and may not work for other badges. Always check that you’re using the Trailhead Playground or the special Developer Edition org that we recommend.
- Sign up for a free Agentforce Revenue Management Developer Edition org.
- Fill out the form.
- For Email, enter an active email address.
- For Username, enter a username that looks like an email address and is unique, but it doesn’t need to be a valid email account (for example, yourname@example.com).
- After you fill out the form, click Sign me up. A confirmation message appears.
- When you receive the activation email (this might take a few minutes), open it and click Verify Account.
- Complete your registration by setting your password and answering the challenge question. Tip: Save your username, password, and login URL in a secure place—such as a password manager—for easy access later.
- You’re logged in to your Developer Edition org.
Now connect your new Developer Edition org to Trailhead.
- Make sure you’re logged in to your Trailhead account.
- In the Challenge section at the bottom of this page, click the playground name and then click Connect Org.
- On the login screen, enter the username and password for the Developer Edition you just set up.
- On the Allow Access? screen, click Allow.
- On the Want to connect this org for hands-on challenges? screen, click Yes! Save it. You’re redirected back to the challenge page and ready to use your new Developer Edition to earn this badge.
Enable Pricing
Now that you have your org, make sure it’s ready to use.
- From Setup, in the Quick Find box, find and select Salesforce Pricing Setup.
- In the Sync Pricing Data section, click Sync.

- Confirm that you want to sync your org.
Sometimes, the sync takes a few minutes to complete, but you don’t have to wait. Move on to the next set of steps.
Refresh the Decision Tables
Next, refresh the required decision tables in your org.
- From Setup, in the Quick Find box, find and select Decision Tables.
- From the list of decision tables, select Product Disqualification.
- Click Refresh.

- Similarly, refresh the Product Qualification decision table.
You’re all set to start using your Developer Edition org.
Rebuild the Index
Manoj’s first task is to rebuild the index so that he can set up product search. Follow along in your Developer Edition org to perform a full index rebuild.
- From the App Launcher, find and select Product Catalog Management.

- On the Product Catalog Management home page, click the Index and Search Configuration tile.
Note that an error message sometimes appears because the system is trying to fetch the latest index snapshot details. An index build doesn’t exist yet though, because your Developer Edition is a brand new org. The next time you rebuild the index, the error message shouldn’t appear anymore.
In a real-world implementation, your system has a snapshot available to gather details for the first index rebuild. But for the purposes of this challenge, just close the error banner and go to the next step.
- Click Rebuild Index, select Full Index Rebuild, and click Rebuild. This generates the full index.

- In the Rebuild History section, a new entry is created for this rebuild and the Status shows In Progress.

- Click
 to refresh the rebuild status. When the Rebuild History section shows a status of Completed, move on to the next step.

Now that the index is ready, time to refine the product search.
Define Index Fields and Attributes
Typically, you search for products in a catalog by entering a keyword in the search field. The system matches this keyword against product attributes, and if it finds a match, displays the product in the search results. For example, if you search with the keyword laptop, the system lists all of the products that have the word laptop in their name or description. You can then further filter products from this list to see laptops that have a specific storage capacity or memory.
In Product Catalog Management, you define fields and attributes as searchable and filterable so that search key words can be matched against them to retrieve matching results.
Take a look at the Edit Fields & Attributes page where you define the searchable and filterable fields and attributes.

All of the available fields are shown here. Fields that are searchable are available for selection (1) and the others are unavailable (2). To make a field searchable, select it (3). Similarly, fields that can be filterable are available for selection (4) and the others are unavailable (5). To make a field filterable, select it (6). You can also select picklists or boolean fields as filterable.
Next, Manoj configures searchable and filterable fields and attributes. Follow along in your Developer Edition org.
- With the Build and Search Index page open, click the Manage Fields & Attributes tab.
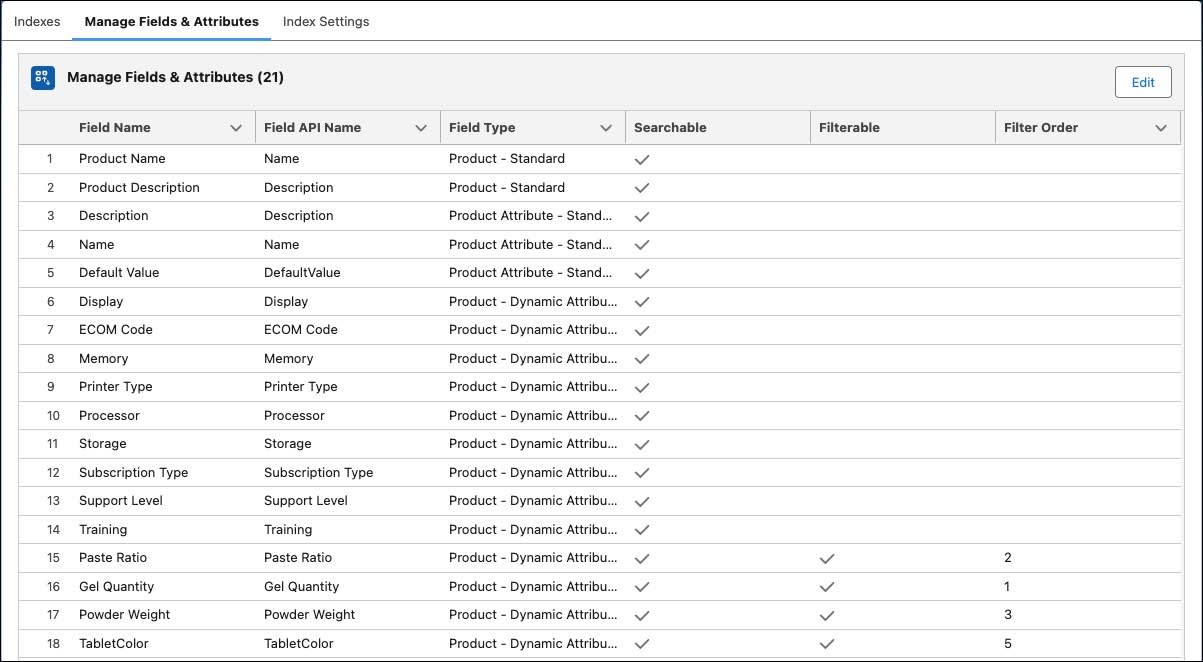
The Searchable column shows all the fields that are marked as searchable. The fields marked as Filterable are search facets, meaning you can use these fields to further filter the search results.
- Click Edit.
- In the Searchable column, select Product Type.
- In the Filterable column, select Product Type.

- Click Next.
- Move Product Type into the Selected column. Leave the order as is and save your changes.
- Go to the Product Catalog Management home page.
- Click the Index and Search Configuration tile, and rebuild a full index. Wait for the rebuild to complete before moving to the next step.
Nice! You have defined the searchable fields and the filterable fields. Now, explore how this is benefitting business users such as sales reps and customers while searching for product information.
Build a Quote and Search Product Information
Your customer and sales reps can now search for products using keywords and filter the results. Follow along in your Developer Edition org to see how.
- From the App Launcher, find and select Revenue Lifecycle Management.
- Click
 and select Quotes.
- Click New Quote.
- In the New Quote window, add these details.
- Quote Name:
New Purchase - Account for Quote: Edge Communications
- Save your changes.
- In the New Purchase quote record, click Browse Catalogs.
- In the Choose Price Book window, make sure the Standard Price Book is selected, and save your work.
- Select Hardware Catalog and click Next.
- In the Search for products field, enter
laptopand press Enter.
All of the products that have the text laptop in any of the searchable fields are shown. Also observe the Product Type filter in the navigation pane.

- In the navigation pane, expand the Product Type facet. Observe all of the values for Product Type.
- Select Bundle.
The search results are further refined to show the product that matches both criteria: laptop in the searchable fields and the value Bundle for Product Type. The search facets also appear when you click on a category that contains a product with the text laptop in any of the searchable fields.
By indexing product data and setting up attributes as searchable and filterable, you have improved the discoverability of your product catalog.
Next Up
In this unit, you focused on improving product search and discoverability in the product catalog. In the next unit, you learn how to create copies of products using deep clone.
For now, make sure to click Check Challenge to Earn 500 Points.