Fetch Opportunity Data
Learning Objectives
After completing this unit, you’ll be able to:
- Create a context definition.
- Add attributes and tags for a context definition.
- Configure context mapping for a context definition.
Sign Up for a Developer Edition Org with Business Rules Engine and Context Service
To complete this module, you need a special Developer Edition org that contains Business Rules Engine, Context Service, and our sample data. Get the free Developer Edition org and connect it to Trailhead now so you can complete the challenges in this module. Note that this Developer Edition org is designed to work with the challenges in this badge, and might not work for other badges. Always check that you’re using the Trailhead Playground or special Developer Edition org that we recommend.
- Sign up for a free Developer Edition org with Business Rules Engine and Context Service.
- Fill out the form:
- For Email, enter an active email address.
- For Username, enter a username that looks like an email address and is unique, but it doesn't need to be a valid email account (for example, yourname@example.com).
- For Email, enter an active email address.
- After you fill out the form, select Sign me up. A confirmation message appears.
- When you receive the activation email (this can take a few minutes), open it and select Verify Account.
- Complete your registration by setting your password and challenge question.
Tip: Save your username, password, and login URL in a secure place—such as a password manager—for easy access later.
- You're logged in to your Developer Edition.
Now, connect your new Developer Edition org to Trailhead.
- Make sure you’re logged in to your Trailhead account.
- In the Challenge section at the bottom of this page, select the org name and then select Connect Org.
- On the login screen, enter the username and password for the Developer Edition org you just set up.
- On the Allow Access? screen, select Allow.
- On the Want to connect this org for hands-on challenges? screen, select Yes! Save it. You’re redirected back to the challenge page and ready to use your new Developer Edition to earn this badge.

Create a Context Definition
In the previous unit, you learned about the requirements for the example scenario. Now, it’s time to build your solution. Start by building a context structure using a context definition that includes Nodes, Attributes, and Tags that you use to fetch opportunity data.
First, create your context definition.
- From Setup, in the Quick Find box, enter
Context Definitions, and then select Context Definitions.
- Select New.
- In the Create Context Definition window, for Name, enter
SalesTransaction.
- Select Next.
- In the Add Nodes section, enter
Opportunityas the node name.
- Select Next.
Now, you can configure the context definition.
Add Attributes and Tags
Next, add attributes to the Opportunity node.
- In the Create Context Definition window, select Add Attributes.
- Provide these attribute details.
- Name:
AccountId - Type: INPUT
- Data Type: STRING
- Name:
- Similarly, add these attributes and select Next.
Name |
Type |
Data Type |
|---|---|---|
OpportunityAmount |
INPUT OUTPUT |
CURRENCY |
AccountRating |
INPUT OUTPUT |
PICKLIST |
CalculatedDiscount |
INPUT OUTPUT |
PERCENT |
RiskStatus |
INPUT OUTPUT |
STRING |
Next, add tags to the node and each attribute.
- In the Create Context Definition window, for the Opportunity node, select + Add Tags.
- For the tag name, enter
Opportunity.
- Select Done.
- Similarly, add tag names for each of these attributes, and save your work
Attribute Name |
Tags |
|---|---|
RiskStatus |
Opportunity_RiskStatus |
CalculatedDiscount |
Opportunity_CalculatedDiscount |
AccountRating |
AccountRating |
OpportunityAmount |
OpportunityAmount |
AccountId |
Opportunity_AccountId |
Your context definition with the context structure is ready.
Add Context Mapping
Next, map the nodes and attributes with the Opportunity object and its fields respectively.
- In the Context Definitions setup page, select the Custom Definitions tab.
- Select SalesTransaction.
- Select the Map Data tab.
- Select Add Mapping and specify these details in the Add Context Mapping window.
- Name:
ContextMap
- Select Mark as Default.
- Name:
- Select Next and then Map. The context mapping page opens in a new tab.
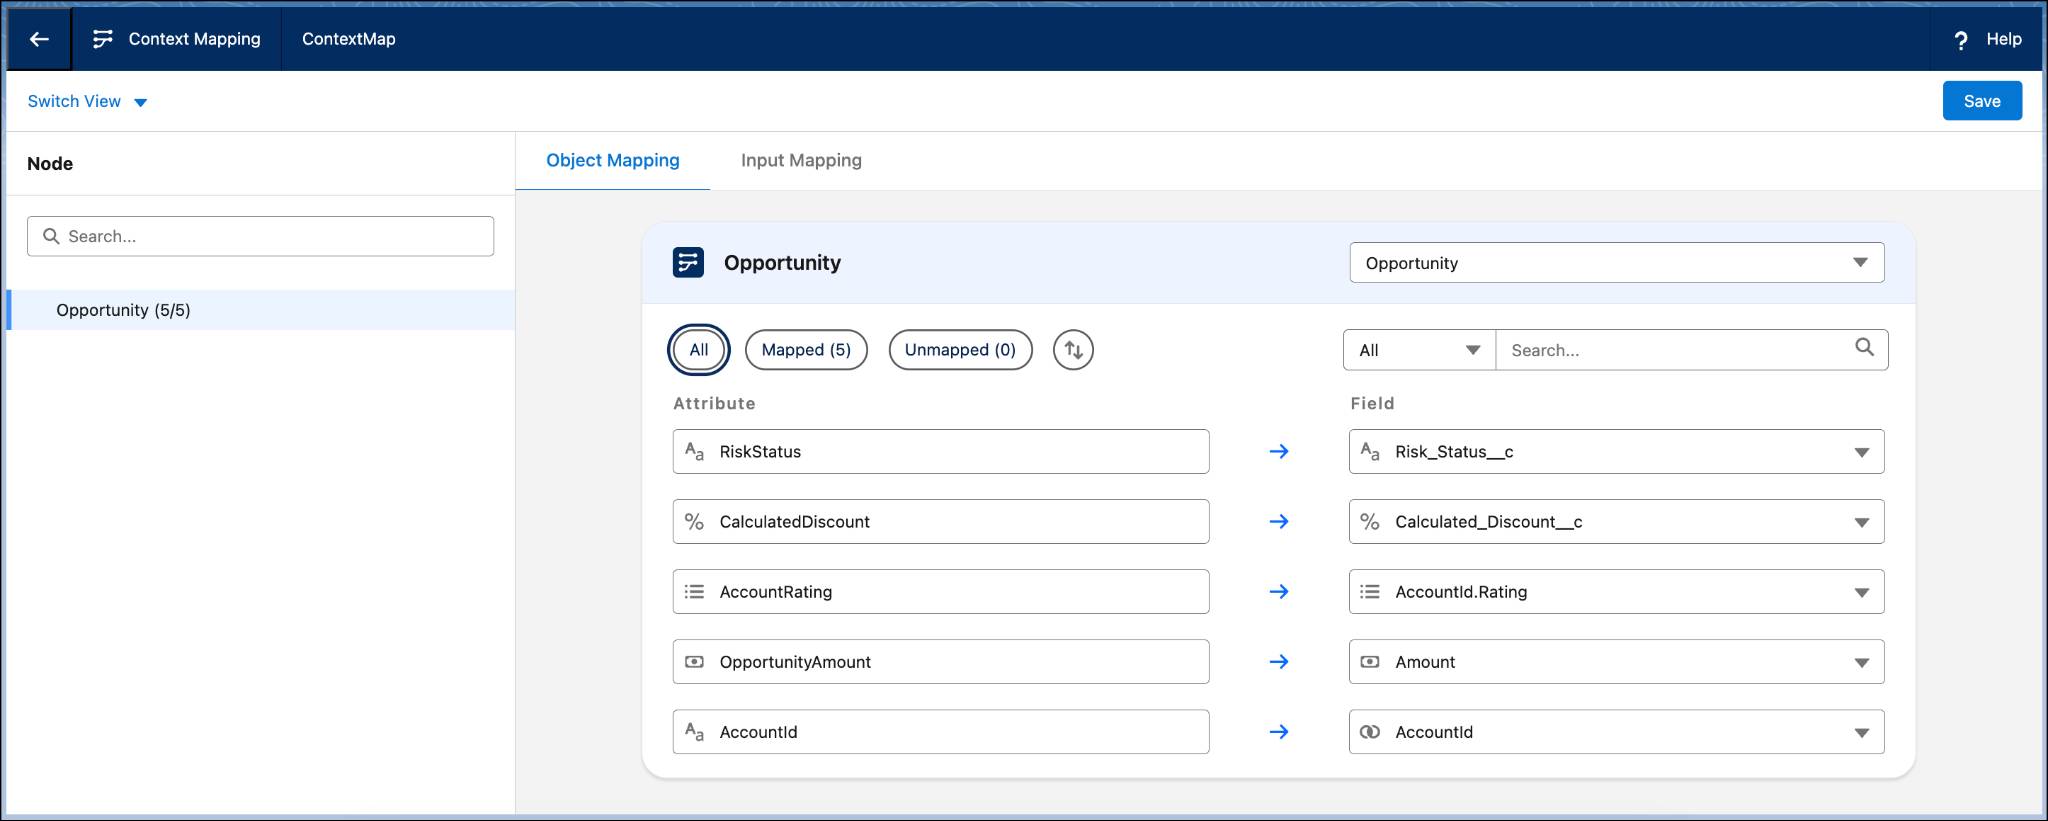
The attributes are listed for each node. Next, connect the objects for each node and the fields with each attribute.
- In the Context Mapping page, under the Object Mapping tab, select Select Object.
- In the Salesforce Objects window, find and select Opportunity.
- Save your work.
- For the RiskStatus attribute, select Select Fields in the Field section, then find and select Risk_Status__c.
- Save your work.
- Similarly map these attributes and fields, and save your changes.
Attributes |
Fields |
|---|---|
CalculatedDiscount |
Calculated_Discount__c |
OpportunityAmount |
Amount |
AccountId |
AccountId |
Mapping the AccountRating attribute is slightly different. You map the AccountRating attribute to the Rating field, which is available in the Account object. But you perform this mapping through the Opportunity object. You use the AccountId lookup field to find the Rating field and complete the mapping. Here’s how you do it.
- In the Context Mapping page, for the AccountRating attribute, select Select Fields in the Field section.
- Select
 beside the AccountId field and then find and select Rating.
- Save your changes.
- In the Context Mapping page, select Save to save your mapping.
- In the Context Mapping page, select
 to go back to the SalesTransaction context definition.
- Select Activate.
Your context mapping is complete and your context definition is now available for use in Business Rules Engine.
What’s Next?
In this unit, you created a context definition to build a context structure that includes nodes, attributes, and tags. You also created a context mapping to map the nodes with objects and attributes with fields. This gives you the data to calculate opportunity discounts and ensure compliance.
In the next unit, you create a decision table to calculate the base discount. You also create an expression set to configure a rule to calculate opportunity discount and risk status.