Build the App Data Layer and Iterate with Live Preview
Learning Objectives
After completing this unit, you’ll be able to:
- Describe how a React app connects to Salesforce data using Salesforce Data SDK.
- Distinguish GraphQL queries from mutations and how they flow through the User Interface API.
- Explain how Live Preview previews real-time changes as you build.
In the previous unit, you used Agentforce Vibes to deploy the custom objects and fields for your property management app, and then it assigned you the object permission set required to edit these fields. Following your approved plan, Agentforce Vibes paused so you can transition to building the data layer. Before prompting Agentforce Vibes to continue, take a moment to see how Salesforce Data SDK works behind the scenes.
Work with Salesforce Data SDK
For the data layer, two pieces work together. Salesforce GraphQL API serves as the data engine, and Data SDK is the client library that runs your GraphQL queries and mutations from React. Data SDK is provided by the @salesforce/platform-sdk/data package, which is included in the React app project templates. It connects your components to Salesforce data by sending GraphQL operations through the User Interface API. Because everything goes through the User Interface API, the Salesforce Platform enforces object- and field-level security, sharing rules, and validation rules automatically.
Agentforce Vibes generates GraphQL when you ask to add data access for an object, or to fetch, query, or update Salesforce data. Here’s the full Agentforce Vibes workflow for GraphQL.
-
Deploy the data model. Before any GraphQL work, Agentforce Vibes must deploy your objects and fields to the org. User Interface API only exposes metadata that actually exists in the org, so the data model has to be deployed before the schema can reflect it.
-
Assign object and field access. Agentforce Vibes creates a permission set for Property__c, deploys it, and assigns it to the current user. Without object-level and field-level access, the GraphQL schema won’t include Property__c for that user, and later queries fail. Your project is currently at this stage.
-
Refresh the GraphQL schema. Agentforce Vibes refreshes the project’s local
schema.graphqlfile so it matches what the org now exposes. This file is the source of truth for which fields, filters, and sort options are available through the API.
-
Explore the schema. Agentforce Vibes searches the refreshed
schema.graphqlfile to find the object’s available fields, filter options, and sort options before writing a query.
-
Write the query. Agentforce Vibes generates a GraphQL operation, which references only fields that the schema confirms are exposed.
-
Test and correct. Agentforce Vibes can test the operation against your connected org. If the test surfaces a problem, such as a restricted field, it diagnoses the cause and revises the operation before moving on. You might notice that this automatic test-and-correct loop adjusts a query right after Agentforce Vibes writes it.
-
Generate types. Agentforce Vibes generates TypeScript types from your
.graphqlfiles intosrc/api/graphql-operations-types.ts, so your components and Salesforce data stay type-safe.
Use GraphQL Queries and Mutations
Data SDK uses two kinds of GraphQL operations.
- A query reads data—for example, it can fetch all available property listings.
- A mutation writes data. The supported mutation operations include Create, Update, and Delete.
Agentforce Vibes generates GraphQL queries and mutations for you, but it helps to recognize the shape so that you can read and verify what’s produced.
To call Data SDK, Agentforce Vibes creates an instance with createDataSDK(), and then reads data with dataSdk.graphql?.query(...) or writes data with dataSdk.graphql?.mutate(...).
Here’s a generated data access function that fetches property listings.
import { createDataSDK, gql } from "@salesforce/platform-sdk/data";
import type {
  GetPropertiesQuery,
  GetPropertiesQueryVariables,
} from "../graphql-operations-types";
const GET_PROPERTIES = gql`
  query GetProperties($first: Int) {
    uiapi {
      query {
        Property__c(first: $first) {
          edges {
            node {
              Id
              Name {
                value
              }
              Status__c {
                value
              }
              Monthly_Rent__c {
                value
              }
            }
          }
        }
      }
    }
  }
`;
export async function getProperties(first = 50) {
  const dataSdk = await createDataSDK();
  const result = await dataSdk.graphql?.query<
    GetPropertiesQuery,
    GetPropertiesQueryVariables
  >({
    query: GET_PROPERTIES,
    variables: { first },
  });
  if (result?.errors?.length) {
    const errorMessages = result.errors.map((e) => e.message).join("; ");
    throw new Error(`GraphQL Error: ${errorMessages}`);
  }
  return result?.data?.uiapi?.query?.Property__c?.edges?.map((edge) => edge?.node) ?? [];
}
The errors check is important. The Salesforce Platform enforces user permissions, so if the running user can’t access a field in the query, the response comes back as a partial response. It includes the data the user can review and an entry in result.errors describing the restricted field. Your app should handle both, so always check result.errors even when you get data.
A mutation is similar, but you call dataSdk.graphql?.mutate(...) instead of query, and the operation uses a create, update, or delete structure. For example, a PropertiesUpdate mutation passes the record Id and the changed fields in its variables and returns the updated record. The same shape applies to any standard or custom object that UI API supports.
Agentforce Vibes also chooses where to keep each operation. It writes simple, single-use queries inline with the gql tag, next to the code that uses them. It moves complex or shared operations into external .graphql files, which keeps them organized and enables full type generation through codegen.

Build the Data and UI Layers
Now that you understand how React apps use Data SDK, it’s time for Agentforce Vibes to continue building. Enter a prompt like this one.
Yes, continue to the next phase.
Agentforce Vibes builds the data and UI layers for your property management app in a single pass. This process involves complex operations and can take up to 10 minutes to complete. Keep the Agentforce Vibes chat interface open so that you can review and respond to tool call requests, such as asking permission to read project files or rerun ESLint.
After the Agentforce Vibes finishes the data layer, it modifies the existing UI bundle. It adds the property listings page, configures client-side routing to make that page the default route, and updates the app name and browser title. The page uses the existing layout, components, styles, and routing patterns available in the Internal React App template.
As your plan specifies, the generated page displays each property’s image, name, address, monthly rent, and status. It connects the status selector to the generated GraphQL mutation so a user with the assigned Property__c permission set can update a listing inline. Agentforce Vibes also creates loading, empty, and error states so the page gives useful feedback while data is loading or unavailable.
The Preview Stage
Your app is taking shape, but how do you review it as you build? That’s where Live Preview comes in.
Live Preview is a feature in Agentforce Vibes IDE and Visual Studio (VS) Code that renders your React app in a real-time browser preview. When Agentforce Vibes saves changes to your source code, Live Preview updates the app automatically without a manual deploy or a browser refresh. With this tight feedback loop, you can keep the conversation going with Agentforce Vibes as the app evolves in real time.
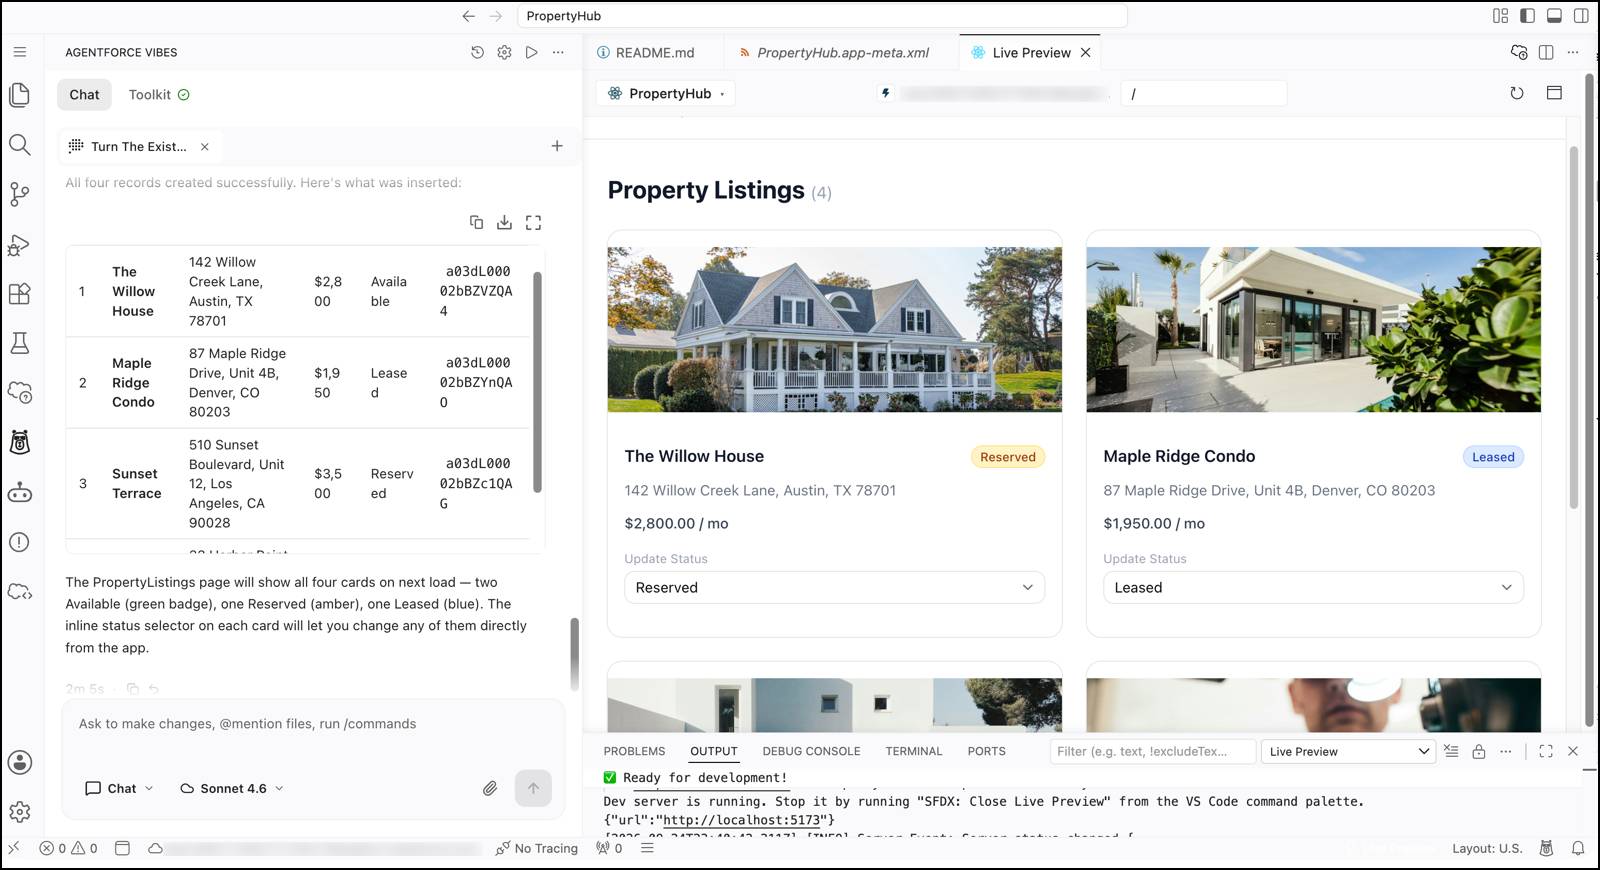
Before you use Live Preview, add sample records to your org so that you can preview your app’s full capabilities. Use this prompt.
Add four realistic sample Property__c records to my org. Give the records distinct names, addresses, monthly rents, a mix of Available, Reserved, and Leased statuses, and hero image URLs from https://images.unsplash.com.
Agentforce Vibes generates sample property records, including stock image URLs for each record, and imports them into your org.
Now you can open Live Preview.
- From the Command Palette (Ctrl+Shift+P on Windows or Command+Shift+P on macOS), run SFDX: Open in Live Preview.
- Select your React app. The app opens in a Live Preview tab in Agentforce Vibes IDE.
- If Live Preview shows a blank screen or a blocked content error, refresh your browser and try again.
Review your property listings and try updating a status. While your sample records are stored in your org, the interactive UI components and status updates run locally inside Live Preview.
Refine Your App Through Conversation
Co-creating is a back-and-forth conversation, not a single command. Once the initial app exists, keep going. Add features, refine the UI, and fix bugs through ongoing prompts, and review each change in Live Preview.
For example, try updating the app’s style with this prompt.
Refine the listing page. Use larger hero images and add an obvious hover effect with image zoom. Preserve the existing data access, routes, and property management workflow.
Agentforce Vibes treats each request as part of the project’s context, and makes changes incrementally while preserving your existing work.
With the data layer, routing, and UI in place, your local React app is fully functional. Now it’s time to deploy your app so that you can get it to your users.