Enroll in a Support Program
Learning Objectives
After completing this unit, you’ll be able to:
- Set up org settings.
- View the support program on the Learner Portal.
- Enroll in the support program.
Configure the Org
So far, you’ve created a support program, assessment questions, and an Omniscript form that stores the questions. In this unit, you learn what the program enrollment experience looks like for a student.
To do that, you give students access to the Learner Portal, adjust sharing so she can see the Study Abroad program and intake form, and then walk through enrollment from her point of view. Finally, you switch back to the advisor view to confirm that the enrollment and responses appear on her case record.
First, configure your hands-on challenge org so that you can log into the student portal as a student and complete the enrollment.
Create an Experience Cloud Site User
Start by creating an Experience Cloud site user for an Astro University student named Sophia. This user includes the necessary license, role, and profile for accessing the student portal.
- From the Student Success app, click
 and select Accounts.
- Change the list view to All Accounts and click
 to pin the list view.
- Find and click the Sophia Student account.
- Click Enable Customer User.
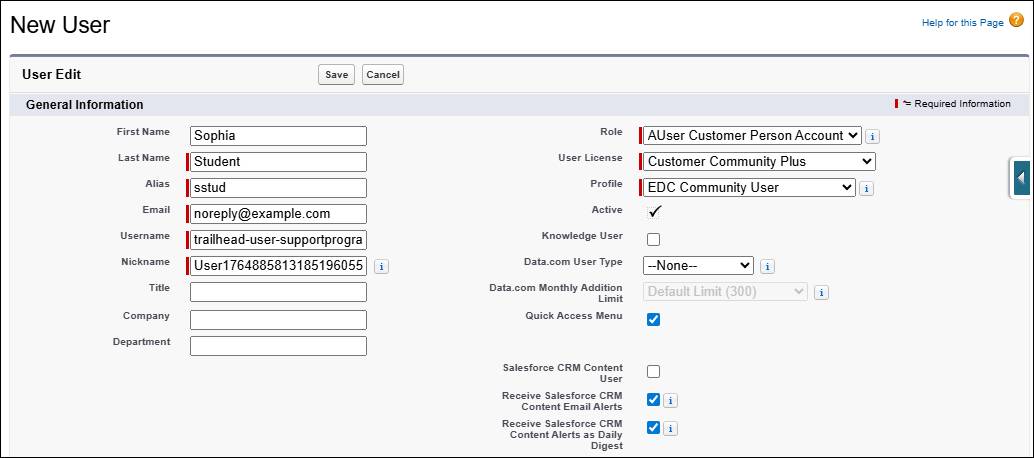
- On the New User page, enter
noreply@example.comfor the email.
- For username, enter your email address and then add support-program+[your favorite color] before the @ symbol. We won’t check this.
- For User License, select Customer Community Plus.
- For Role, select AUser Customer Person Account.
- For Profile, select EDC Community User.
- Save your work and click OK in the notification.
Assign an Experience Cloud Permission Set
Next, assign a permission set to give Sophia access to the student portal.
- From Setup, search for and select Permission Sets.
- On the Permission Sets page, change the list view to show All Permission Sets.
- Search for and click Education Cloud for Experience Cloud Access2.
- Click Manage Assignments.
- Click Add Assignment.
- Select the checkbox next to Sophia Student and click Next.
- Click Assign.
- Click Done.
Configure Sharing Settings
Now configure a few sharing settings so that users like Sophia have access to the necessary objects for program enrollment.
- From Setup, search for and select Sharing Settings.
- Under Organization-Wide Defaults, click Edit.
- For User, select Public Read Only for the Default External Access.
- Repeat step 3 to assign the Public Read Only external access for each of these objects:
- Assessment Question
- Benefit Assignment
- Benefit Type
- Goal Assignment
- Goal Definition
- Program
- Program Enrollment
- Service Resource
- Unit of Measure
- Assessment Question
- For Success Team, change both the Default Internal Access and Default External Access to Public Read Only.
- Save your work.
These settings make sure students like Sophia can read the program, benefits, intake questions, and related records they need for enrollment without exposing additional data.
Create a Sharing Rule
Next, create a sharing rule so that Sophia can access the assessment component on the site.
- Scroll down the Sharing Settings page to Omni Process Sharing Rules and click New.
- For Label, enter
IntakeAssessmentSharingand press Tab to populate the Rule name.
- In the Select your rule type section, select Based on criteria.
- Enter this information for the first criteria:
- Field: Designer Customization Type
- Operator: equals
- Value:
Discovery Framework
- Field: Designer Customization Type
- Enter this information for the second criteria:
- Field: Type
- Operator: equals
- Value:
ProgramAssessment
- Field: Type
- In the Select Users to share with section, select Public Groups and All Customer Portal Users.
- For Access Level, select Read Only.
- Save your work and click OK in the confirmation window.
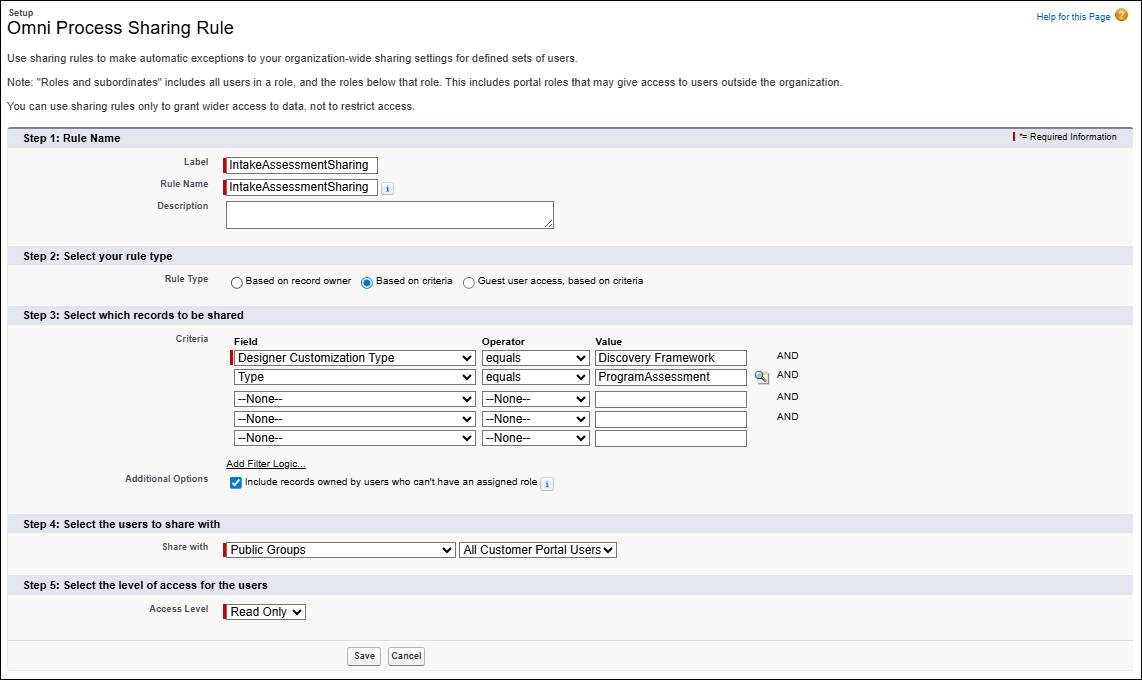
This rule shares all Discovery Framework program assessment Omniscripts with portal users, so the Study Abroad intake questionnaire and any assessments of the same type can appear on the Learner Portal.
Publish the Experience Cloud Site
Finally, publish the Experience Cloud site (we won’t check this). The site may already be published, but republishing ensures your changes are live and gives you the ability to log in as Sophia in the hands-on challenge org.
- From Setup, search for
Digital Experiencesand click All Sites.
- Duplicate the browser tab so it’s easy to navigate back to Sophia’s account in the next step.
- Click Builder next to HOCSite. This launches the Experience Builder, where you can preview and edit the site.
- Click Publish and then Publish again in the confirmation window.
Great work! While these steps might not be glamorous, you’ve now configured the necessary permissions and sharing settings. All that’s left to do is test out your program enrollment.
Test Support Program Enrollment from a Student Perspective
Let’s check out how learners can self-enroll in support programs from the Learner Portal.
Follow these steps to test out support program enrollment from the student’s perspective.
- Return to the previous browser tab.
- Click
 , then find and select Student Success from the App Launcher.
- In the Global Search bar, search for and select the Sophia Student account (not her contact record).
- Click Log in to Experience as User.
- In the site navigation, click Support Programs. You may find it under the More dropdown menu.
- Click Study Abroad in the tile header to see the program details, including the three participatory benefits you created earlier.
- Click Enroll.
- In the Study Abroad Intake form, complete the assessment questions. We won’t check your responses.
- Click Next to submit the enrollment.
- Click Support Programs and switch to the Enrolled tab to see the program in the list.

You’ve seen how students can enroll in support programs. Now let’s see how academic advisors can view the student’s enrollment record and their responses to the intake assessment.
Test Support Program Enrollment from an Advisor Perspective
Follow these steps to view a learner’s support program enrollment from a case record (we won’t check this).
- Click
 and select Logout.
- If you aren’t already there, navigate back to the Sophia Student account record.
- In the Advising Center, click the link to the Study Abroad case.
- Click the Program Enrollments tab. It may be hidden under the More tab.
- In the Programs section, expand the Study Abroad enrollment, and notice that the Application Date is today’s date, and the Enrollment Status is In Progress.
- Click the Assessments tab. It may be hidden under the More tab.
- Expand the Study Abroad Assessment.
- Expand and review the three responses to the intake assessment questions.

In this hands-on challenge, you configured a Study Abroad support program and its benefits, built an intake assessment, and walked through enrollment as both a student and an advisor.
With programs and assessments surfaced on the portal, your students can quickly find support that aligns with their academic goals while advisors get the context they need to guide them effectively.