Configure Merge Fields in Salesforce Spiff Documents
Learning Objectives
After completing this unit, you’ll be able to:
- Set up the merge fields template.
- Customize and upload the template.
- Apply merge fields to documents.
Using Merge Fields
Merge fields is a feature offered within Documents in Salesforce Spiff that allows you to populate your document with text and values that are customized to each rep. Once the merge fields configuration is complete, you can send these tailored documents to your reps en masse. Let’s walk through how to set up merge fields.
- Navigate to Documents | Merge Fields.
- Download the template.
- Customize the template with your needed fields.
- Upload the customized template.
- Add the merge fields to a document.
Navigate to Documents | Merge Fields
In Salesforce Spiff, locate and select the Documents tab at the top of the page. From the Documents main page, click Merge Fields.

Download the Template
From the Merge Fields tab, Click +Upload merge fields. On the popup that appears, click Download Merge Fields Template. The file comes prepopulated with three fields: external_id, User_Name, and Assigned_Plans. The field contents are pulled from Spiff for each rep in your Spiff instance. For this process to work correctly, the first two columns (external_id and User_Name) cannot be deleted.
Customize the Template with Your Needed Fields
Again, do not delete column A (external_id) or B (User_Name) or edit the cell contents of any rows in these columns. You can rearrange the order of the columns and rows or delete rows, but the external_id and User_Name of any remaining rows must stay the same for the template to load properly into Spiff.
To add a new merge field, type the name of the field into a cell on the first row of the template. Adding names or headers to this first row creates a merge field once you upload the file. For example, adding Quota as a header in D1 creates a new merge field called Quota once it’s uploaded to Spiff. Note that there is a limit of 200 merge fields.
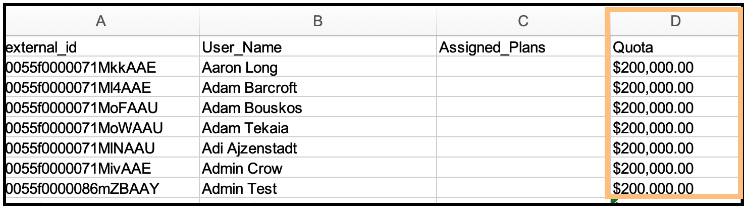
Once your header is added to the field, you can input values into the cells of the field. These are the values that populate in each rep’s document. For example, in the table above, the $200,000 value in the Quota field will populate on a document for a rep where the Quota merge field has been placed on the document. Adding functions such as =SUM(D2:D25) to a cell formula results in the document displaying the output of the function. If the output of the function =SUM(D2:D25) is $100, then $100 is displayed on the document.
Other examples of merge fields include (but aren’t limited to) OTE, Quota, Start Date, End Date, Payout Cadence, Manager Name, and Employee ID.
All documents pull the cell contents from this single uploaded Merge Fields file. If you need to replace the file or edit the file, you may re-download and re-upload the file at any time. There can only be one merge field file uploaded at a time.
Upload the Customized Template
From the Merge Fields section of Documents, click +Upload merge fields. Click Browse your computer. Select the customized template from your computer’s files. Remember, if the cell contents of column A and column B have been changed or don’t match what’s currently in Spiff’s system, the upload fails, or the document doesn’t populate correctly for reps. Once you upload the file, you see it appear on the screen.
To re-download the file, click the menu icon on the right side of the screen and click Download. If you made edits to the merge fields file and want to replace the file currently in Spiff, click the ellipsis (...) on the right side of the screen and click Replace. This prompts you to select a replacement file from your computer.
Add the Merge Fields to a Document
Fields uploaded through the merge fields template, and therefore available to add to the document, can be seen in the right panel.
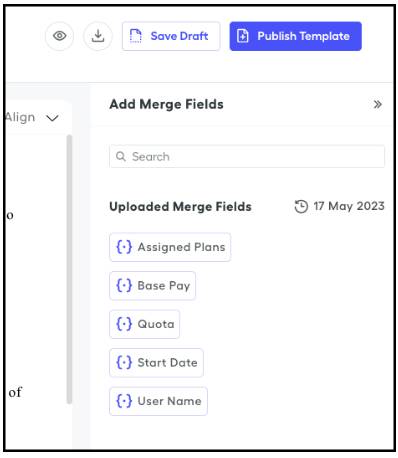
To add a merge field to the document, place the cursor where the entry should be populated. Either click to select the field from the right panel, or begin typing a { (fore-facing bracket) and the field name to bring up clickable options in the type ahead. Click  to review your document before sending it out for approval.
Now that you understand how to create a template, add merge fields, and send out documents using approval routes, you can start streamlining your plan document processes in Salesforce Spiff.