Configure Price Books
Learning Objectives
After completing this unit, you’ll be able to:
- Explain how Agentforce Commerce for B2C determines which price book to use.
- List the permissions required to create, modify, and delete price books.
- Describe how Read-Only Price Books help merchants.
- Explain how site assignment works with price books.
- Explain why you would use price tables.

Review Price Books
Agentforce Commerce for B2C price books contain price data for products based on a currency. You can create a price book manually in Business Manager or import price data from an enterprise resource planning (ERP) system or another financial system. Prices are not generally considered product data per se. The Read-Only Price Books feature offers a high-speed import option.
Define Products for Price Books
You need to define products before you create price books. Each product requires a price defined for a quantity of one (1) in a price book that operates actively for the site. Computed prices derive from this price.
You can configure a price continuously or for a specific period, such as for the duration of a sale. Many price books operate simultaneously. B2C Commerce chooses which price to use based on predefined rules. If two price books are assigned to a site, with overlapping valid periods, the price book with the lowest price for a given product is used.
Maintain a set of fixed price books with fixed price book names. Use the merge or replace import mode to update prices as they change, to make updates a lot faster. Deleting and recreating price books in a regular cadence slows down the system, affecting the shopper experience.
Manage Permissions
To create, modify, or delete price books, you need either the Manage_PriceBooks (for all price books globally) or the Manage_Site_PriceBooks functional permission.
Assign Price Books to Sites
You define price books for an entire organization, but still assign individual price books to sites for them to be active on those sites. You can assign one or more price books to a site, and you can assign a price book to one or more sites in an organization.
Currency is important. You can assign more than one price book to a site as long as they have the same currency. If you use the multi-currency feature, you can assign multiple price books to a site as long as each currency is enabled on the site. While you can assign a price book that has a not-enabled currency, B2C Commerce ignores it when determining prices on the site.
Create a Price Book
Here’s how you create two essential price books.
-
main-list-price contains the retail prices for all products on the site.
-
accessory-sale-price-list contains prices for certain accessories.
Instead of specifying the prices for all products in the accessory-sale-price-list price book, you specify just the sale prices for accessories that are on sale. During price lookup, the system collects prices from all applicable price books and picks the lowest price.
In this module, we assume you are a B2C Commerce merchandiser with the proper permissions to perform these tasks. If you’re not a B2C Commerce merchandiser, that’s OK. Read along to learn how your merchandiser would take these steps in a staging instance. Don’t try to follow our steps in your Trailhead Playground. B2C Commerce isn’t available in the Trailhead Playground.
If your site uses B2C Commerce but you don’t have access, contact your administrator for login credentials. If you have a B2C Commerce sandbox instance, you can try out these steps on that instance. If you don’t have a sandbox and you’re a customer or partner developer, ask your manager if there is a sandbox that you can use.
To create the two price books:
- In Business Manager, click App Launcher, and select Merchant Tools | Site | Products and Catalogs | Price Books.
- Click New.
- Enter the ID:
main-list-price-cc - Enter the name:
Main List Price - Cloud Kicks - Select Activated.
- Select the currency: US Dollar
- Click Apply.

- The tabs are now active.
- Click the Attributes tab. Here’s where you specify custom attributes that you’ve created for the PriceBook system object.
- Click the Site Assignments tab.
- Select one or more sites and click Apply.
- Return to the Price Books page and create the accessory-sale-price-list price book.
- Enter the ID:
accessory-sale-price-list - Enter the name:
Accessory Sale Price - Cloud Kicks - Select Activated.
- Select the currency: US Dollar
- Enter the “based on” price book:
main-list-price-cc - Click Apply.
Manage Read-Only Price Books
The Read-Only Price Book feature provides frequent and fast price imports to merchants who use an ERP or another data import source. Read-Only Price Books:
- Are XML-based.
- Import a minimum of 60% faster than a standard price book.
- Don’t require product indexing for prices to take effect in the search index.
- Can hold up to 300 million prices.
Once you switch to Read-Only Price Books, the price data is read-only. It uses a storage technology that’s separate from B2C Commerce. You edit prices in the ERP and then reimport the data into Business Manager. In an emergency, you can create an editable price book in Business Manager and rebuild the search indexes. However, be aware that performance degrades in this scenario. Make sure you reimport the read-only price data and delete the editable data as soon as is practical.
Here's how to import Read-Only Price Books.
- Turn on the feature.
- In Business Manager, click App Launcher and select Administration | Global Preferences | Feature Switches.
- Find the HighScale Price Books Feature and click Read and agree to legal requirements.
- Select the agreement checkbox and click I Agree.
- Click Apply.
- Enable the feature.
- Select Administration | Global Preferences | Import and Export.
- Enable the Import All Prices Books as Read-Only preference.
- Click Apply.
- Reimport the price books to the staging instance, then replicate to production. This is a best practice.
Create Price Tables
Volume-based price tables enable merchants to specify lower prices for higher quantities. You can create multiple price tables for each product ID (or SKU) in a price book. Each table must have a unique start date and a different and valid time period. An empty time period (null) represents a continuous price.
Say you want to create price tables for seasonal sports apparel. (To learn how to configure and catalogue these products first, complete the Agentforce Commerce for B2C Catalogs, Categories, and Products badge.)
|
Product
|
1–5 units
|
6–10 units
|
11 or more units
|
|---|---|---|---|
Straight Fit Shorts |
20 |
15 |
10 |
Spring Shorts |
15 |
12 |
8 |
Summer Straight Fit Shorts |
20 |
16 |
10 |
Cotton Straight Shorts |
10 |
8 |
6 |
Here’s how to create a price table for them.
- In Business Manager, click App Launcher, and select Merchant Tools | Site | Products and Catalogs | Price Books.
- Select a price book: main-list-price-cc
The prices will be in the currency of this price book.
- Click the Price Definitions tab.
- Enter
*shorts*, and click Find.
- Click All, so you can see all the products with shorts in their name.
- Locate the straight fit shorts products, and enter
20as the price for each of them.
- Locate the spring shorts product and enter
15as the price for them.
- Click Apply. Now you can add the first set of volume prices.
- For the straight fit shorts product:
- Enter
6in the empty field beneath the 1.00 to create the first volume limit.
- Enter
15for the price.
- Do this for the other bar-shorts products and click Apply.
- Enter
11and10for the next volume limits and prices and click Apply.
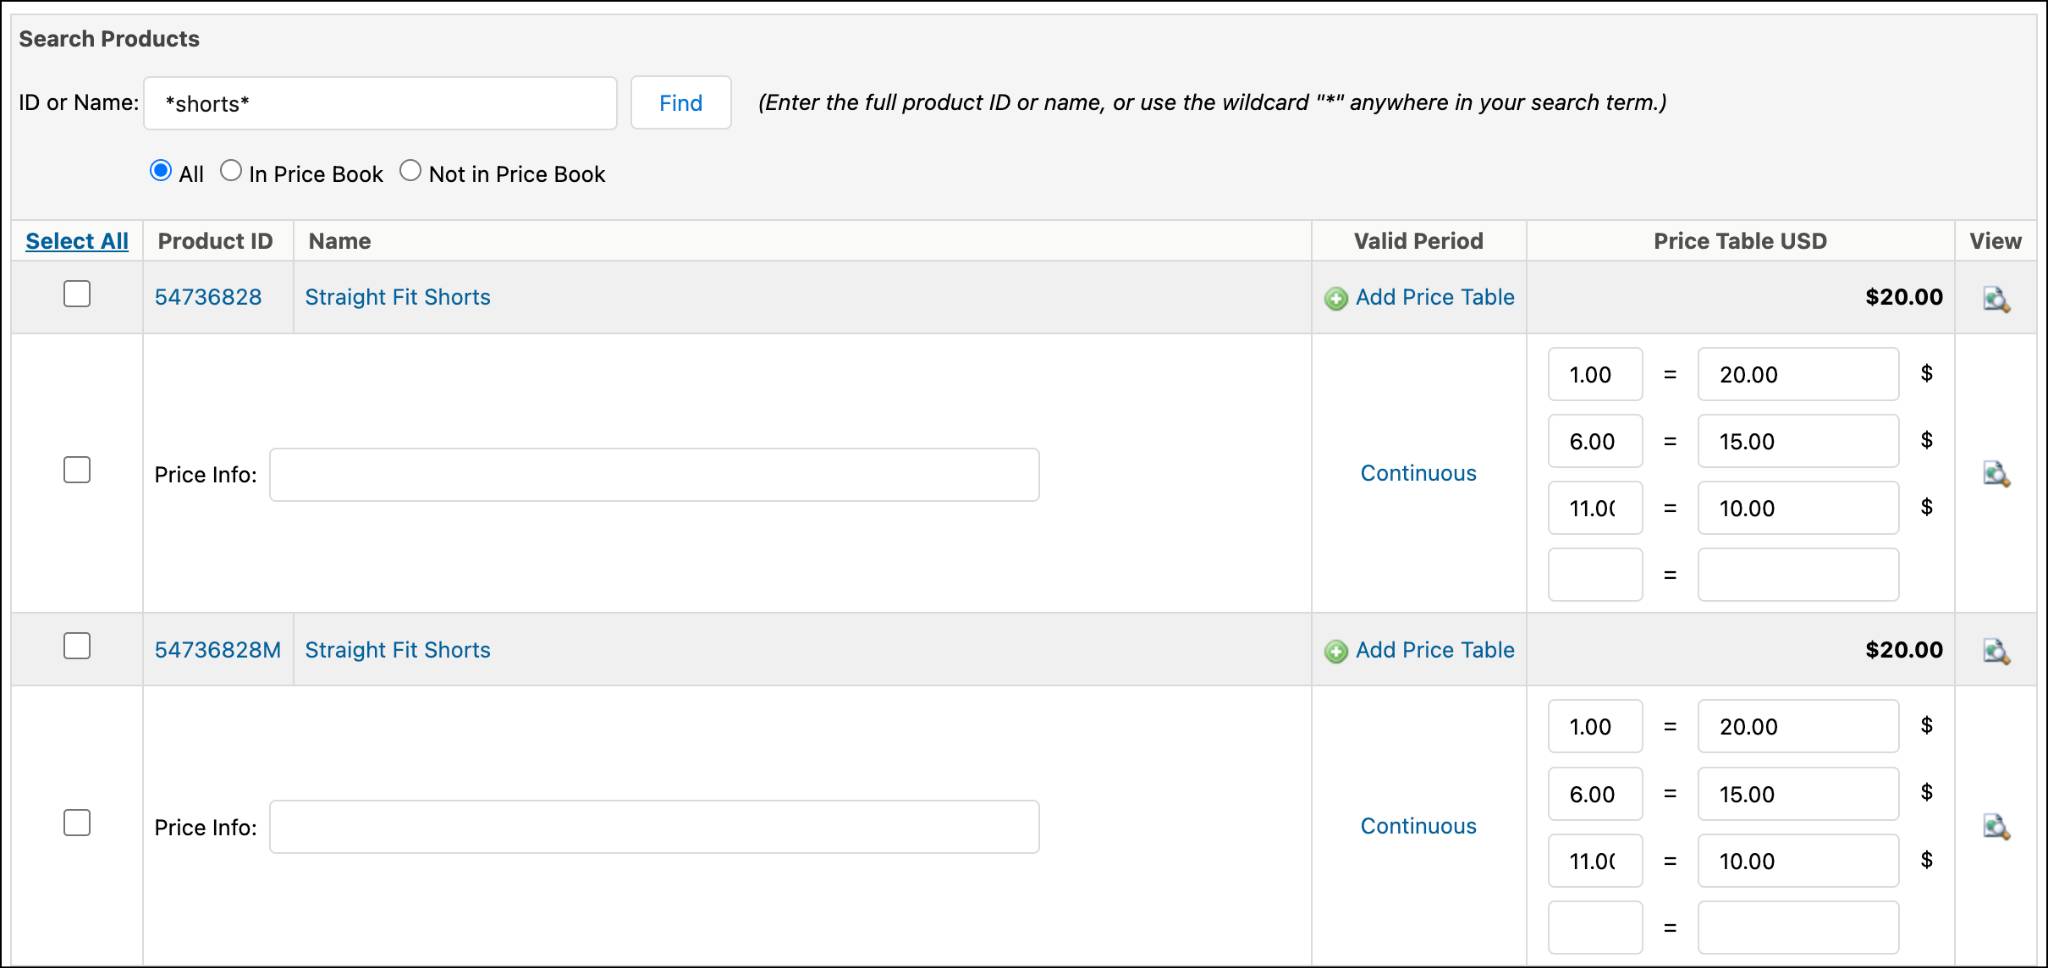
Each time you click Apply, another empty row appears in the price table for each product for which you entered a price.
Here’s how to define a time period.
- Click Continuous in the straight fit shorts product section.
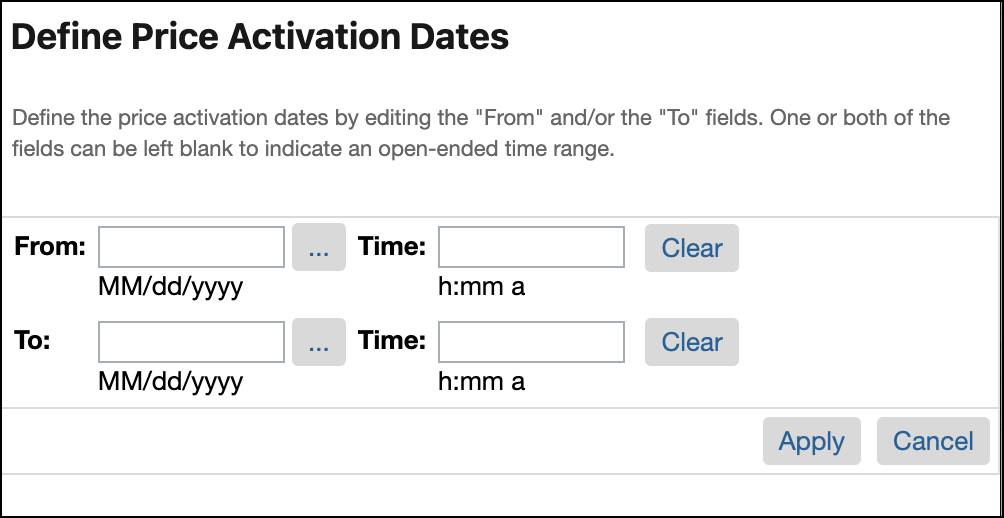
- Enter From and To dates and times.
- Click Apply.
- To return to a continuous period, click Clear beside the From and To fields and click Apply.
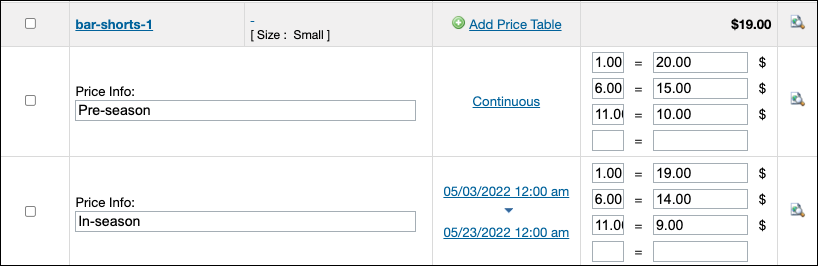
Here’s how to create multiple price tables for a product.
- Click the Add Price Table button beside bar-shorts-1.
- When the window opens, click Create.
- Now you can add price information to identify the price tables, and change the prices in one of them.
Next
In this unit, you learned how B2C Commerce determines which price book to use, how Read-Only Price Books help merchants, and how site assignment works. Next, learn how to manage product images.
Resources
- Salesforce Help: Price Books
- Trailhead: Salesforce B2C Commerce Import & Export
- Salesforce Help: Roles and Permissions
- Salesforce Help: Update a Price in a Read-Only Price Book