Configure Import and Export
Learning Objectives
After completing this unit, you’ll be able to:
- List three types of permissions an Commerce B2C admin needs to perform import/export.
- List three basic steps of the import process.
- List three basic steps of the export process.
- Explain the purpose of site import/export.
- Describe two ways to deal with transfer limitations.
In this unit, you learn how to configure and run an import and export process. While Commerce B2C admins are responsible for various import and export processes, this unit focuses on catalog import and order export.
To configure Import and Export, you need access permissions to:
- Site import/export, which includes all site information
- Import/export of storefront information, such as products and content
- WebDAV access to log files and import/export directories on the server
You also need to request access to an FTP port from Agentforce Commerce for B2C Support so you can use the FTPClient scripts provided by a developer.
Import a Catalog
You start by running manual import and export processes in Business Manager. Later, you plan to work with a developer to create processes that use standard pipelets. These pipelets deal easily with large datasets, are fast and reliable, and use system resources efficiently. To improve your efficiency, you also plan to create batch jobs for both file transfer and import/export. For now, manual processes are fine.
To import a catalog containing product data, you create and zip a catalog file on your PIM system by using the catalog.xsd format, as described in the first unit of this module.
Here are the next steps that you take.

- In Business Manager, click App Launcher, and select Merchant Tools | Products and Catalogs | Import & Export.
- In the Import and Export Files section, click Upload.

- Click Choose File.
- Select your file.
- Click Upload.
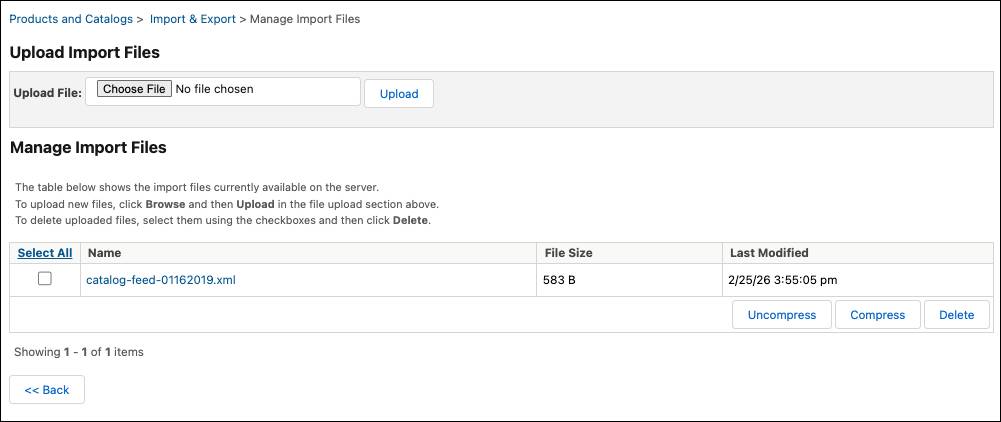
- Business Manager unzips the file.
- Click Back.
- In the Catalogs section, click Import.
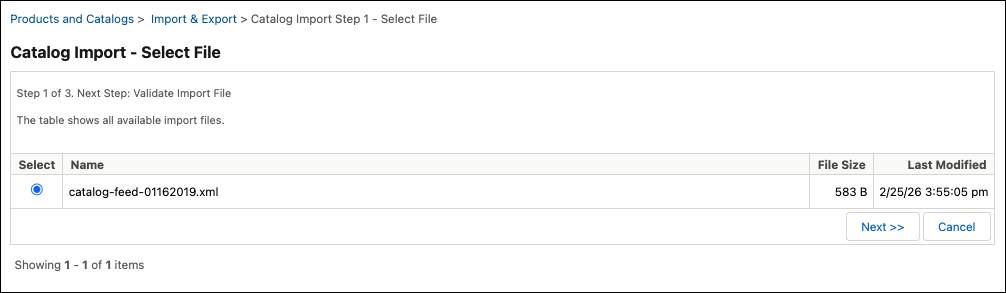
- In the catalog import, select the file to import and click Next.
- Business Manager validates the file and shows a file analysis. Check the analysis to see that Business Manager recognized the expected information before continuing the import.
- Click Next.
- Select the merge import mode.
Export Orders
You want to export orders for processing by your external order management system (OMS). Your export file uses the same schema definition as the import. Business Manager builds the XML file automatically.
To export orders, you take these steps.
- In Business Manager, click App Launcher, and select Merchant Tools | Ordering | Import & Export.
- Click Export.
- Select the orders that you want to export and click Next.
- Select Export Selected Orders.
- Enter the file name.
- Select Update Order Export Status and Inventory.
- Click Export.
- In the Import and Export Files section, click Download.
- Select the file name, and click Compress.
- Click the zip file name, which downloads the file to the local system.
You transfer the XML file to the OMS using WebDAV, and import the file on the OMS. Optionally, you can use FTP or HTTPS, but your company developed the implementation to use WebDAV. Your transfer process uses a secure connection due to PCI-DSS requirements for data transfer and OMS system requirements.
View Import/Export files via WebDAV
To make sure that everything is ready, you review the files. Here’s the procedure.
- In Business Manager, click App Launcher, and select Administration | Site Development | Development Setup.
- Click Import/Export.
- Review the log files to ensure they’re correct.
Commerce for B2C limits export file uploads to 500 MB. This means that multiple site exports or exports with giant images lead to data overage charges. You only run exports as required–for example, one time a day, and with only the data necessary.
Site Import/Export
Another type of import/export you handle is site data. Your company is implementing a new site, with multiple development teams working in parallel on different development instances. The functional architect asks you to copy one development instance configuration and share it with another development instance.
For this task, you use the site import/export module. You can save a snapshot (configuration and data) of an instance and restore it on the same or another instance.
To export site data, you take these steps.
- In Business Manager, click App Launcher, and select Administration | Site Development | Site Import & Export.

- In the Export section, enter a file name for the archive.
- Select the data that you want to export.

- Click Export.
- When the export finishes, click the export file link at the bottom of the page.
- On the next page, scroll down to the bottom of the page and click the file’s download link. The system creates a zip file on the local system.
To import site data:
- In Business Manager on the receiving instance, click App Launcher, and select Administration | Site Development | Site Import & Export.
- In the Import section, with Local selected, click Choose File.
- Browse for the file and click Open.
- Select the file in the Import section, and click Import.
Transaction Limits
Though standard imports are designed to handle XML files of arbitrary sizes, a single process is limited to 1,000 business objects. As your company grows, you pay attention to this limit and others.
Limit |
Description |
|---|---|
Upload |
A WebDAV push into a Commerce for B2C instance has an upload limit of 500 MB. If it takes too long to transfer the file, you can try again with the files zipped. |
Download |
For download into a file, the file size limit is 200 MB for FTP or WebDAV. The file sizes for download into a string are smaller. |
FTPClient Size |
Programmatic file fetches use enforced file limits. You can pass the limits in an argument or default. |
HTTPClient Size |
The HTTP client doesn’t have a file size limitation. |
Compressed XML Files
You reduce your XML file sizes through compression. By using compressed files, you stay within upload size limits and speed up upload and download times on slow network links.
-
gzip: Business Manager automatically compresses standard import files with the gzip algorithm, so you avoid running
.gunzipon the instance. You enter a file name such as catalog.xml.gz to the import pipelet or select a gzipped file (extension is required to be .gz) in Business Manager.
-
zip: You zip and unzip XML files (zip compression, not gzip compression) on a single file basis within Import/Export in Business Manager. Business Manager automatically unzips .zip files during an upload.
Delta Feeds
For imports other than catalog data, you create XML files that contain only the differences between the current and previous XML files. These are called delta feeds. These files are usually smaller and faster to import, and less vulnerable to network interruptions.
While you can create a delta catalog feed, you exclude elements that replace the global import mode with an element-specific import mode. It’s not possible, for example, to create a delta feed for a bundled product, because the bundled-products field automatically uses the replace mode.
Static Files
The persistent objects in the catalog and content library (category, products, and content data) have supplemental static files, such as product images. Commerce for B2C stores these in the instance file system. Your XML files can only contain persistent database objects and references to the static objects. To export/import or download/upload static files, Linda must use the WebDAV interface.
Why Archive?
Because Commerce for B2C doesn’t roll back XML files, always archive the previous XML file before an import. If the new XML file doesn’t validate, you can import the previous version. It’s a best practice to delete old files (except the last file) once a week so that they don’t accumulate.
Sum It Up
In this unit, you learned how to import catalogs, export orders, and view the logs in WebDAV. With site import/export, you copied site data from one development instance to another. You learned how to deal with file and transaction size limitations and the importance of archives.
Resources