Gestionar el enrutamiento de llamadas entrantes
Objetivos de aprendizaje:
Después de completar esta unidad, podrá:
- Crear un flujo de OmniCanal para enrutar llamadas.
- Conectar el flujo al canal de voz.
Enrutar llamadas entrantes con flujos de OmniCanal
Ahora que ya configuró el agente de Agentforce Voice, es momento de conectarlo a los flujos, de modo de poder enrutar las llamadas de manera eficiente. Los flujos de OmniCanal son el cerebro de enrutamiento para Salesforce Voice. Cuando llega una llamada entrante, la plataforma usa el flujo de entrada de OmniCanal asociado para determinar qué agente debería gestionarla y, luego, transfiere la llamada en consecuencia. Ahora que creó y personalizó el agente, el paso siguiente es configurar un flujo de OmniCanal que dirija las llamadas entrantes a él.
- Haga clic en
 y seleccione Configuración.
- En el cuadro de búsqueda rápida, busque y seleccione Flows (Flujos).
- Haga clic en Nuevo flujo.
- En la ventana emergente New Automation (Nueva automatización) en Flow Builder, seleccione Omni-Channel Flow (Flujo de OmniCanal).

- Necesita una variable de entrada para almacenar la Id. de registro de llamada de voz. Haga clic en
 y, luego, seleccione New Resource (Nuevo recurso).
- En la ventana emergente New Resource (Nuevo recurso), ingrese esta información.
- Resource Type (Tipo de recurso): Seleccione Variable
- API Name (Nombre de API):
recordId - Data Type (Tipo de datos): Seleccione Text (Texto)
- Disponible para entrada: Seleccionada
- Resource Type (Tipo de recurso): Seleccione Variable

- Haga clic en Listo.
Con la variable creada para almacenar la Id. de registro de la llamada de voz, todo está listo para crear el flujo que enrute las llamadas entrantes a su agente de Agentforce Voice. Este flujo conecta el evento telefónico al agente de IA, garantiza que se transfiera el contexto correcto y organiza la forma en que la llamada se mueve por el sistema.
- Haga clic en
 y seleccione el componente Route Work (Enrutar trabajo). Este componente entrega el elemento de trabajo actual, como una llamada entrante, a OmniCanal para entrar en la cola y pasarlo en tiempo real al agente que creó anteriormente.

- En el panel lateral Route Work (Enrutar trabajo), ingrese la siguiente información:
- Label (Etiqueta):
Inbound Voice Routing Flow(Flujo de enrutamiento de llamada de voz entrante) - API Name (Nombre de API):
Inbound_Voice_Routing_Flow - How Many Work Records to Route? (¿Cuántos registros de trabajo enrutar?) Seleccione Single (Único)
- Record ID Variable (Variable de Id. de registro): Seleccione recordID (Esta es la variable que creó en la sección anterior).
- Service Channel (Canal de servicio): Seleccione Phone (Teléfono)
- Route to (Enrutar a): Seleccione Agentforce Service Agent (Agente de servicio de Agentforce)
- Agentforce Service Agent (Agente de servicio de Agentforce): Inbound Voice Service Agent (Agente de servicio de voz de entrada) (Este es el agente que creó anteriormente).
- Fallback Queue (Cola de reserva): Seleccione Queue (Cola)
- Fallback Queue ID (Id. de cola de reserva): Seleccione Default Queue Salesforce (Cola predeterminada de Salesforce) (u otra cola que desee usar como red de seguridad cuando el destino principal de enrutamiento no pueda aceptar el trabajo).
- Label (Etiqueta):

- Haga clic en Save (Guardar) e ingrese la siguiente información:
- Flow Label (Etiqueta de flujo): Seleccione Voice Call Handling Flow (Flujo de gestión de llamada de voz)
- Flow API Name (Nombre de API del flujo): Voice_Call_Handling_Flow
- Flow Label (Etiqueta de flujo): Seleccione Voice Call Handling Flow (Flujo de gestión de llamada de voz)
- Haga clic en Guardar y, a continuación, en Activar.
Ahora que ya configuró el agente y activó el flujo de OmniCanal, su marco de trabajo de enrutamiento de llamadas está completo.
Creó y personalizó un agente que está listo para interactuar con los clientes. También creó un flujo que funciona de manera fluida con el agente para enrutar llamadas en función del desarrollo de la plática. El último paso es conectar este flujo al canal de voz, para garantizar que todas las llamadas entrantes ingresen en esta experiencia de OmniCanal. Desde aquí, el agente puede interactuar con los clientes, resolver problemas tal como fue diseñado y, cuando sea necesario, derivar el caso de manera fluida a un representante de servicio al cliente para que tome el control.
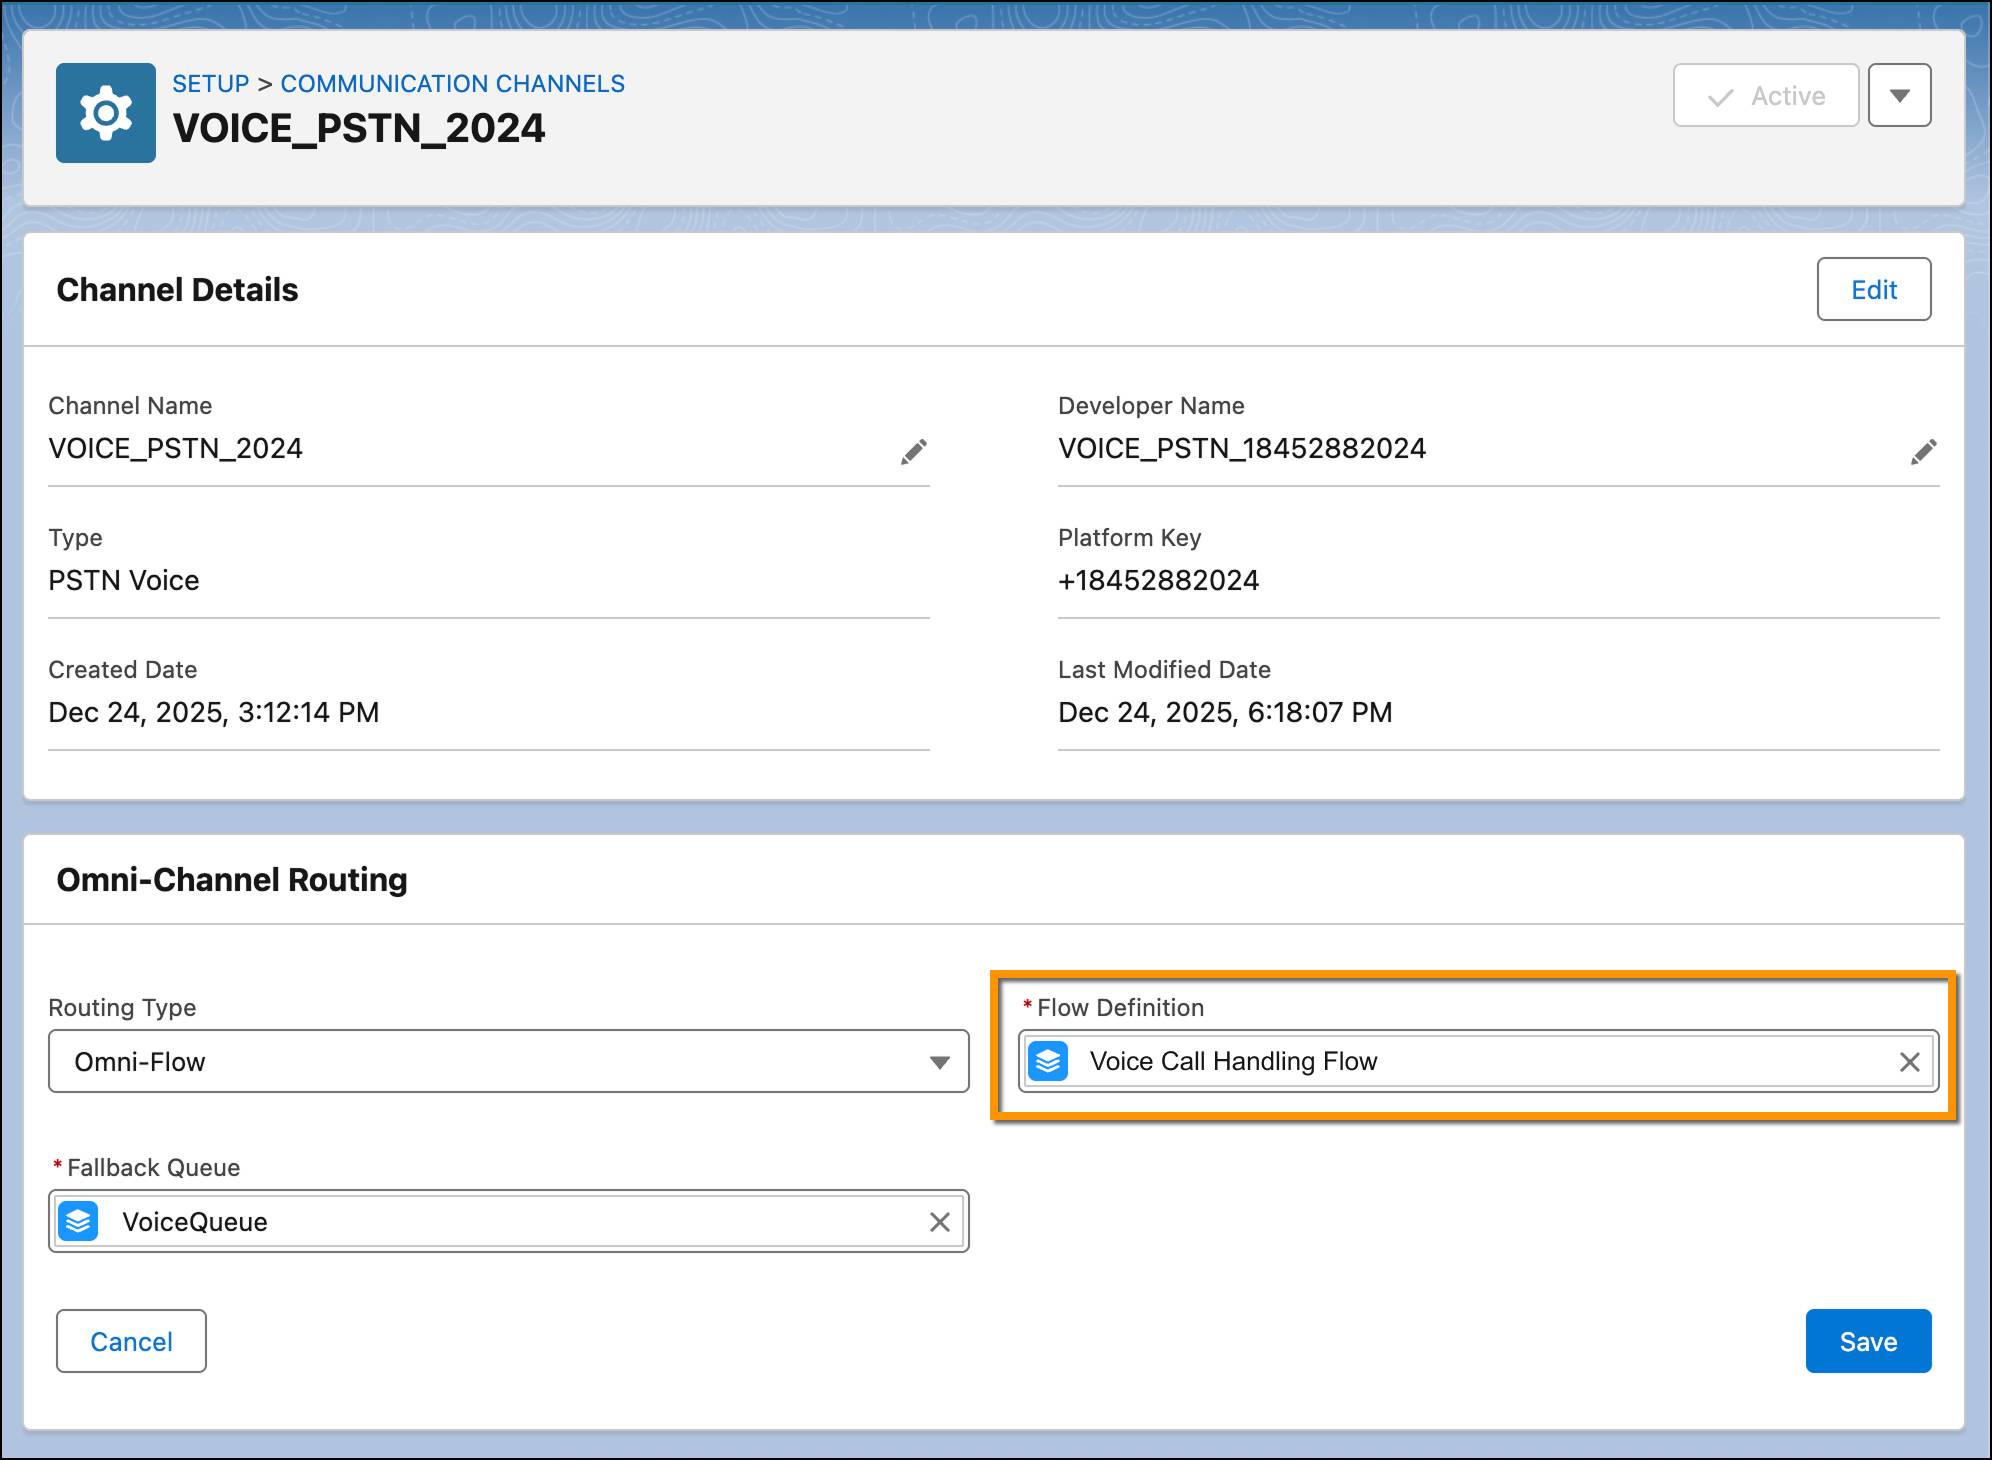
Conectar el flujo al canal de voz
- En Setup (Configuración), en el cuadro de búsqueda rápida, busque y seleccione Communication Channels (Canales de comunicación).
- Haga clic y abra su canal de voz desde la ficha All Channels (Todos los canales).
- Haga clic en Edit (Modificar) en la sección Omni-Channel Routing (Enrutamiento de OmniCanal).
- Busque y seleccione el flujo que creó en el campo Flow Definition (Definición de flujo).
- Agregue una cola de reserva.
- Haga clic en Guardar.
¡Y eso es todo! Con el flujo integrado en el canal de voz, ahora las llamadas se enrutan a este flujo, potenciado por agentes de IA que gestionan las consultas de los clientes y un mecanismo de enrutamiento para hacer que el representante de servicio al cliente sea más productivo y que su centro de contacto sea más eficiente.

Finalización
Conectó de manera eficaz las partes fundamentales de la experiencia: el agente potenciado por IA capaz de gestionar interacciones de voz en tiempo real, la conexión telefónica que trae las llamadas al sistema y la lógica de enrutamiento que garantiza que cada llamada llegue al destino correcto.
Esta base no solo sirve para las operaciones de voz actuales, sino que lo prepara para mejoras futuras, como expandirse a agentes y canales adicionales, enriquecer el conocimiento del agente o llevar a cabo una ampliación para satisfacer la creciente demanda de los clientes.
Su estrategia de asistencia por voz ahora es más inteligente, eficiente y preparada para ofrecer las experiencias de respuesta de alta calidad que sus clientes esperan.