Set Up and Plan Your Lightning App
Learning Objectives
After completing this unit, you’ll be able to:
- Create a Lightning app project in Agentforce Vibes IDE.
- Write an effective prompt that describes a complete Lightning app.
- Start in Plan Mode to generate a plan before any metadata is built.
- Review the proposed plan before you approve it.
Set Up Your Development Environment
Agentforce Vibes IDE, formerly known as Code Builder, is a web-based integrated development environment that delivers the full power and flexibility of Visual Studio Code (VS Code) in your browser. It includes Salesforce Extensions, the Salesforce CLI, and GitHub integration, so you don’t need to install extra software to start building.
Sign Up for a Developer Edition Org with Agentforce Vibes IDE
To complete this badge, you need a special, limited-time custom playground with Agentforce and Agentforce Vibes IDE.
- Select Create Playground, and then select Yes, Create Playground.
- Your new org is automatically attached to your Trailhead account.
- Make note of your org's expiration date and complete this badge before then.
- Select Launch to open the playground.
Confirm Agentforce is Enabled
Einstein is the org-level toggle required for every AI feature. Nothing downstream works until it’s on.
- To open the Setup menu, select Setup
 .
- In the Quick Find box, search for and select Einstein Setup.
- Make sure that the Turn on Einstein toggle is On.
- In the Quick Find box, search for and select Agentforce Agents.
- Make sure that the Agentforce toggle is On.
Activate the Salesforce MCP Server
The Headless 360 MCP Server (Beta) empowers Agentforce Vibes to quickly discover and execute complex Salesforce setup and integration operations. It includes MCP tools that help Agentforce Vibes load the correct AI Skills and make the right API for your requests.
- To open the Setup menu, select Setup
 .
- In the Quick Find box, search for and select MCP Servers.
- From the list of MCP Servers, select the Headless360 (H360) MCP Server server.
- Select Activate.

Launch Agentforce Vibes IDE
With the required platform features turned on, you’re ready to configure your Lightning app project in Agentforce Vibes IDE.
- To open Agentforce Vibes IDE, select Setup
 and select Agentforce Vibes from the dropdown menu.
- Review and accept the Terms and Conditions.
- The first time you launch Agentforce Vibes IDE, it runs through a setup process that may take a few minutes. You see the message: “Agentforce Vibes is loading…” After Agentforce Vibes IDE loads successfully, the Agentforce Vibes IDE editor window opens by default.
- If a “Do you trust the authors of the files in this folder?” window appears, select Trust the authors of all files in the parent folder ‘codebuilder’, and then select Yes, I trust the authors.

Create Your Lightning App Project
- In Agentforce Vibes IDE, select Agentforce Vibes
 from the Activity Bar, which opens the Agentforce Vibes side panel.
- If asked, update Agentforce Vibes to the latest version, and then reload the Agentforce Vibes IDE window.
- In the Agentforce Vibes panel, select I agree to the terms.
- Scroll down and select Enable Agentforce.
- Select + New Project to open the Agentforce Vibes Welcome Page.
- Select the Lightning App tile.
- To create a project from the standard SFDX template, select Create a Project.
- Enter
AssetTracker_Projas the project name.
- Keep the default location for the project, and then select Create Project.
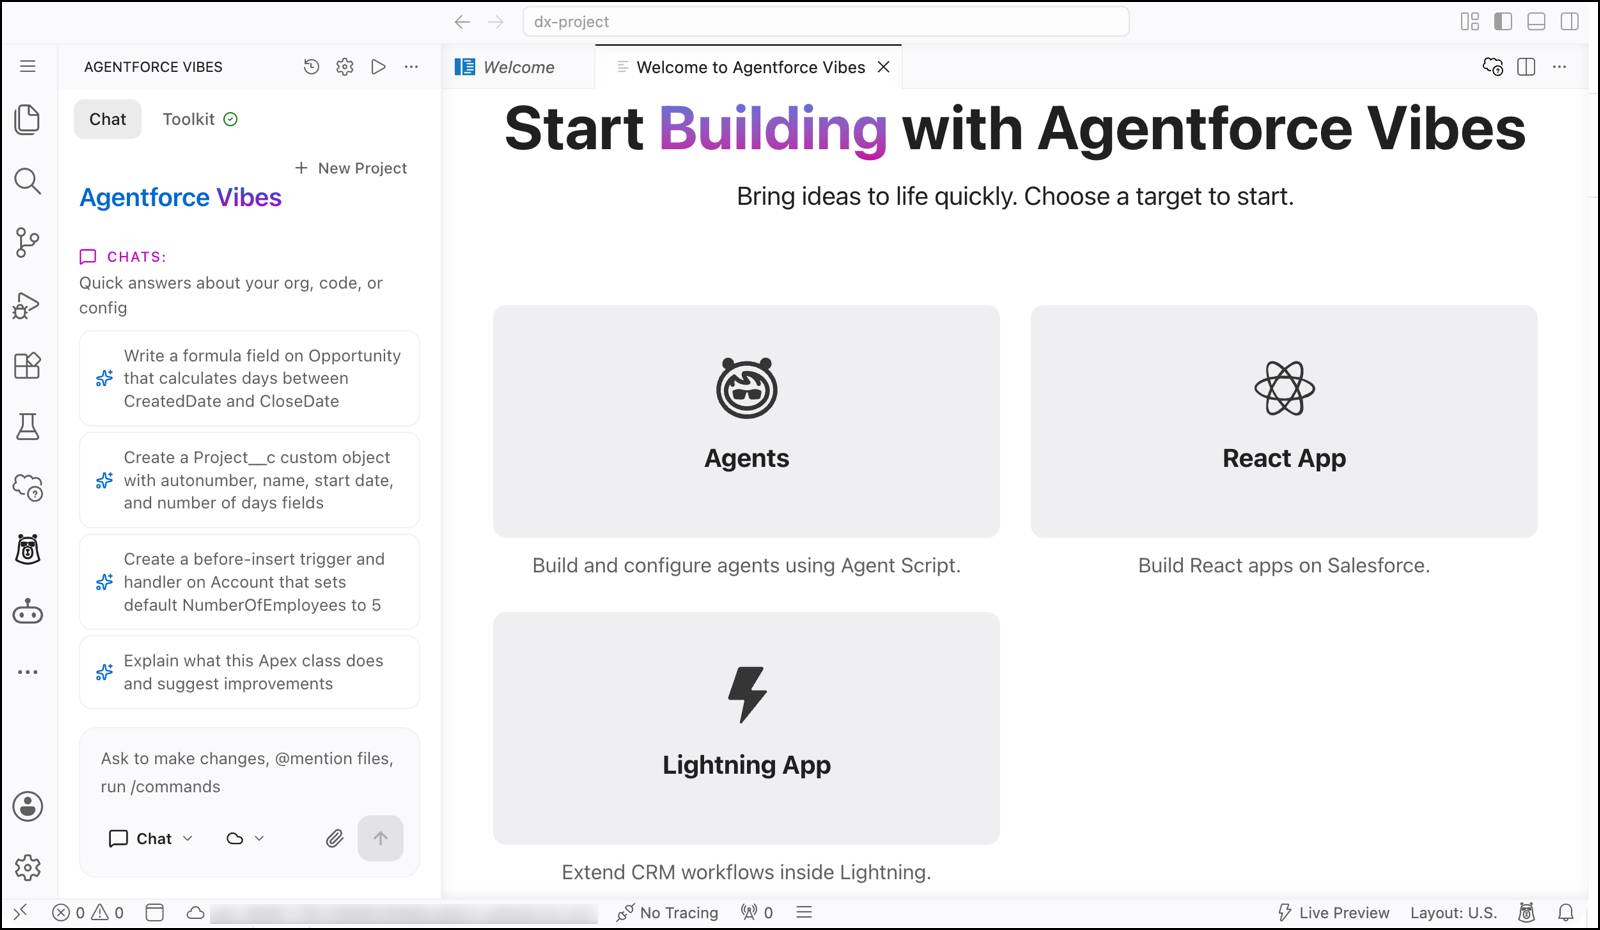
To confirm your setup, reopen the Agentforce Vibes panel. Verify that the panel shows the Chat interface.

Enable the Salesforce MCP Server
- In the Agentforce Vibes panel, select the Toolkit tab.
- In the MCP Servers section, turn on the Salesforce Headless 360 MCP Server.
Now you’re ready to go.
Install Project Dependencies
Finally, install the project dependencies. If Agentforce Vibes runs npm install later, it can pause the build and start a second agent loop when the install finishes, which uses extra agent requests.
- To open the terminal in Agentforce Vibes IDE, press Ctrl+J (Windows) or Cmd+J (macOS).
- Use this CLI command.
npm install
The installation may take a few minutes to complete. It brings in standard Salesforce framework tooling, such as Lightning web component linters and testing tools.
Start in Plan Mode
Before you send your first prompt, turn on Plan Mode.
- In the bottom bar of the Agentforce Vibes Chat interface, select Chat. The Send Mode dropdown menu opens.
- In the dropdown, select the Plan send mode.
In Plan Mode, Agentforce Vibes analyzes your prompt against your connected org’s context and existing project code, asks clarifying questions, and produces a structured plan without writing or deploying any metadata. This mode is perfect for architecturally complex workflows like building complete apps.
Now you’re ready to write your first prompt. An effective prompt lists the desired app components, describes the data the app works with, and calls out how the user interface (UI) should look and behave. The more detail that you provide, the better the result.
Use this prompt for the Asset Tracker app.
Build a Lightning Experience app named Asset Tracker.
Create a custom object named Tracked_Asset__c with the label Tracked Asset. Use the standard Name field with the label Asset Name. Add these custom fields: Serial_Number__c (text), Purchase_Date__c (date), Status__c (picklist values In Service, In Repair, and Retired), and Assigned_Owner__c (lookup to User).
Add a Lightning web component named assetForm that uses lightning-record-edit-form and lightning-input-field so users can create and edit a Tracked Asset. The form must have a clean, accessible layout, clear labels, and a Save button. Make the component available on Lightning record pages. Create Jest tests that verify the form renders its fields and Save button.
Then add a Lightning record page named Tracked_Asset_Record_Page that shows assetForm in the main region, a custom tab for Tracked_Asset__c, and the Asset Tracker Lightning app that declares both Small and Large form factors and includes that tab.
Add a permission set named Asset Tracker User that grants object, field, tab, and app access. Assign Tracked_Asset_Record_Page as the app default for Tracked_Asset__c by adding a View action override of type Flexipage on the Asset Tracker app metadata for both Large and Small form factors.
Create files in this order: object and fields, then assetForm and Jest tests, then Tracked_Asset_Record_Page and tab, then the app with the View action overrides, and then the permission set. Do not deploy until I ask.
Here’s what this prompt does well.
-
It names the main pieces. When you list the object, form, record page, tab, app, and permission set, you tell Agentforce Vibes the full scope of the app.
-
It describes the data model. The listed fields tell Agentforce Vibes which object and fields to create.
-
It describes the form’s layout and behavior. When you specify lightning-record-edit-form and lightning-input-field, Agentforce Vibes will create Lightning base components, which include Lightning Data Service.
-
It calls out accessibility. When you request an accessible layout, Agentforce Vibes creates markup with clear labels and semantic structure.
-
It requests unit tests. Jest is a popular JavaScript testing framework that allows you to locally test code behavior, functions, and user interfaces. Agentforce Vibes can write Jest tests and run them before initial deployment.
-
It anticipates potential pitfalls. When you specify required permission sets, overrides, and dependencies, Agentforce Vibes can build without extra guesswork.
A full-requirements prompt like the one above builds a complete app with minimal back-and-forth with Agentforce Vibes. This type of prompt works great when you have a clear vision, scope, and set of requirements for your project. However, if you’re less sure about the project requirements, try opening with a short, general prompt and let Agentforce Vibes guide you through its recommendations.
Review the Plan
Because your request is complex, Agentforce Vibes may spend a few minutes reviewing and analyzing your project files before it shares the plan. A plan can include these sections.
-
Context or overview: A summary of what you asked for
-
Approach: The number of tasks and the overall strategy
-
Tasks: Numbered steps with descriptions, expected outcomes, and relevant file paths
-
Considerations: Cross-cutting decisions and caveats that can span multiple tasks
-
Out of scope: What the plan deliberately leaves out, such as additional features to add post-deployment

Read the plan critically. Confirm the object and field names, the lightning-record-edit-form pattern, the Asset Tracker User permission set, and that the record page is assigned with a View action override on the app. If something is off, tell Agentforce Vibes what to change, then review the revised plan.
These changes are easiest to make in the plan, before any metadata exists. When you’re satisfied, select Approve Plan. In the next unit, you co-create the app as Agentforce Vibes works through the approved plan.