Create a Reactive Screen
Learning Objectives
After completing this unit, you’ll be able to:
- Describe how screen flow reactivity benefits your users.
- Create a screen component that deactivates reactively.
- Create a formula that reactively sets a component’s default value.
- Create a formula that reacts to specific text values.
- Configure conditional visibility that reacts to other components’ values.

So What Is Reactivity, Anyway?
Reactivity is the ability for various parts of a screen flow to react to each other, even when they’re on the same screen. In other words, when a user changes something in one screen component, it can automatically affect another screen component without requiring the user to navigate to the next screen.
Why is reactivity important? Let’s look at an example. Let’s say you have a screen flow that allows salespeople to add products to an opportunity and set their prices. You also need the flow to show a warning immediately when the salesperson sets the price too low. Without reactivity, you must put the price and the warning on separate screens, because the price field can’t control the visibility of the warning text message. You could use a validation rule, but the user still must click to see if their price is valid. With reactivity, however, you can display warning and approval messages instantly as soon as the user types in the price.
Reactivity reduces the number of clicks that your users have to perform, saving their time and sanity and overall creating a much more fluid, intuitive experience. These qualities are essential to your flows’ user adoption.
Launch Your Trailhead Playground
You'll be completing this hands-on project in your own personal Salesforce environment, called a Trailhead Playground. Get your Trailhead Playground now by first logging in to Trailhead, and then clicking Launch at the bottom of this page. Your playground opens in a new browser tab or window. Keep the playground window open while you do this project. After you complete the project steps in your playground, come back to this window and click Verify step at the bottom of this page.
Create a Reactive Flow
Let’s build an example screen flow that’s full of reactive components. The support department at Pyroclastic, Inc., needs a flow that creates a specific type of case. Here are the requirements for the new flow.
- Ask the user for the case’s subject, description, priority, and due date.
- Suggest a due date and limit how far the user can stray from this date.
- Prompt the user to confirm that the subject and description contain all the necessary information.
For this project, we’ll just focus on creating the screen, and not worry about any other elements. Start with a new flow.
- From the App Launcher (
 ), search for and open Flows.
- Click New.
- Select Screen Flow.
- On the flow canvas, on the path after the Start element, click
 .
.
- Select Screen to add a Screen element.
- In the Screen Properties pane, for Label, enter
Get Case Details. Make sure the API Name isGet_Case_Details.
- In the Components list, click Text to add a Text component to the screen canvas.
- For Label, enter
Subject.
- Make sure the API Name is
Subject.
- Check the Require field.
- For Label, enter
- Add a Long Text Area component to the screen canvas.
- For Label, enter
Description.
- Make sure the API Name is
Description.
- Check the Require field.
- For Label, enter
- Add a Radio Buttons component to the screen canvas.
- For Label, enter
Priority.
- Make sure the API Name is
Priority.
- Check the Require field.
- In the Choice field, select New Choice Resource.
- For Resource Type, select Picklist Choice Set.
- For API Name, enter
choicePriority.
- For Object, select Case.
- For Data Type, select Picklist.
- For Field, select Priority.
- Click Done.
- If the Choice field doesn’t contain
{!choicePriority}, select choicePriority.
- For Resource Type, select Picklist Choice Set.
- For Label, enter
- Add a Date component to the screen canvas.
- For Label, enter
Due Date.
- Make sure the API Name is
Due_Date.
- For Read Only, select True.
- For Label, enter
- Add a Checkbox component to the screen canvas.
- For Label, enter
I confirm that the case's subject and description contain all necessary information to replicate the bug, including login information if needed.
- Change the API Name to
Confirmation.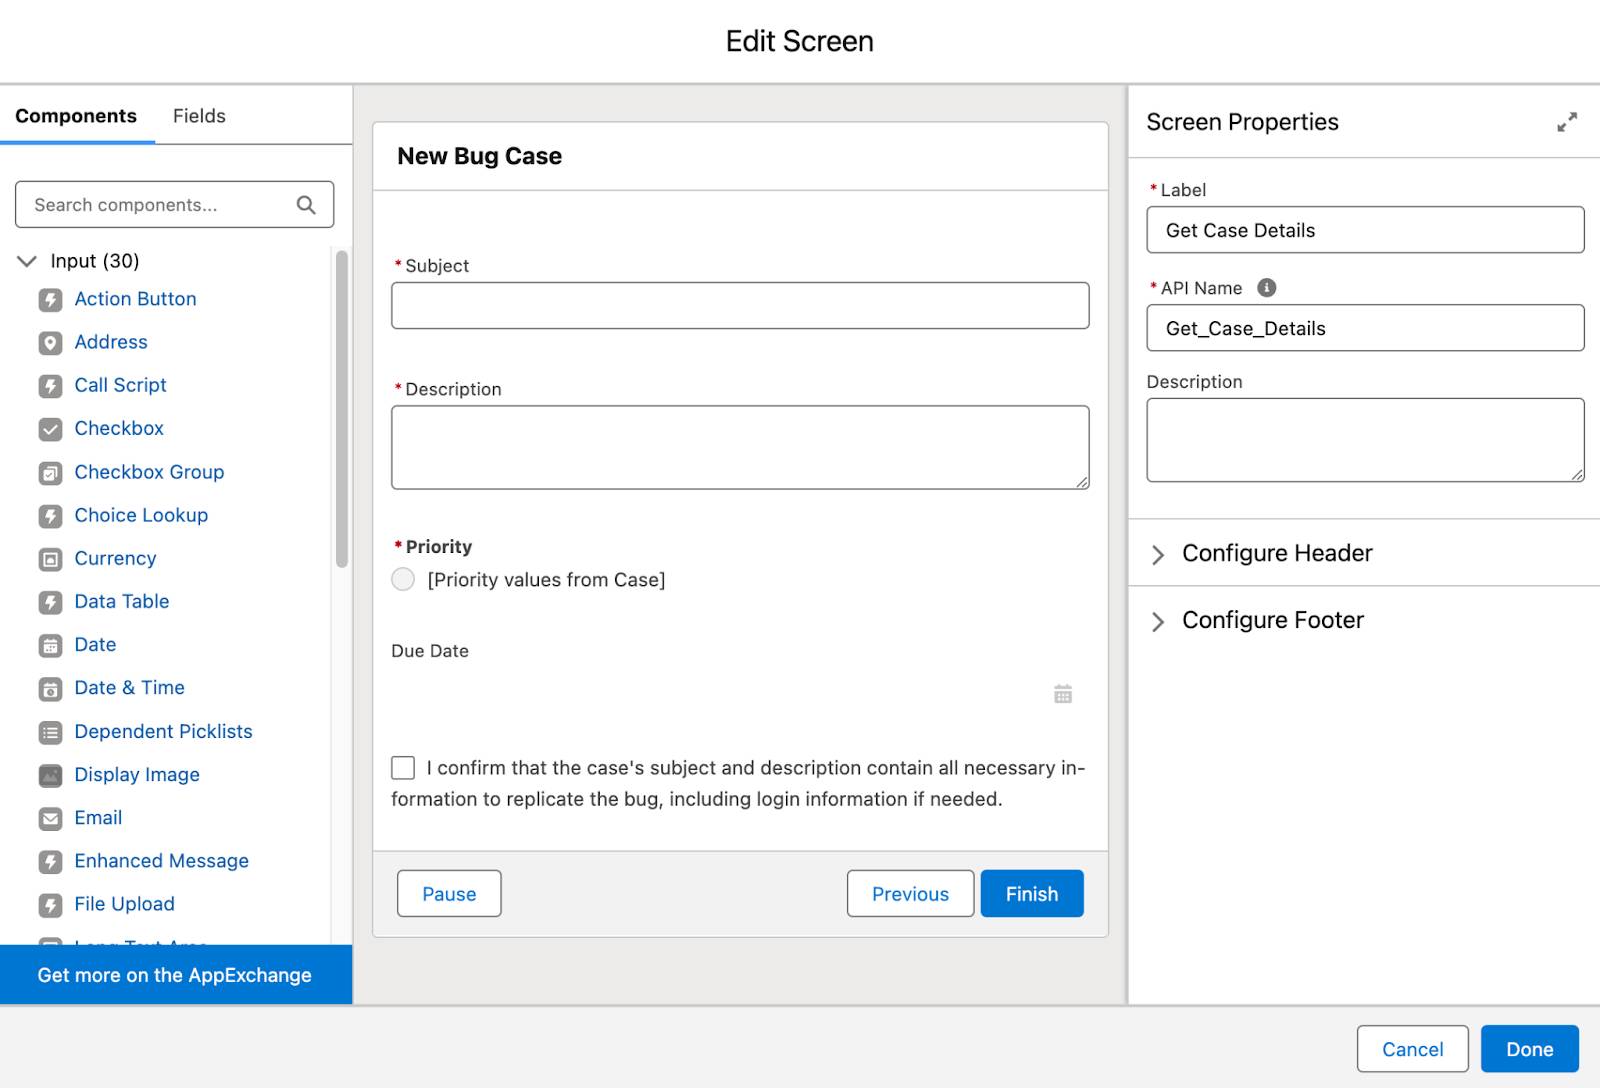
- For Label, enter
- Click Done.
- Save the flow. For Flow Label, enter
New Bug Case. Make sure the API Name isNew_Bug_Case.
The screen now has the basic components, but no reactivity. Let’s add some!
Disable a Field Reactively
We want to be sure the user confirms the final subject and description, so let’s prevent editing the Subject and Description fields after the confirmation box is checked. If we disable the Subject and Description fields when the confirmation box is checked, users will have to uncheck the confirmation box to edit the subject or description and then confirm the new values.
Let’s set that up.
- In the Get Case Details screen, select the Subject component.
- For Disabled, select Get Case Details, then the I confirm that the case’s subject… screen component.
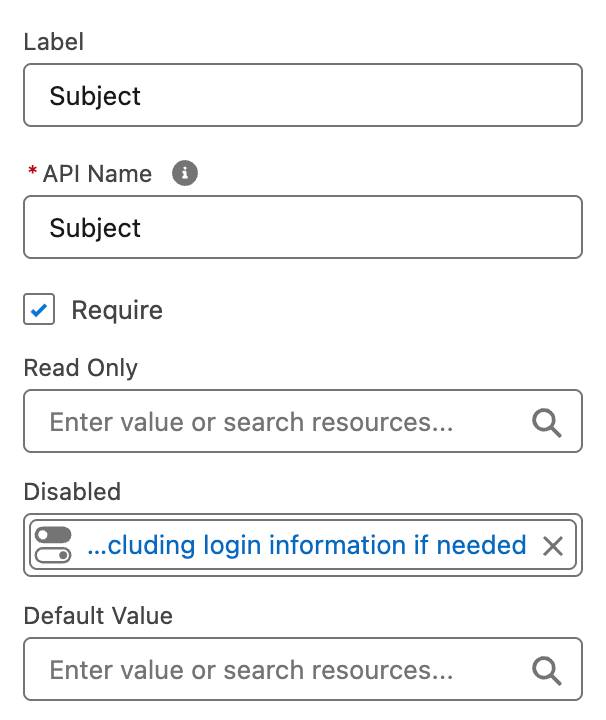
- Repeat steps 1 and 2 for the Description component.
- Click Done.
- Save the flow.
What’s going on here? The Confirmation screen component is a checkbox. Its value is always either True or False (or null, which is usually treated the same as False). The flow can pull that True or False value into the configuration of another component that references the Confirmation component. When the flow reaches the Subject or Description component, it pulls the value of the Confirmation component into the Disabled setting. If the user checks the Confirmation box (True), then Disabled is True (on the Subject and Description components). Unchecking the Confirmation box instantly sets the components’ Disabled setting to False, allowing the user to edit the Subject and Description fields on the screen.
To see this reactivity in action, click Run in the menu bar to run the flow in a new tab. Click the “I confirm…” checkbox and watch what happens to the Subject and Description fields. Boom! Magic. And we’re just getting started.
Disabled Versus Read Only
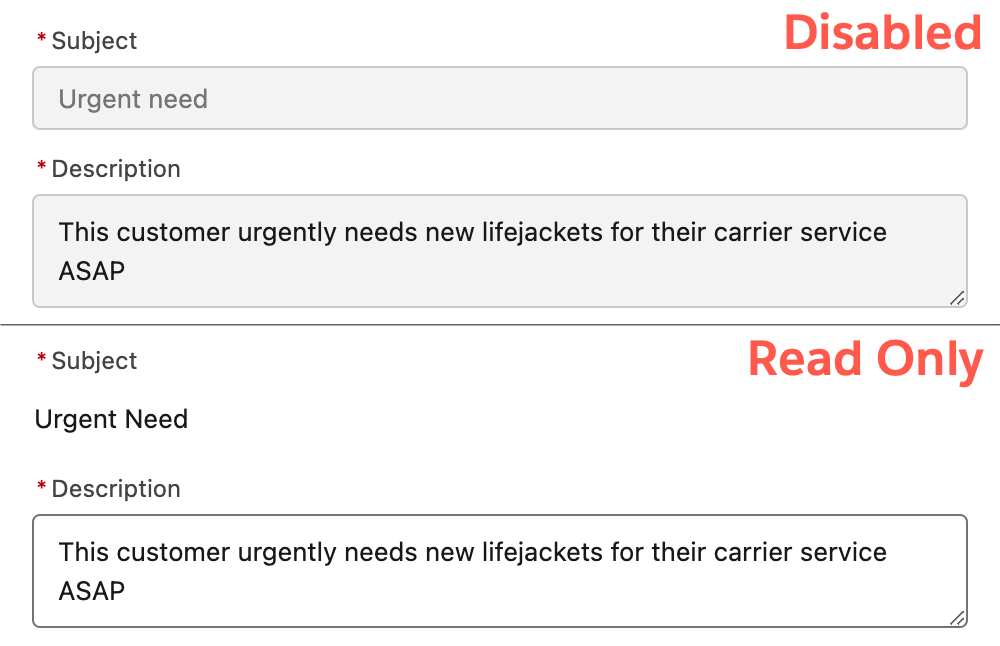
The Read Only option is similar to Disabled but has some notable differences. It has a different look on some components, but it also has different accessibility considerations; using the Tab key, you can navigate between read only fields, but not disabled fields. Try running this flow using the Read Only setting instead of Disabled for the Subject and Description.
Pre-Select a Picklist Value Reactively
Customers often use predictable language when they have urgent requests, so we can use that fact to reduce user clicks. Let’s create a formula that looks for specific words in the Subject field and sets Priority to High if it finds them.
- Click
 to display the Toolbox.
- Click New Resource.
- Select Formula to create a formula resource.
- For API Name, enter
DefaultPriority.
- For Data Type, select Text.
- For Formula, enter the following formula:
IF( OR( CONTAINS(LOWER({!Subject}),"urgent"), CONTAINS(LOWER({!Subject}),"cancel") ), "High", "Medium" ) - Click Done.
- For API Name, enter
- In the Get Case Details screen, select the Priority component.
- For Default Value, select DefaultPriority.
- Click Done.
- Save the flow.
Let’s go over that formula first. It looks for the words “urgent” or “cancel”. If it finds one of those words, the formula returns the text “High”; otherwise, it returns “Medium”. However, you can’t predict which letters will be upper and lower case (it could be “Urgent”, “URGENT”, or perhaps even “uRgEnT”), so use the LOWER function to look for the all-lowercase version of those words.
By placing this formula in the Priority component’s Default Value, it sets the “Medium” value when the screen loads, because the Subject field is empty. But as soon as “urgent” or “cancel” is present in the Subject field, the formula sees that and changes its value. The user doesn’t have to refresh the screen or click anything.
To check out this new functionality, click Run. Enter some text in the Subject field and see what happens when you include “urgent” or “cancel”.
Calculate a Date Reactively
When a support team member creates a case, the flow lets them set the Due Date field to any value. Pyroclastic’s guidelines say that support team members should base the due date on the case’s priority: low-priority cases get 18 days, medium-priority cases get 10 days, and high-priority cases get three days. Support team members can add up to four days to those timelines. Let’s set a default due date based on the Priority field’s value, and give users a simple, controlled way to adjust the due date on the screen.
- In the Get Case Details screen, drag Slider from the Components list to the screen canvas, between the Due Date field and the Confirmation checkbox.
- For API Name, enter
AdjustDueDate.
- For Label, enter
Adjust Due Date.
- For Range Maximum, enter
4.
- For Slider Size, enter
medium.
- Leave the other fields as their default values.
- For API Name, enter
- Click Done.
- In the Toolbox, click New Resource.
- Select Formula to create a formula resource.
- For API Name, enter
DefaultDueDate.
- For Data Type, select Date.
- For Formula, enter the following formula:
TODAY()
+CASE({!Priority},"High",3,"Medium",10,"Low",18,10)
+IF(
   ISNULL({!AdjustDueDate.value}),
   0,
   {!AdjustDueDate.value}
)
- Click Done.
- For API Name, enter
- In the Get Case Details screen, select the Due Date component.
- For Default Value, select DefaultDueDate.
- Click Done.
- Save the flow.
Let’s take a look at this new formula. The CASE function checks the selected priority, {!Priority}, and determines a number of days to add to today’s date. Then we add the number of days selected in the Adjust Due Date slider, {!AdjustDueDate.value}. But why put it inside an IF function?
This flow always loads with the Adjust Due Date slider set to 0. But slider components have a quirk: if their default value is 0, the flow's reactive components behave as if the value is null. That's a problem because Date screen components can't handle nulls, which causes this flow's Due Date component to load blank instead. To prevent that, we use the IF function to change a null to a zero.
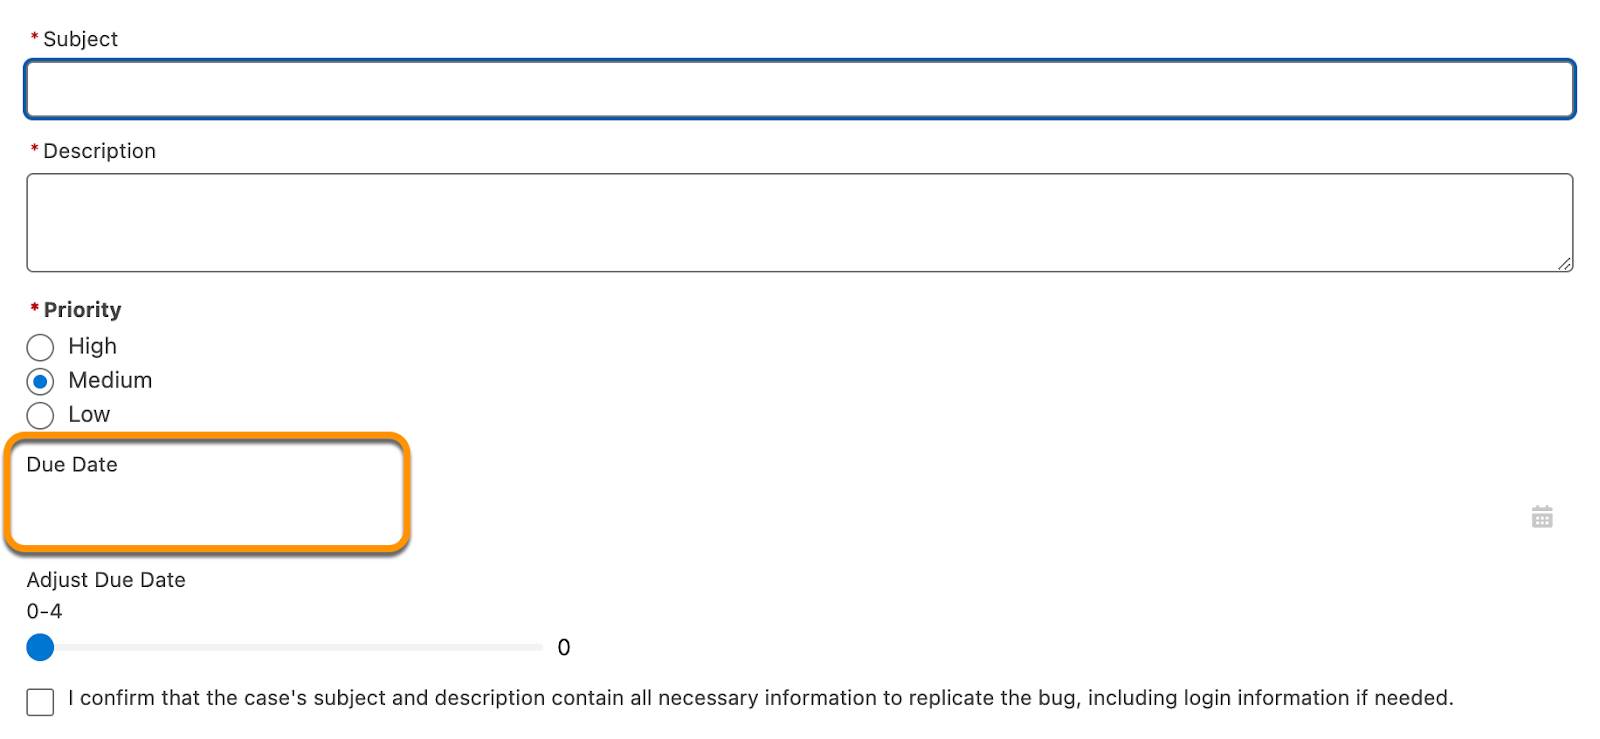
To prevent the Due Date from loading blank, tell the formula that when the slider’s value is null, it should instead return a “0” value. This IF function helps the formula and Due Date component to work as expected.
Click Run and check out the screen. Try changing the priority and adjusting the slider to see how it affects the Due Date.
Guide Users Reactively
Input validation is essential to protect your data (and to protect your users from themselves), but it doesn’t kick in until the user clicks to leave the current screen. With reactivity, you can save your users time and effort by letting them know about issues right away.
To do this, you use a reactive feature found on all flow screen components: conditional visibility. When you add conditional visibility to a component, the flow displays the component only when the conditions you specify are present. These conditions can reference almost anything in the flow, including other components on the same screen. The component vanishes or appears reactively according to the specified conditions.
On Pyroclastic’s support team, members are allowed to push a due date out by up to four days, but they must request approval for three or more days. Let’s add some reactive alerts that inform the user about approval requirements.
- In the Get Case Details screen, drag Display Text from the Components list to the screen canvas, between the Adjust Due Date slider and the Confirmation checkbox.
- For API Name, enter
WarningApproval.
- Copy this emoji ⚠️ and paste it in the text area. Make sure the emoji is a large size; 48 looks nice and big.
- After the emoji, enter
This due date requires approval from your supervisor.
- For API Name, enter
- Click Set Component Visibility.
- For When to Display Component, select All Conditions Are Met (AND).
- For Resource, select Get Case Details, then select Adjust Due Date, and then select Value.
- For Operator, select Greater Than or Equal.
- For Value, enter
3.
- For When to Display Component, select All Conditions Are Met (AND).
- Click Done in the popup.
The Display Text panel should look like this.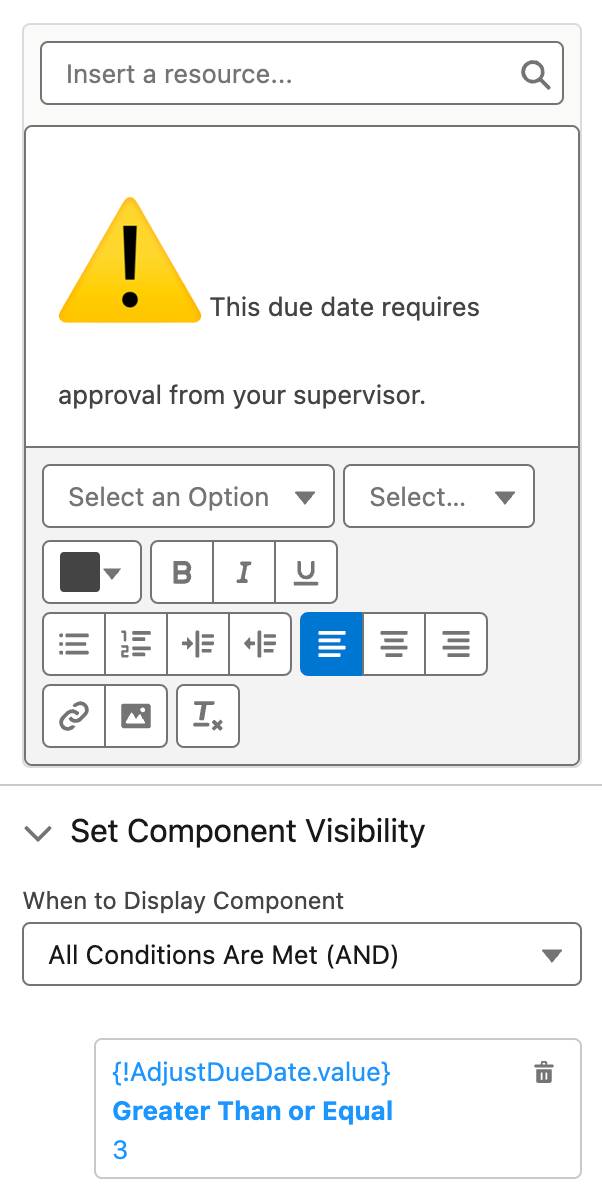
- Drag Display Text from the Components list to the screen canvas, between the WarningApproval component and the Confirmation checkbox.
- For API Name, enter
GreenNoApproval.
- Copy this emoji 👍 and paste it in the text area. This one should be a little smaller, around size 36 or so.
- After the image, enter
This due date doesn’t require approval.
- For API Name, enter
- Click Set Component Visibility.
- For When to Display Component, select Any Condition Is Met (OR).
- For Resource, select Get Case Details > Adjust Due Date > Value.
- For Operator, select Less Than.
- For Value, enter
3.
- For When to Display Component, select Any Condition Is Met (OR).
- Click Done in the popup.
- Click Add Condition.
- For Resource, select Get Case Details > Adjust Due Date > Value.
- For Operator, select Is Null.
- For Value, select True.
- For Resource, select Get Case Details > Adjust Due Date > Value.
- Click Done in the popup.
The Display Text panel should look like this.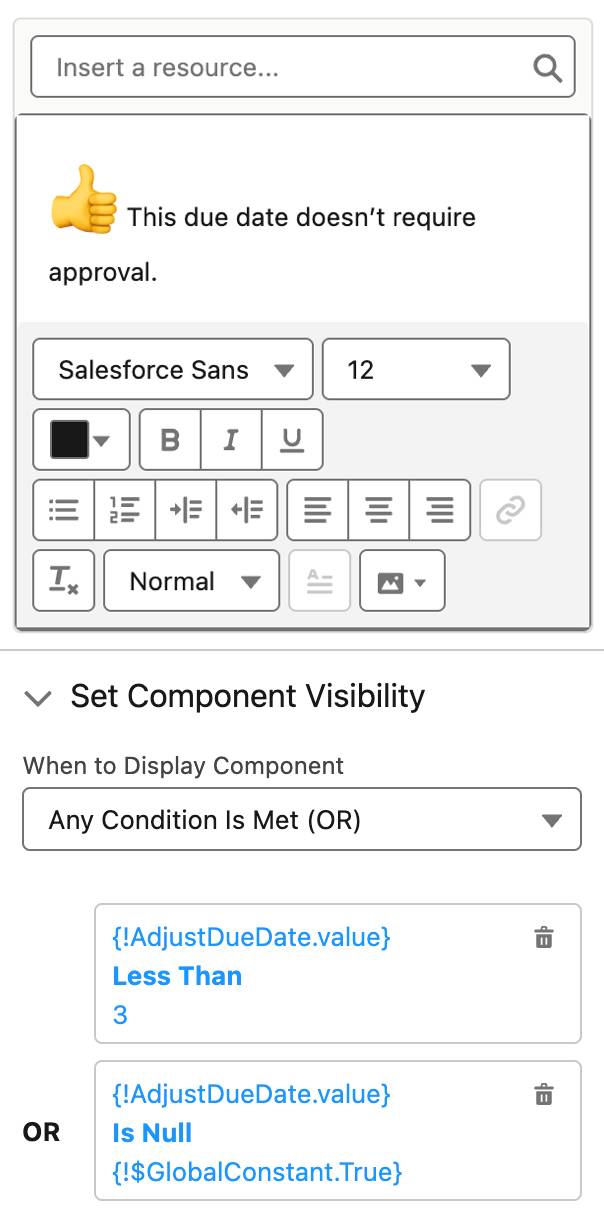
- Click Done to close the screen element.
- Save the flow.
There are now two Display Text components functioning as alerts, though the conditional visibility for each component ensures that only one component appears to users at any given time. The approval warning appears only if the Adjust Due Date slider adds three or more days to the due date, and the no-approval message appears only if the slider adds fewer than three days to the due date. And like the DefaultDueDate formula, we add a condition that looks for a null Adjust Due Date value, because that’s the same as 0. Otherwise, the no-approval message won’t appear when the user hasn’t moved the slider.
One more time, click Run and review the finished screen. The two components appear and disappear as you move the slider.
Now that you’ve seen reactivity in action, think about how you can use it to improve your org’s screen flows. Don’t be content with creating flows that work but are difficult to use; flow above and beyond, flow the extra mile!