Prepare and Deploy Enhanced Omni-Channel
Learning Objectives
After completing this unit, you'll be able to:
- Summarize the prerequisites and steps to activate Enhanced Omni-Channel Routing in Setup.
- Identify the channel upgrade requirements before enabling Enhanced Omni-Channel.
- Describe how reps and supervisors use Command Center for Service to manage work.
Bring It All Together
You've learned how Enhanced Omni-Channel routes work items using Server-Sent Events, explored queues, skills, and routing models, and now it’s go time. Let's activate it all—and hand your supervisors the tools they need to keep your contact center running smoothly.
This unit guides you through the prerequisites, the setup steps, and the supervisor tools you'll use after go-live.
Check Off These Prep Steps
Before you turn on Enhanced Omni-Channel Routing, here's what you need to check off your list.
-
Schedule an offline activation window: Start your Enhanced Omni-Channel activation when reps are offline. A mid-shift enablement means reps in mid-conversation need to refresh and log back in.
-
Confirm whether Enhanced Omni-Channel is already active: Go to Setup | Omni-Channel Settings and check the Enhanced Omni-Channel Routing toggle. Orgs created after Summer ’23 have it enabled by default.
- If Enhanced Omni-Channel Routing is already on, you can skip to the Set Up Command Center for Service section.
- If it's off, continue with the Activate Enhanced Omni-Channel Routing section.
- If Enhanced Omni-Channel Routing is already on, you can skip to the Set Up Command Center for Service section.
-
Allowlist the SSE domain on your network: Enhanced Omni-Channel connects AI agents to work through a new domain:
*.salesforce-scrt.com. If your organization uses a corporate network or VPN with domain restrictions, this domain must be added to the allow list before you go live. Service reps or AI agents on restricted networks won't receive any Omni-Channel work if this step is skipped.

Activate Enhanced Omni-Channel Routing
These steps depend on whether you’re turning on Omni-Channel for the first time or upgrading from Standard Omni-Channel.
If Omni-Channel has never been set up:
- Go to Setup.
- In the Quick Find box, enter
Omni-Channel Settingsand select it.
- Select Enable Omni-Channel.
- Select Save.
If Standard Omni-Channel is already active (upgrade):
- Go to Setup.
- In the Quick Find box, enter
Omni-Channel Settingsand select it.
- Turn on Enhanced Omni-Channel Routing. (The Enable Omni-Channel checkbox is already checked.)
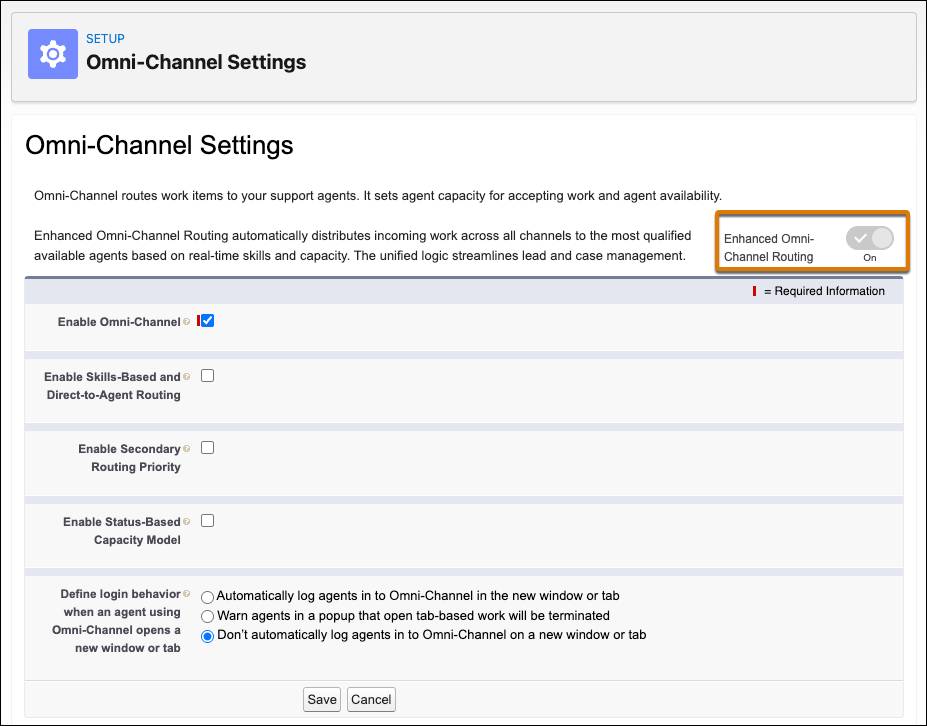
- Select Save.
Refresh to Get Started
Regardless of your scenario, be sure that:
- Reps refresh their browsers and log back in to the Omni-Channel widget.
- Supervisors refresh the Command Center for Service to pick up the new routing connection.
 ) and select Salesforce Go.
Set Up Command Center for Service
Command Center for Service is your mission control for Enhanced Omni-Channel. It gives supervisors real-time visibility into:
- Active queues and wait times
- Rep availability and current workload
- Bottlenecks across channels
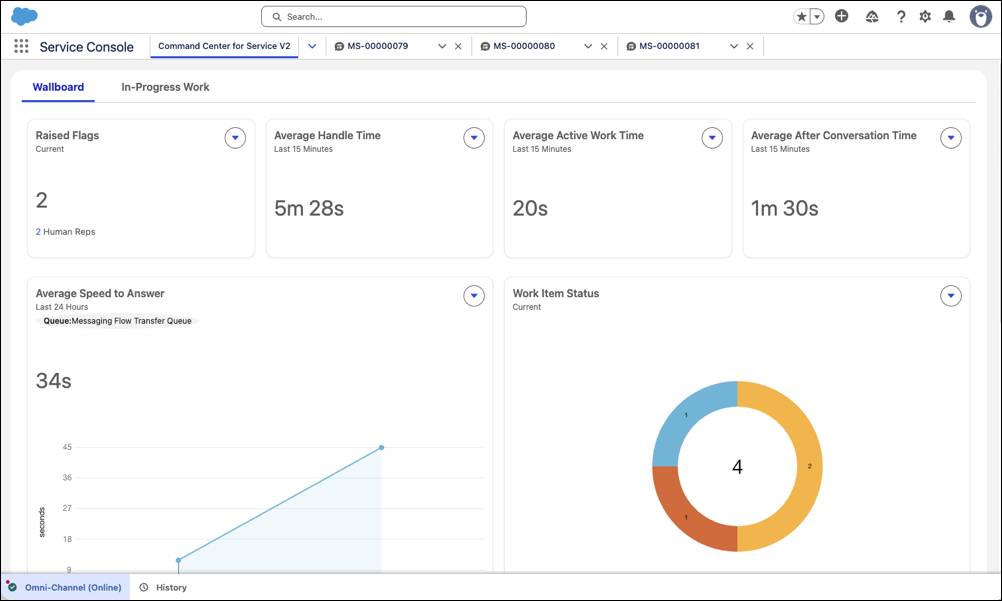
Whether you’re upgrading from Standard Omni-Channel or setting up for the first time, add Command Center as a navigation item in a Lightning app so supervisors can access it.
Add Command Center for Service and the Omni-Channel Sidebar to a Lightning App
Activate the Omni-Channel sidebar, which service reps use to receive work. Then add Command Center for Service—which supervisors use to monitor the team—as a navigation item. Most orgs configure a single app that both service reps and supervisors use.
- Go to Setup.
- In the Quick Find box, enter
Apps, and then select Apps Manager.
- Find the Lightning app you want to add Command Center to (for example, Service Console), select the dropdown next to it, then select Edit.
- Under App Options, select Use Omni-Channel sidebar.
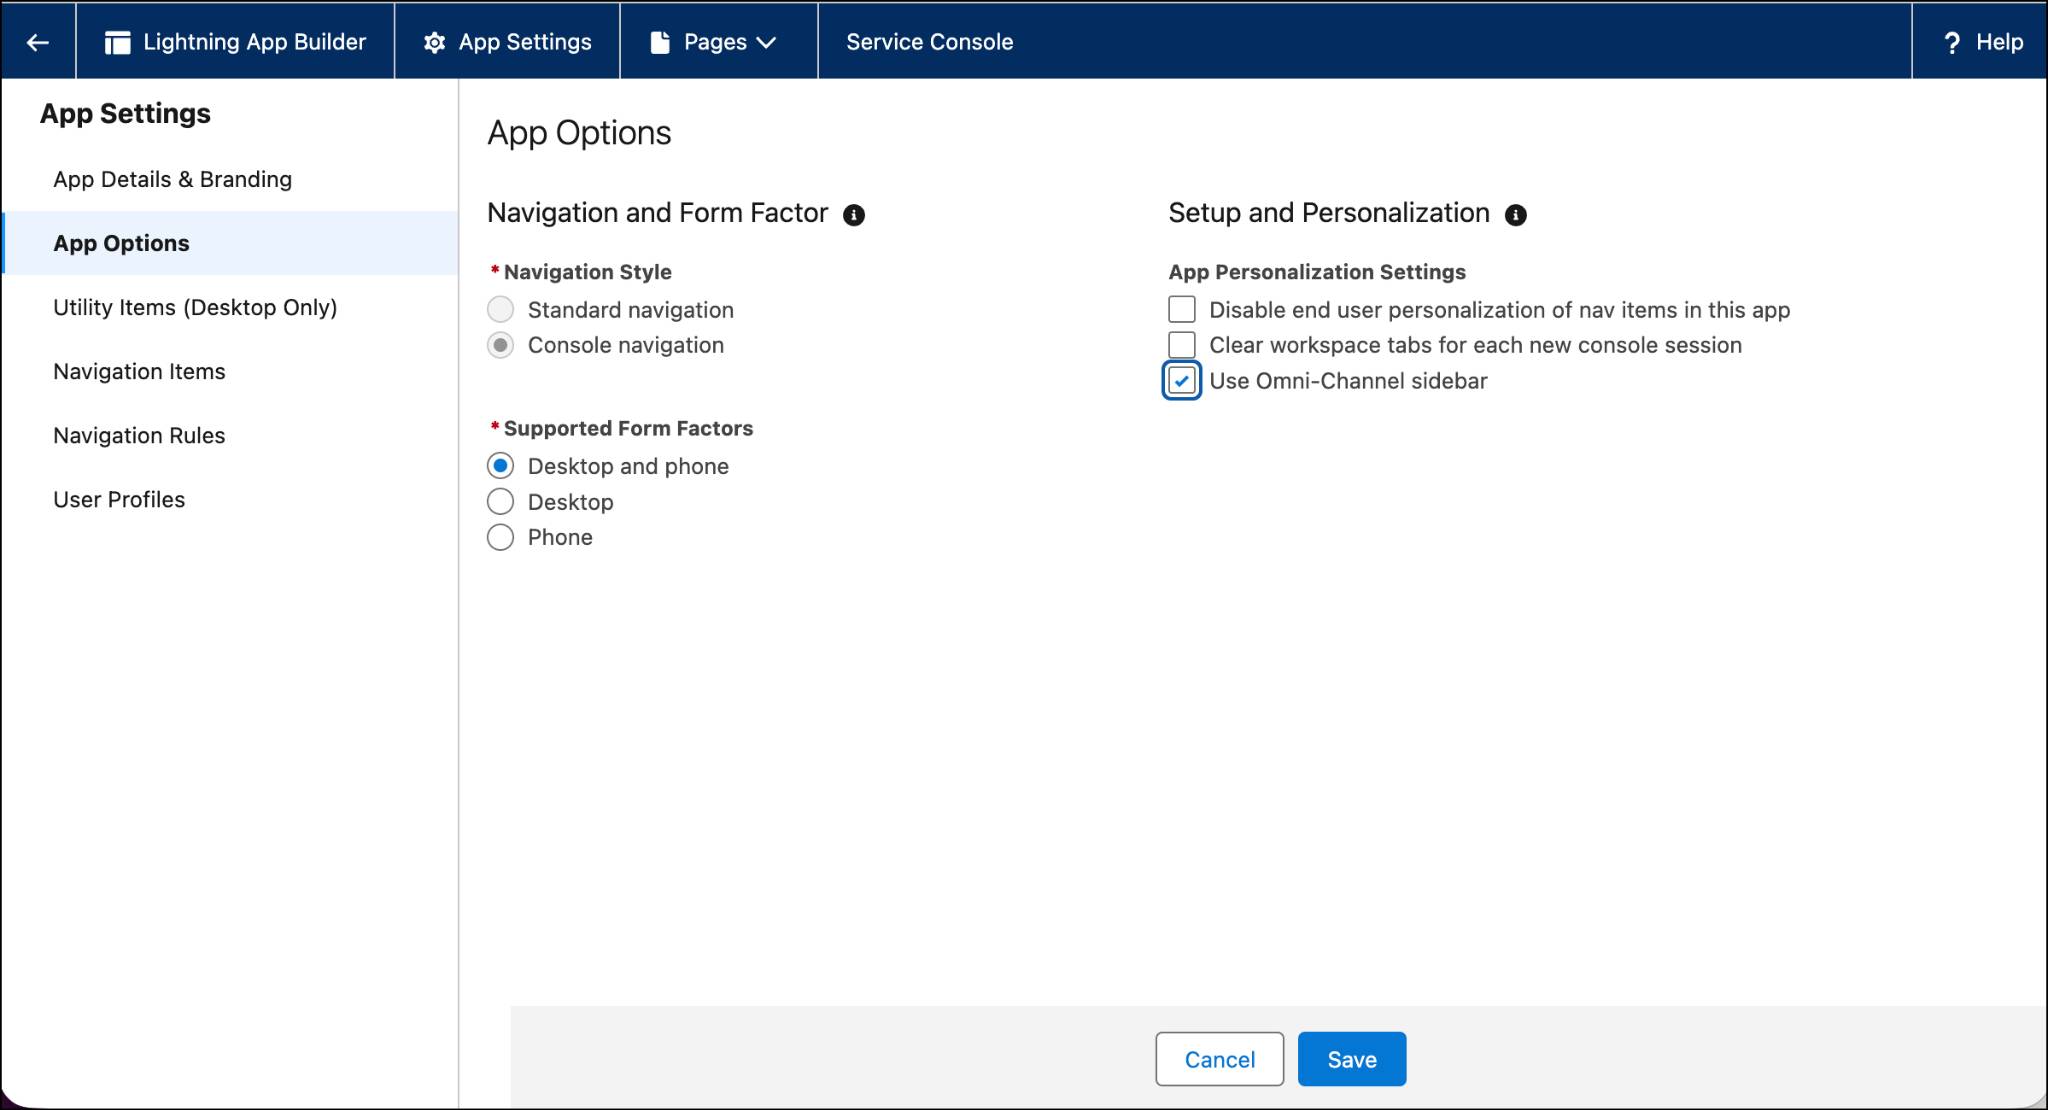
- Under Utility Items, make sure Omni-Channel is present. If it's not there, select Add Utility Item | Omni-Channel. Service reps need this utility to receive work.
- Under Navigation Items, move Command Center for Service from Available Items to Selected Items.
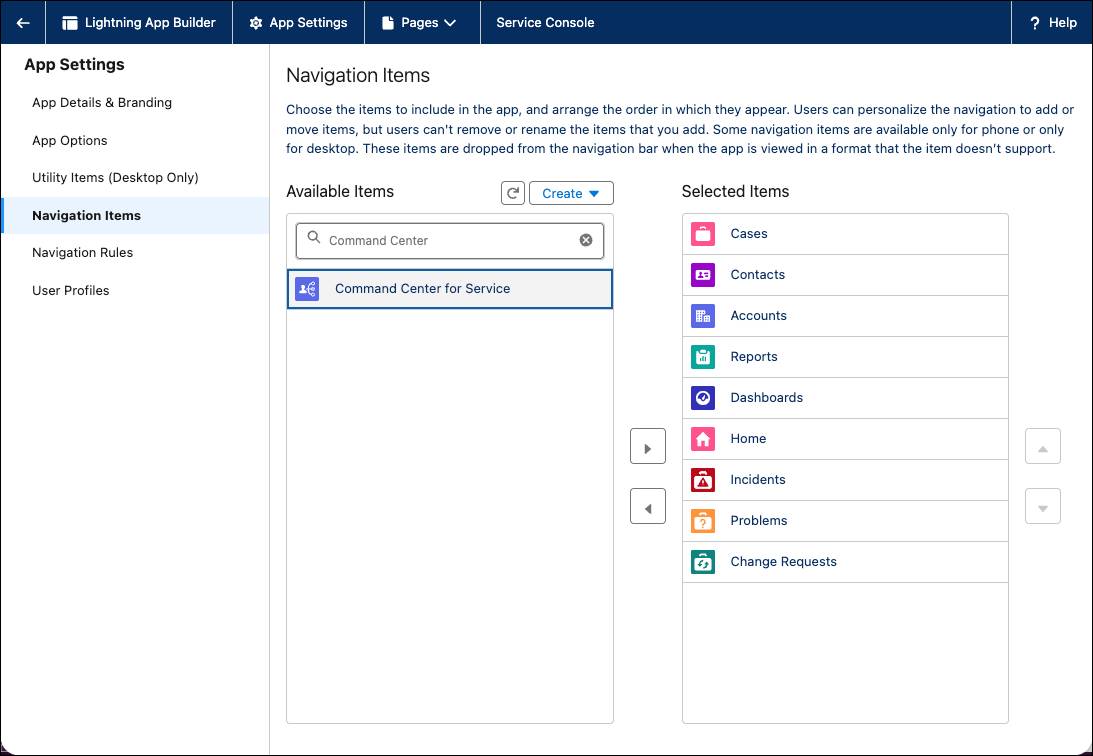
- Under User Profiles, select the profiles that should have access to this app. Users must have tab visibility to access Command Center.
- Select Save.
To verify, open the app and check that:
- Command Center for Service appears in your navigation tabs.
- The Omni-Channel sidebar is visible.
- If you set up Command Center for Service V2, your custom page is activated and visible after supervisors add the tab as a navigation option.
Set Up the Reassign Dropdown
The Reassign dropdown lets service reps and supervisors transfer work directly from a record page—a major workflow improvement from Standard Omni-Channel. Whether you’re upgrading or setting up for the first time, you need to add the dropdown to your page layouts and set a default routing configuration on your service channels.
Reps can reassign work to:
- A rep
- An AI agent
- A queue
- One or more skills
- An Omni-Channel flow
Add the Reassign Dropdown to a Page Layout
To let reps reassign work directly from a record page, such as a case:
- Go to Setup.
- In the Quick Find box, enter
Object Manager, then select the object you want to add the dropdown to, for example, Case.
- Select Page Layouts.
- Select the page layout you want to edit, for example, Case Page Layouts.
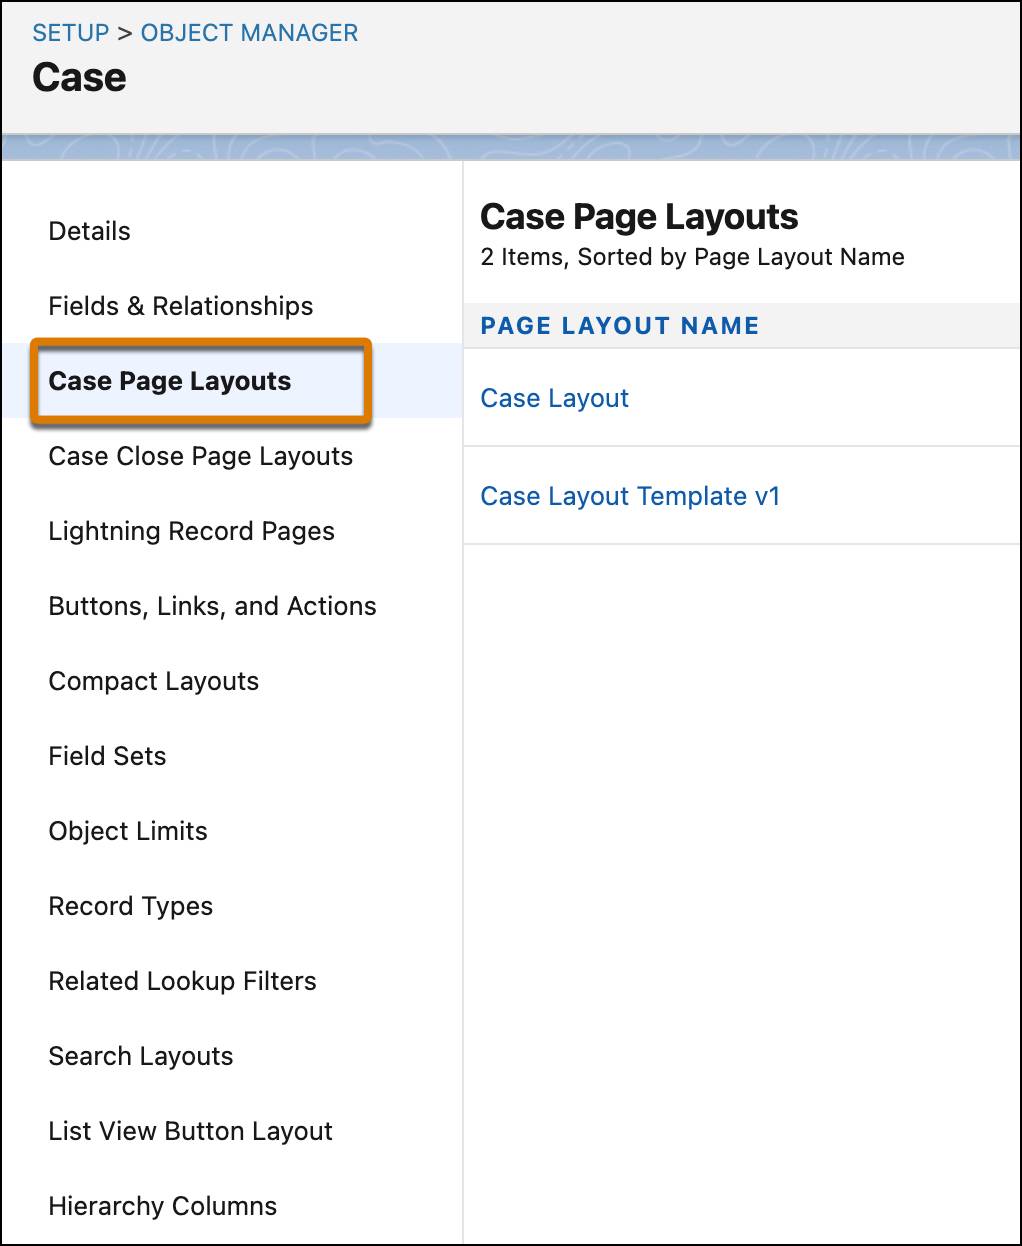
- In the Mobile & Lightning Actions section, drag the Reassign action on to the Salesforce Mobile and Lightning Experience Actions section of the page layout.
- Select Save.
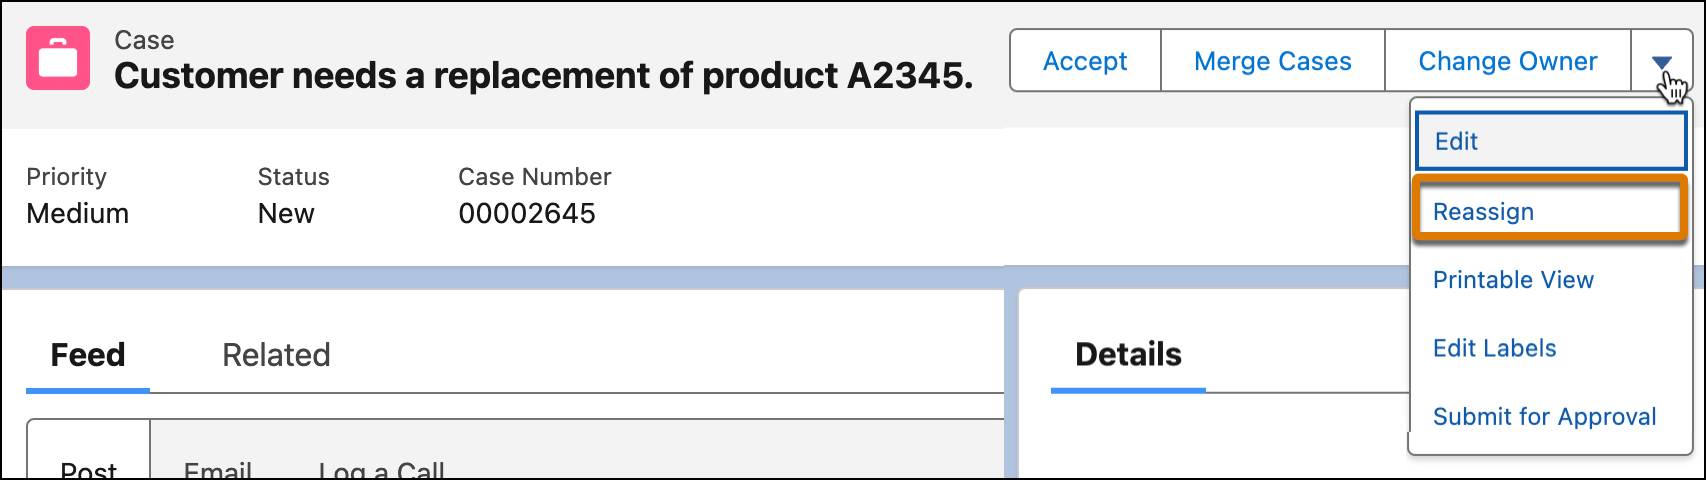
The Reassign action appears in the object page.
Set a Default Routing Configuration
The Reassign dropdown uses your service channel’s default routing configuration in specific routing scenarios. To set this up:
- Go to Setup.
- In the Quick Find box, enter
Service Channels, then select it.
- Open the service channel you want to configure, for example, Case or Messaging.
- Under Default Routing Configuration, select a routing configuration from the dropdown.
- Select Save.
Once the button is set up, reps select Reassign from any active work record and select a reassignment target. The button appears in the actions menu on any record page where you added it.
Monitor Your Contact Center After Go-Live
It's the morning after go-live. Enhanced Omni-Channel is live, work is flowing, and your supervisors are watching it all happen in the Command Center for Service. Here's what they see in real time.
-
Wallboard tab: Queue health, work item status, wait times, and rep capacity
-
Service Reps tab: Individual rep status, current workload, and availability
-
Queues Backlog tab: Work items waiting in queues, sorted by priority
-
In-Progress Work tab: Active work across all reps and AI agents
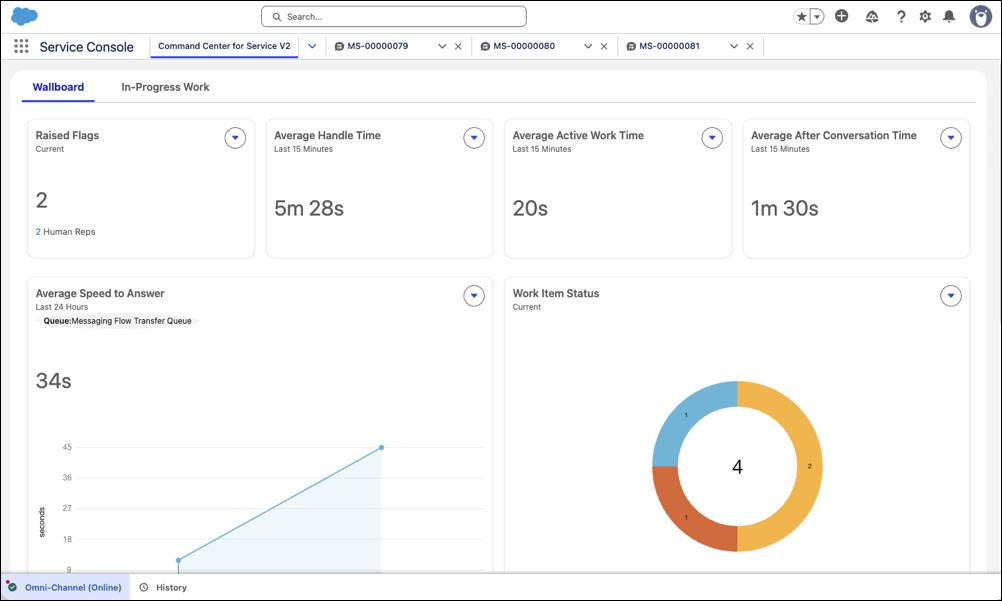
Supervisors open Command Center from the app navigation. Reps use the Reassign dropdown to transfer work when needed—it’s in the actions menu on any record page where you added it.
Wrap It Up
You've covered a lot of information in this badge—nice work!
You've gone from “What’s Enhanced Omni-Channel?” to deployment-ready in three units. You understand the SSE architecture that powers real-time routing, you can optimize assignments with queues and skills, and you know how to manage your contact center with Command Center for Service. Time to put it all into action.
Your next step is to put these skills to work in a broader Agentforce Service context. Check out the Meet Agentforce Contact Center trail to explore what Enhanced Omni-Channel unlocks for AI-assisted service.