Build and Test Recommenders
Learning Objectives
After completing this unit, you’ll be able to:
- Create a rule-based recommender.
- Create an objective-based recommender.
- Simulate a recommender.
Put Strategy to Work
So far, you’ve explored the two types of recommenders and when to use each one. Now it’s time to put that knowledge into practice and build your own recommenders.
Cloud Kicks wants to configure two recommendation strategies to power personalized experiences across its website and mobile app.
- A Top Sellers recommender for new visitors, surfacing the most popular sneakers to shoppers who are still getting to know the brand.
- A Maximize Revenue recommender for returning customers using AI to surface the sneakers each individual shopper is most likely to buy based on their history and behavior.
Sign Up for a Developer Edition with Data 360
Follow along with Linda as she builds both recommenders. But first, set up your own Salesforce org.
- Click Create Playground.
- Your new org is automatically attached to your Trailhead account.
- Make note of your org’s expiration date and complete this badge before then.
To complete this challenge, you need a special, limited-time custom playground that contains Data 360 and Marketing Cloud Next.
Set Up Your Org
Before you can build recommendations, your org needs two things: a web connector to capture site activity, and a data kit to bring in the product data. Let's set those up now.
Create a Web Connector
A web connector links your website to Data Cloud so Personalization can capture visitor activity. Follow these steps to create one.
- Select
 and select Data Cloud Setup from the dropdown list. This opens the Data Cloud setup page in a separate tab.
- In the Quick Find box, search for and select Websites & Mobile Apps.
- Select New Connection.

- Add the details:
- Connection Name:
Training - What are you connecting to: A Custom Website
- Connection Name:
-
Save your changes.
Your web connector is ready. Now let’s install the data kit.
Install the Data Kit
With your connector in place, install the data kit package into your org.
- In a new browser tab, enter your Trailhead Playground URL followed by
/packagingSetupUI/ipLanding.app?apvId=04ta500000E4MUv. Your final URL looks something like this: https://your-playground-domain.develop.lightning.force.com/packagingSetupUI/ipLanding.app?apvId=04ta500000E4MUv.
- On the installation page, select Rename conflicting components in package.
- Select Install for All Users, then click Install.

- Once the installation is complete, select Done.
The package is installed. Next, deploy it so Data Cloud can use it.
Get the Org ID
- Select Home on the Data Cloud Setup page.
- In the section Your Home Org Details, copy the Home Org ID.

You will need this ID to deploy the data kit.
Deploy Data Kit
Now that the package is installed, deploy the data kit to make it available in Data Cloud.
- In your org, navigate to the Data Cloud Setup.
- In the Quick Find box, search for and select Data Kits.
- From the list of available data kits, select sprecsv2.
- Select Data Kit Deploy and specify these details.
- Select web2 and select Training for Connector Name.
- For crm1, enter org id from the previous step.
- Select Training_Products2, and confirm Product is selected for Primary DMO.
- Select RT_Profile1, and confirm Unified Individual thr is selected for Primary DMO.
- Select web2 and select Training for Connector Name.
- Select Deploy. Deployment takes around 10 to 15 minutes.

- You see a confirmation message appear that says, The sprecsv2 data kit deployment was triggered.
- Refresh the browser and click the Deployment History tab to verify the status. Wait until the Deployment Status is Successful for all the items before proceeding.

Your org is fully set up with the connector and data kit. You're ready to start building your first recommender.
Update Data Graph
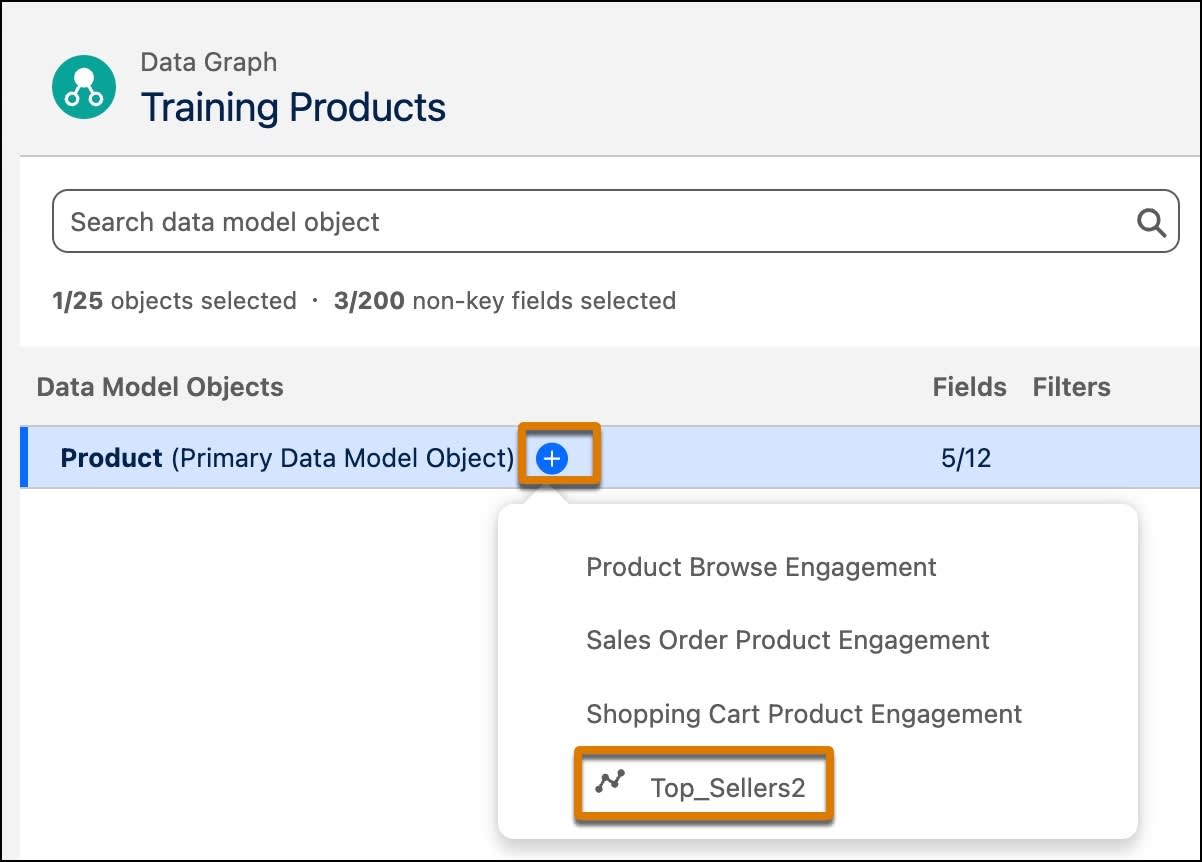
Before building the rules-based Top Sellers recommender, you need to update the Training Products data graph to include the Top Sellers calculated insight.
- From the App Launcher (
 ), find and select Personalization.
- From the navigation bar, select Data Graphs.
- For Training Products, select Edit from the drop down.

- Select + and then select Top_Sellers2.
- Select Save and Build.
- Leave the default value for Refresh Interval.
- Select Save and Build again.
Once the build completes, the Training Products data graph will include the Top Sellers total sold units calculated insight.
Create a Rule Based Recommender
To help new shoppers discover popular products, Cloud Kicks wants to add a Top Sellers recommendation carousel to its homepage. Linda starts with a rule-based recommender that is based off of historical purchase data. This recommender uses a Calculated Insight from the Item Data Graph to rank and return items. In this case, Linda uses the Top Sellers Calculated Insight, which ranks sneakers by total units sold. Follow along.
- From the App Launcher (
 ), find and select Personalization.
- From the navigation bar, select Recommenders and select New.
- Add these details:
- Profile Data Graph: RT Profile
- Item Data Graph: Training Products
- Recommender Name:
Cloud Kicks Top Sellers
- Recommender API Name: Auto-populated

- Profile Data Graph: RT Profile
- Select Next.
- Select Rule-Based Recommendations and select Next.
- In the Rule-Based Recommender Configuration page, add details:
- Data Graph Resource: Calculated Insights > Top_Sellers2 > TotalSoldUnits
- Sort Order: Descending
- Data Graph Resource: Calculated Insights > Top_Sellers2 > TotalSoldUnits
- Select Next.
- To apply an Include filter click + Add Condition and add:
- Item Data Graph Resource: Calculated Insights > Top_Sellers2 > TotalSoldUnits
- Filter Type: Static
- Operator: Is Greater Than
- Value:
100
- Item Data Graph Resource: Calculated Insights > Top_Sellers2 > TotalSoldUnits
- Select Next.
- Select Save & Exit.
The new recommender is active now to provide a ranked list of Cloud Kicks’s most popular products, ready to serve to any new visitor on the homepage.
Other Rule-Based Strategies
Rule-based recommenders aren't just for top sellers. Here are other common strategies Linda can configure for Cloud Kicks:
-
Recently Viewed: Surfaces items the shopper viewed in recent sessions, using a Profile Data Graph Filter to pull their browse history. Great for reengaging shoppers who didn't convert on their first visit.
-
Co-Buy: Recommends products that are frequently purchased together, using a Calculated Insight that tracks co-purchase frequency. Ideal for cart pages or post-purchase upsell.
-
Co-Browse: Surfaces products that other shoppers commonly view together in the same session, powered by a co-browse Calculated Insight. Useful for product display pages.
Always choose the strategy that best aligns with your business goals.
Create an Objective Based Recommender
With the Top Sellers recommender in place for new visitors, Linda now wants to go further for returning customers. Instead of applying a fixed rule, she wants the platform to figure out which sneakers each individual shopper is most likely to buy—based on their unique history and behavior.Salesforce Personalization includes several standard out of the box objectives.
Objective |
What It Optimizes For |
|---|---|
Maximize Revenue |
Surfaces items most likely to result in a purchase with high order value |
Maximize Clicks |
Surfaces items most likely to be clicked |
Maximize Revenue with Promotions |
Surfaces the best promotional offers for each customer to maximize revenue |
While these standard objectives are powerful, Linda wants to create a custom objective for Cloud Kicks to get more granular control over which engagement metrics the model optimizes for.
Follow along to create a maximize revenue recommender.
- From the App Launcher (
 ), find and select Personalization.
- From the navigation bar, select Recommenders and select New.
- Add these details:
- Profile Data Graph: RT Profile
- Item Data Graph: Training Products
- Recommender Name:
Cloud Kicks Maximize Revenue - Recommender API Name: Auto-populated

- Profile Data Graph: RT Profile
- Select Next.
- Select Objective-Based Recommendations and select Next.
- Select New objective and add below fields:
- Objective Name:
Max Rev - API Name: Autopopulates with Max_Rev
- Recommender Purpose: Maximize
- Engagement Signal Metric: [Purchase Event] Revenue
- Objective Name:
- Select Next.
- For Engagement Signals, select all three engagement signals Cart Event, View Event, Purchase Event from the drop down menu.

- Select Next.
- To apply an Include filter, select + Add Condition and add:
- Item Data Graph Resource: Direct Attributes > Product Id
- Filter Type: Decision Context
- Operator: Match Any
- Decision Context Resource: Direct Attributes > Product Id

- Item Data Graph Resource: Direct Attributes > Product Id
- Select Next.
- Select Save & Exit.
If the standard objectives don't match your business goal, you can define a custom objective based on engagement signals and their associated metrics. An engagement signal represents the customer action you want to track, such as clicking a product recommendation, adding an item to a wishlist, or submitting a form. The engagement signal metric defines how to measure that action, for example, by counting clicks or summing the total value of items added to a wishlist. Once these are set up, your custom objective appears alongside standard options when creating an objective-based recommender.

For example, Linda can create a maximize wishlist adds objective by tracking wishlist activity on Cloud Kicks’s website, letting the model learn which products each shopper is most likely to save and surface those first.
Simulate the Recommender
Before deploying a recommender to production, Linda validates that it returns the expected results. The Recommender Simulator lets you preview recommendations before publishing. By specifying a sample recipient, you can see exactly what items the recommender will return for that specific user. To validate a recommender, choose Simulate from the quick action menu, and then select a sample recipient from your Data 360 organization to preview the ranked results.
The simulator returns the full recommendation response. Simulating lets you catch issues before they reach customers, for example, if the filter logic is too strict and returns no results, or if the wrong products are surfacing.
Next Up
In this unit, you built a rules-based and objective based recommender. Follow Linda in the next unit to deploy this recommender across channels.
To pass the challenge and move on to the next unit, make sure to select Check Challenge to Earn Points.