Create an Experience Builder Site
What You’ll Learn
In this project, you’ll learn how to:
- Create a basic Experience Builder site.
- Create a theme layout component.
- Add a company logo.
- Build a vertical navigation menu.
- Build a custom search component.
- Add configuration properties to the theme layout component.
Introduction
Get Cloudy Consulting is a Salesforce SI partner that specializes in building custom Experience Cloud implementations for their clients. Cloud Kicks, one of their main customers, wants to create a branded site with:
- A side navigation menu
- A custom search feature that searches accounts, contacts, and leads
- A headerless layout
A custom theme layout component is the best way to give Cloud Kicks exactly what they want, because it can alter the structure of an Experience Builder template and override its default styles.
Using the code samples in this project, you’ll create the skeleton structure for a custom theme layout component for Cloud Kicks, which uses a side navigation menu and a custom search component, and removes the header entirely.
How Do Custom Theme Layout Components Work?
A theme layout component defines the top-level layout for the template pages (1) in your Experience Builder site. It includes the common header and footer (2), and often includes navigation, search, and the user profile menu. In contrast, the content layout (3) defines the content regions of your pages, such as a two-column layout.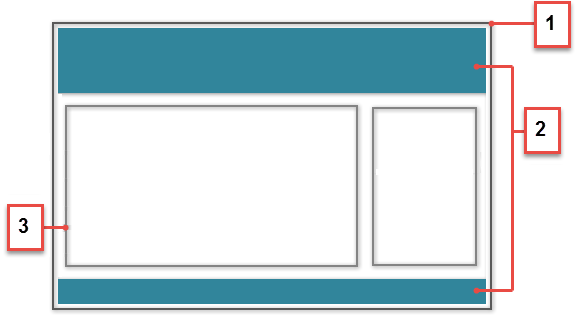
Each Experience Builder template includes theme layout components that control the layout of its pages. However, you can override a template’s default structure by creating a custom Lightning component in the Developer Console, which implements the forceCommunity:themeLayout interface.
To use the custom Lightning component in your pages, you must assign your component to a theme layout in Experience Builder. Then you apply the theme layout—and thereby the associated component—in each page’s properties.
For example, the Customer Service template includes the following theme layouts and associated Lightning components.
-
Default applies the Customer Service component to all pages, except the login pages.
-
Login applies the Login Body Layout component to the login pages.

Curious why Experience Builder doesn’t let you assign your custom Lightning component directly to a page? A key benefit of this arrangement is that you can instantly update the structure of every page that a theme layout applies to by simply swapping the Lightning component that’s associated with the theme layout. Because who wants to waste time updating every...single...page when your site needs a quick refresh?
Example
Let’s say you create three pages for your upcoming Spring campaign and you want to include a large header at the top to make a big splash. Using the forceCommunity:themeLayout interface, you create a custom theme layout component called Large Header in the Developer Console. Then in the Settings | Theme | Configure area of Experience Builder, you create a new theme layout called Spring and assign the Large Header component to it.
Next, you select the Spring theme layout in each page’s properties, which instantly applies the Large Header component to the pages of your Spring campaign.

Everything looks rosy until the VP of marketing decides that the header takes up too much room. That’s an easy fix, however, because you don’t have to update the properties of each page again to change the theme layout component. Instead, in the Theme area, you can replace the Large Header component in the Spring theme layout with a Small Header component, and instantly update all three pages!
Launch Your Trailhead Playground
To complete this project, you need a free Trailhead Playground. You can find it at the bottom of this page. Click Launch to open the Trailhead Playground in a new browser tab (login required).
It typically takes 3–4 minutes from the time you first sign up for Trailhead to create your Trailhead Playground.
Create a Basic Experience Builder Site
OK, first things first—let’s get started by turning on digital experiences.
- From Setup, enter
Digital Experiencesin the Quick Find box, then select Settings.
- Select Enable Digital Experiences. Your digital experiences domain is shown. It includes your My Domain name in the format MyDomainName.my.site.com for production orgs.
- Click Save.
Now let’s set up a basic site. You should have been redirected to the All Sites page in Setup, but if not, enter Digital Experiences in the Quick Find box, then select All Sites.
- Click New. The Creation wizard appears with different template options for you to choose from.
- Select the Customer Service template. (You can use any Experience Builder template with custom theme layout components, but for this project, stick to Customer Service.)
- Click Get Started.
- Enter a site name and URL. Name the site
CloudKicksThemeand ensure that the final URL end with /CloudKicksTheme.
- Click Create. Your site has been created in Preview status, which means that what you’ve created so far isn’t in the world yet.
Take a quick look around. This area is Experience Workspaces, where you customize and administer your site. There are many additional features that you typically need to configure in a site, but for our purposes, we can dive right into the code for our custom theme layout. Onward!