Create a Candidate Rating Flow
Right now, the AW Computing hiring managers have to manually input a number when they rate candidates. Ling Wu wants this process to be more user friendly, with radio buttons.
To set this up for her, create a flow. Flows, which you build using Flow Builder, automate business processes by executing logic, interacting with the Salesforce database, and collecting data from users.
Create Radio Buttons for Experience
Begin creating the flow.
- Click the App Launcher (
 ).
).
- In the Search apps and items box, enter
autoand then select Automation.
- In the Flows panel, click New.
- Under Frequently Used, select Screen Flow.
- On the Canvas, change the Auto-Layout setting to Free-Form.
- Add a screen element to prompt for the Review information by dragging Screen from the palette onto the flow window.
- For Label, enter
New Review.
Now add radio button choices to rate a candidate on a scale of 1 (poor) to 5 (excellent) for Experience, along with a text box for comments.
- Click Radio Buttons from the Input section of the palette on the left.
- Enter
Experiencein the Label field. (The API Name field will default.)
- Set the Data Type to Number.
- Click inside the Choice field, select +New Choice Resource, select Choice as the Resource Type, and fill in the details.
- API Name:
Excellent - Choice Label:
Excellent - Data Type: Number
- Choice Value:
5
- API Name:

- Click Done.
- Click +Add Choice four times.
- Click inside the second Choice field and select +New Choice Resource.
- Select Choice as the Resource Type, and fill in the details.
- API Name:
VeryGood - Choice Label:
Very Good - Data Type: Number
- Choice Value:
4
- API Name:
- Click Done.
- Click inside the third Choice field and select +New Choice Resource.
- Select Choice as the Resource Type, and fill in the details.
- API Name:
Average - Choice Label:
Average - Data Type: Number
- Choice Value:
3
- API Name:
- Click Done.
- Click inside the fourth Choice field and select +New Choice Resource.
- Select Choice as the Resource Type, and fill in the details.
- API Name:
BelowAverage - Choice Label:
Below Average - Data Type: Number
- Choice Value:
2
- API Name:
- Click Done.
- Click inside the fifth Choice field and select +New Choice Resource.
- Select Choice as the Resource Type, and fill in the details.
- API Name:
Poor - Choice Label:
Poor - Data Type: Number
- Choice Value:
1
- API Name:
- Click Done.
- Click Text from the Input section of the palette on the left.
- For Label, enter
Experience Comments. (The API Name field will default.)
You’ve got your first set of radio buttons, but don’t click Done on the screen just yet.
Create Radio Buttons for Leadership Skills
Now that radio buttons and text screen elements for Experience are added to the flow, repeat the process for Leadership Skills.
- Click Radio Buttons from the Input section of the palette on the left.
- For Label, enter
Leadership Skills. (The API Name field will default.)
- Set the Data Type to Number.
- Click into the Choice field and select Excellent.
- Click +Add Choice four times.
- Repeat step 4 to add Very Good, Average, Below Average, and Poor to the Choice fields.
- Click Text from the Input section of the palette on the left.
- For Label, enter
Leadership Skills Comments. (The API Name field will default.)
There’s one more set of radio buttons to add—don’t click Done yet.
Create Radio Buttons for Core Competencies
Repeat the process once more for Core Competencies.
- Click Radio Buttons from the Input section of the palette on the left.
- For Label, enter
Core Competencies.
- Set the Data Type to Number.
- Click into the Choice field and select Excellent.
- Click +Add Choice four times.
- Repeat step 4 to add Very Good, Average, Below Average, and Poor to the Choice fields.
- Click Text from the Input section of the palette on the left.
- For Label, enter
Core Competencies Comments. (The API Name field will default.)
Add Screen Elements
Finally, add screen elements to the flow to create a checkbox and textbox so recruiters can recommend a candidate for hire.
- Click Checkbox from the Input section of the palette on the left.
- For Label, enter
Recommend for Hire. (API Name field will default.)
- Click Text from the Input section of the palette on the left.
- For Label, enter
Reason Recommended. (API Name field will default.)
- Click Done to close the screen.
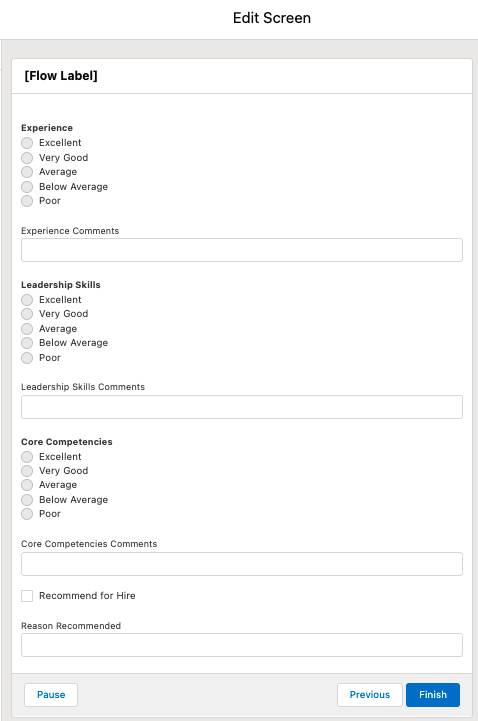
Your New Review window should look like this. You can double-click the Screen element to see the details and edit the Screen.
Set a Start Element
Now that you’ve created the flow, set its start element.
Connect the Start element to the New Review Screen element by clicking and holding the Start circle and then dragging your cursor to the New Review element. The two elements should connect with a solid line.
Next add a Create Records element to the flow.
- Drag the Create Records element from the palette onto the flow window.
- For Label, enter
createReview, and let the API name default.
- For How to set record field values, select Manually.
- For Object, select Review.
- Under Set Field Values for the Review, for Field, select Job Application.
- For Value, select +New Resource and fill in the information.
- Resource Type: Variable
- API Name:
varJobAppId - Data Type: Text
- Available for input: Select
- Available for output: Select
- Resource Type: Variable
- Click Done.
- Confirm that the Value that aligns with the Job Application field now contains varJobAppId.
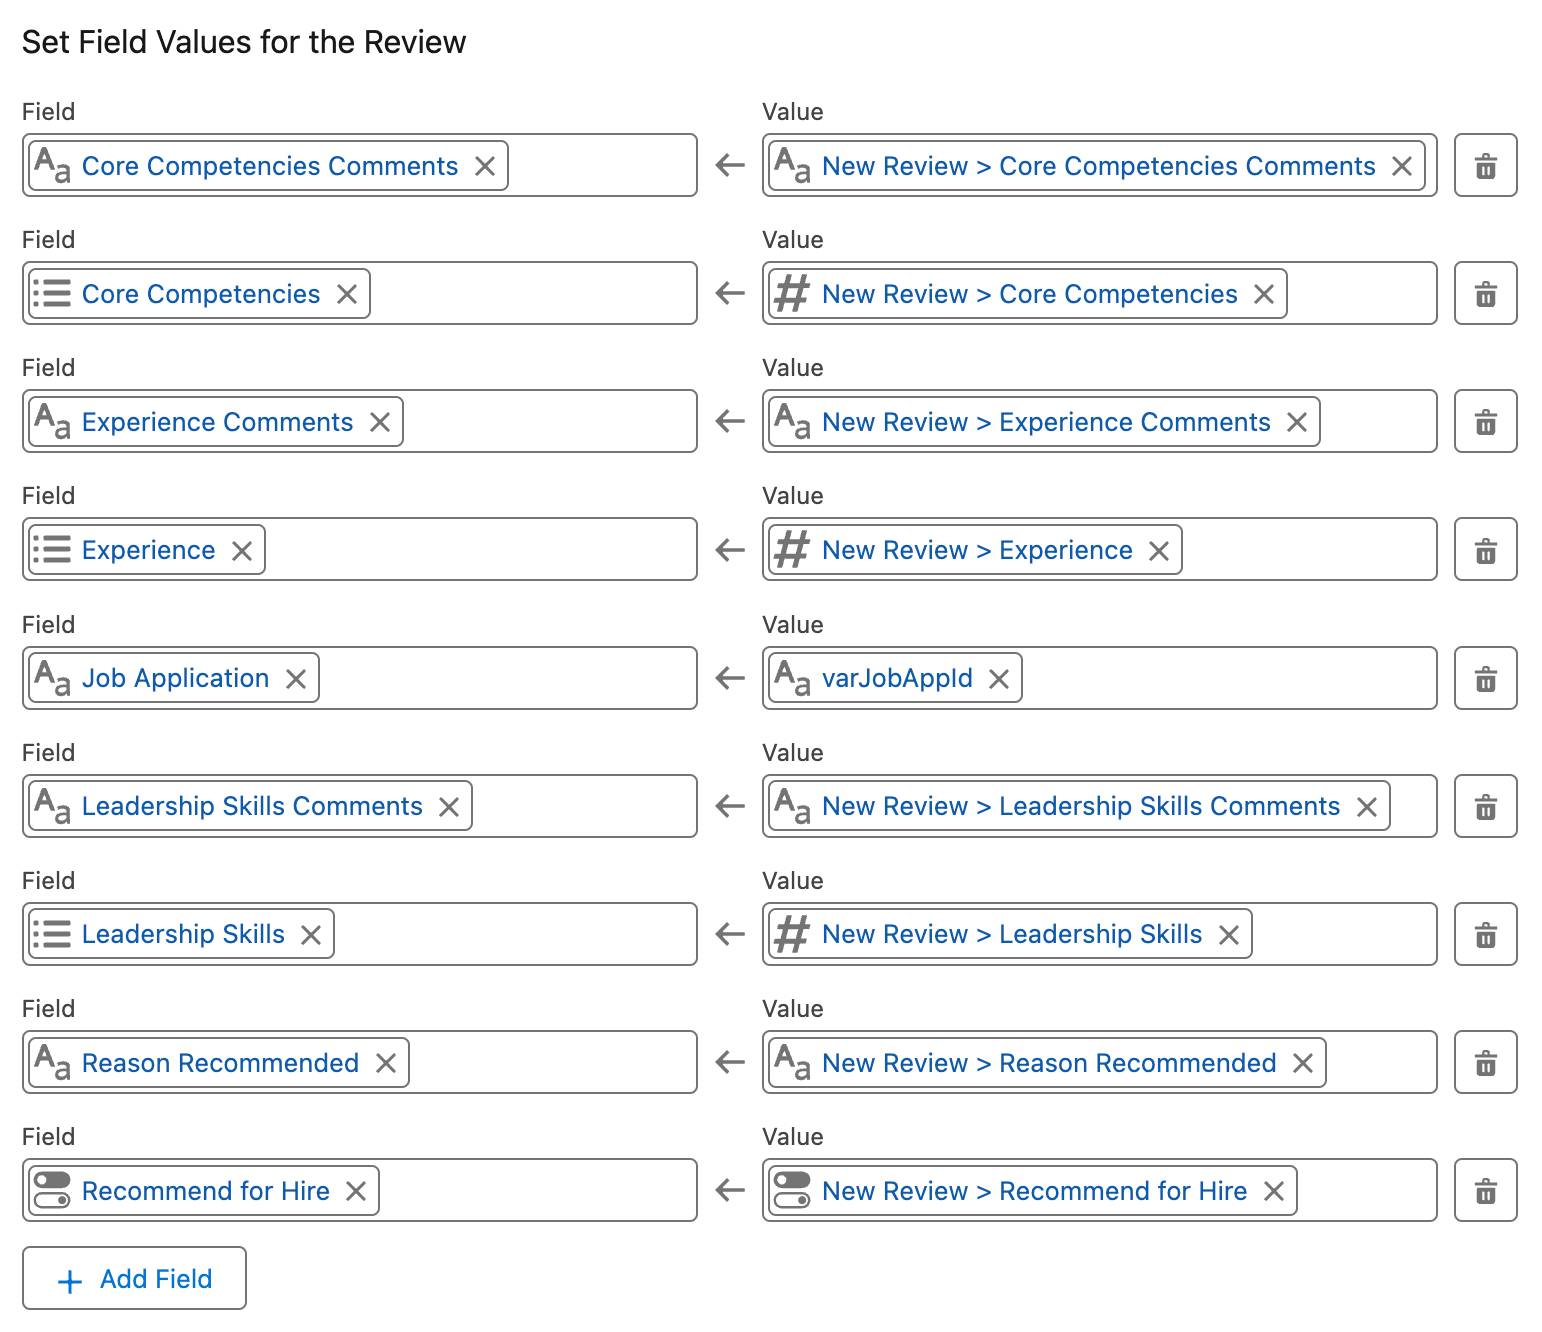
- Click +Add Field 8 times, then map the rest of the values according to the chart below. (Hint: Type the first few letters of the Field or Value name, then click it when you see it.)
Field
Value
Core Competencies Comments
New Review > Core Competencies Comments
Core Competencies
New Review > Core Competencies
Experience Comments
New Review > Experience Comments
Experience
New Review > Experience
Leadership Skills Comments
New Review > Leadership Skills Comments
Leadership Skills
New Review > Leadership Skills
Reason Recommended
New Review > Reason Recommended
Recommend for Hire
New Review > Recommend for Hire
Verify that your screen looks something like this.
- Click Done.
- Connect the New Review screen element to the createReview element by clicking and holding the New Review circle and then dragging your cursor to the createReview element.
Add Screen Elements
Next, add a screen element to display a success message.
- Drag Screen from the palette onto the flow window.
- For Label, enter
Record Created. (The API Name field will default.)
- Under Display on the left, click Display Text.
- For API Name, enter
RecordCreated.
- In the text box, enter
Your review record has been created successfully.
Leave the Insert a resource field above the text box empty.
- Click Done.
- Connect the createReview element to the Record Created element.
Next, add a screen element to display faults for data elements.
- Drag Screen from the palette onto the flow window.
- For Label, enter
Display Faults. (The API Name field will default.)
- Click Display Text under Display on the left.
- For API Name, enter
Display_Fault_Message.
- Click the Insert a resource... box and under Global Variables, select Running Flow Interview > FaultMessage.
- Click Done.
- Connect the createReview element to the Display Faults element.
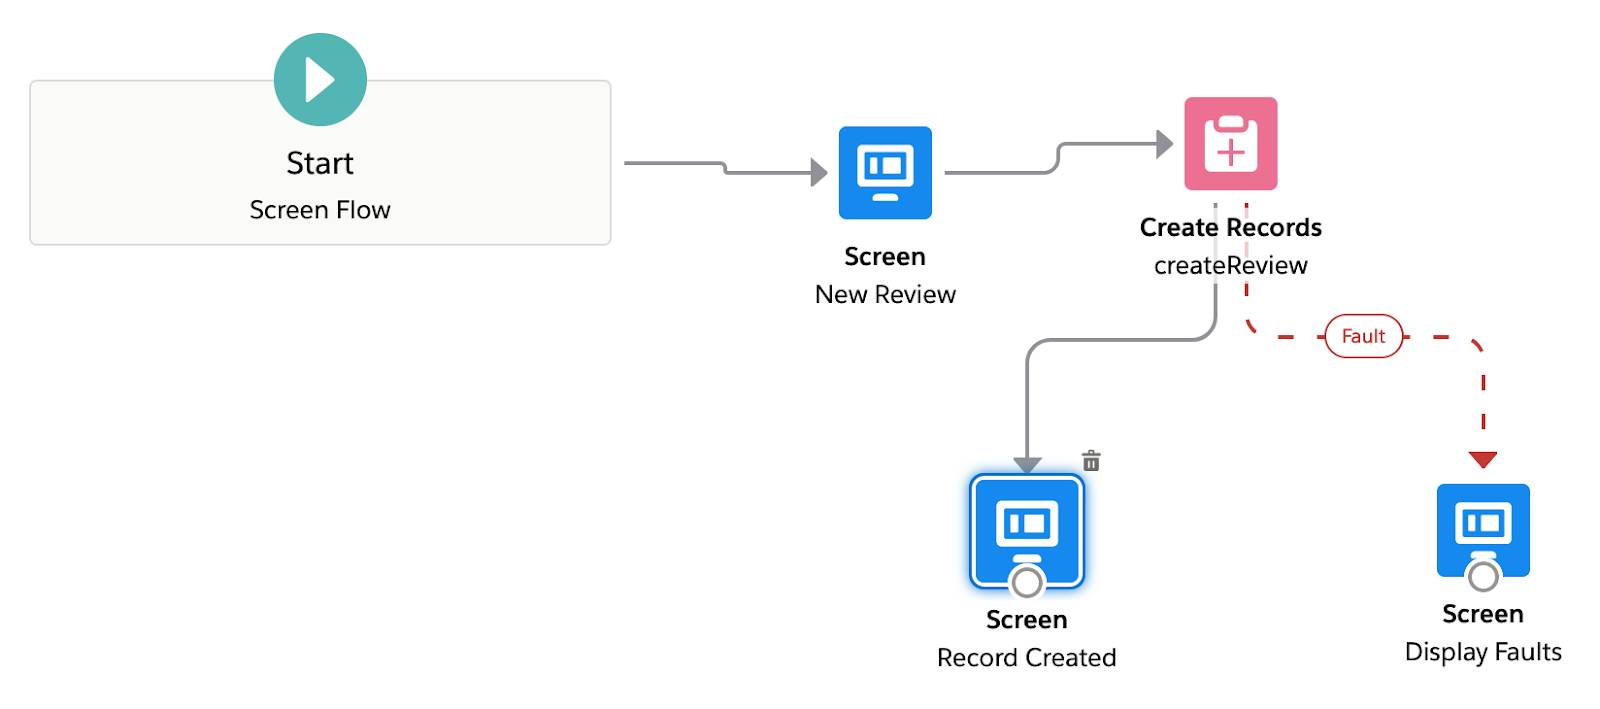
- Verify that your Flow looks something like this.
- Click Save.
- For Flow Label, enter
New Review.
- Let the Flow API Name field default.
- Click Save.
- Click Activate.
-
Click
 to return to Setup.
Deploy the Flow
Now that the New Review flow is set up, create a custom button for launching it.
- From Setup, click Object Manager and select Job Application.
- Click Buttons, Links, and Actions.
- Select New Button or Link.
- For Label, enter
New Review.
- Select Detail Page Button as the display type.
- Paste this link into the large text box below the Select Field Type field:
/flow/New_Review?varJobAppId={!Job_Application__c.Id}&retURL=/{!Job_Application__c.Id} - Click Save, then click OK on the popup.
Now add the New Review button to the page layout.
- While still viewing Job Application in Object Manager, click Page Layouts.
- Click
 next to Job Application Layout and select Edit.
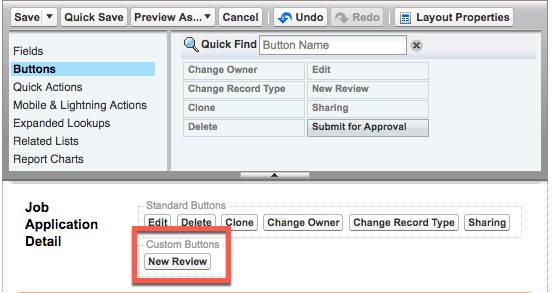
- Click Buttons in the page layout editor.
- Drag the New Review button to the Custom Buttons section of the Job Application Detail.
- Click Save.
By setting up processes, creating an approval process, and building a flow, you’ve automated several tasks for the recruiting team. With less busy work to take care of, the team can spend more of their time on the important task of finding the best candidates for the open positions at AW Computing. Well done!