Create Usage Resources and Grants
Learning Objectives
After completing this unit, you’ll be able to:
- Define usage resources to track consumption.
- Set up product usage resources.
- Create and activate product usage grants.
Usage Resources and Product Usage Grants
A usage resource is a specific, measurable item that your customers consume when they buy a product such as Text Messages, Data, or Call units. Meanwhile, a product usage grant determines the exact quantity of that resource that is included with the purchase as a free entitlement. For example, an InfinitraBytes grant specifies 2 GB of Data or 100 minutes of Call units as part of the customer's plan. Together, these components create the essential foundation for implementing and managing a consumption-based pricing model.
In this unit, join Usage Admin Liam Hoko as he creates these usage resources and grants.
Usage Resources |
Included Usage |
Unit Of Measure |
Unit Of Measure Class |
|---|---|---|---|
Text Messages |
4000 |
Count |
SMS |
Data |
2 |
GB |
Data |
Call |
100 |
Minutes |
Call Units |
Start by creating the usage resources.
Create Usage Resources
To track and bill consumption accurately, Liam plans to create a separate usage resource for every item a customer consumes: Text Messages, Data, and Call. Usage resources bridge the gap between your Anchor product and the Units of Measure (UoM) you created in the last unit. Join Liam to create these usage resources in your Developer Edition org.
When creating a new usage resource, make sure to set the Status to Draft. After the record is created, go back and update the Status to Active.
- On the Rate Management app, click
 and select Usage Resources.
- Click New.
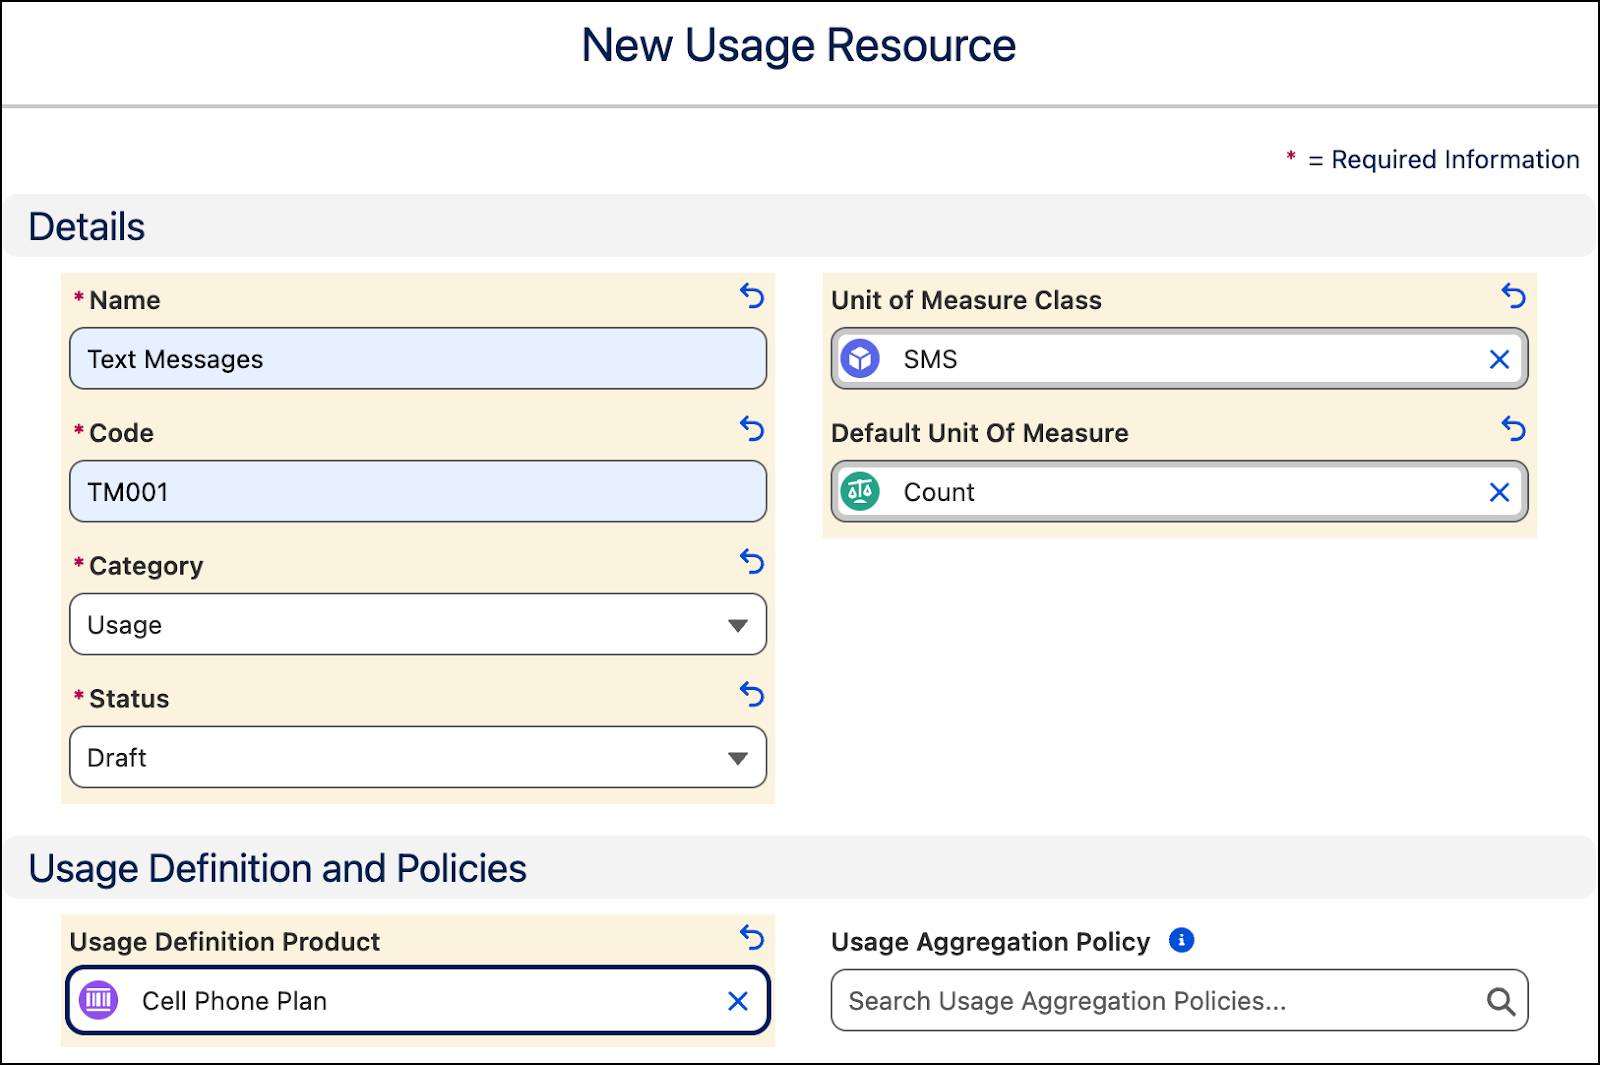
- Add these details to create the Text Messages usage resource.
- Name:
Text Messages - Code:
TM001 - Category: Usage
- Status: Draft
- Unit of Measure Class: SMS
- Default Unit of Measure: Count
- Usage Definition Product: Cell Phone Plan
- Click Save & New.
- Add these details to create the Data usage resource.
- Name:
Data - Code:
Data002 - Category: Usage
- Status: Draft
- Unit of Measure Class: Data
- Default Unit of Measure: GB
- Usage Definition Product: Cell Phone Plan
- Click Save & New.
- Add these details to create the Call usage resource.
- Name:
Call - Code:
Call003 - Category: Usage
- Status: Draft
- Unit of Measure Class: Call Units
- Default Unit of Measure: Minutes
- Usage Definition Product: Cell Phone Plan
- Save your work.
After you define your usage resources, review all data for accuracy and ensure it's entered correctly.
When ready, navigate to the usage resources you just created and activate them. For each resource, click  in the Status field and select Active. Make sure to save your changes.

Create Product Usage Resources
Product Usage Resources (PUR) are junction objects that connect a specific product, such as the Cell Phone Plan, to various usage resources such as Text Messages or Data. A single product can provide access to multiple usage resources, and a single usage resource can be included in multiple products. To manage these complex many-to-many relationships, Agentforce Revenue Management uses the PUR entity.
In this section, Liam creates PURs to map the Cell Phone Plan product to its usage resources: Call, Text Messages, and Data. Follow along in your DE org.
- On the Rate Management app, click
 and select Product Usage Resources.
- Click New.
- Add these details.
- Product: Cell Phone Plan
- Status: Active
- Usage Resource: Call
- Effective Start Date: For Date, select today’s date – 5 days, and for Time select 12:00 PM.
- Click Save & New.
- Add these details.
- Product: Cell Phone Plan
- Status: Active
- Usage Resource: Text Messages
- Effective Start Date: For Date, select today’s date – 5 days and for Time select 12:00 PM.
- Click Save & New.
- Add these details.
- Product: Cell Phone Plan
- Status: Active
- Usage Resource: Data
- Effective Start Date: For Date, select today’s date – 5 days and for Time select 12:00 PM.
- Save your work.


With the PUR set up, Liam moves on to define the amount of included usage for each usage resource that a customer receives as part of their purchase plan.
Establish Product Usage Grants
Get ready to define the product usage grants for each resource in your Developer Edition org. But before that, revisit the requirements for the Cell Phone Plan in this table.
Usage Resources |
Included Usage |
Unit Of Measure |
Unit Of Measure Class |
|---|---|---|---|
Text Messages |
4000 |
Count |
SMS |
Data |
2 |
GB |
Data |
Call |
100 |
Minutes |
Call Units |
When creating a new product usage grant, make sure to set the Status to Draft. After the record is created, go back and update the Status to Active.
- On the Rate Management app, click
 and select Product Usage Grants.
- Click New.
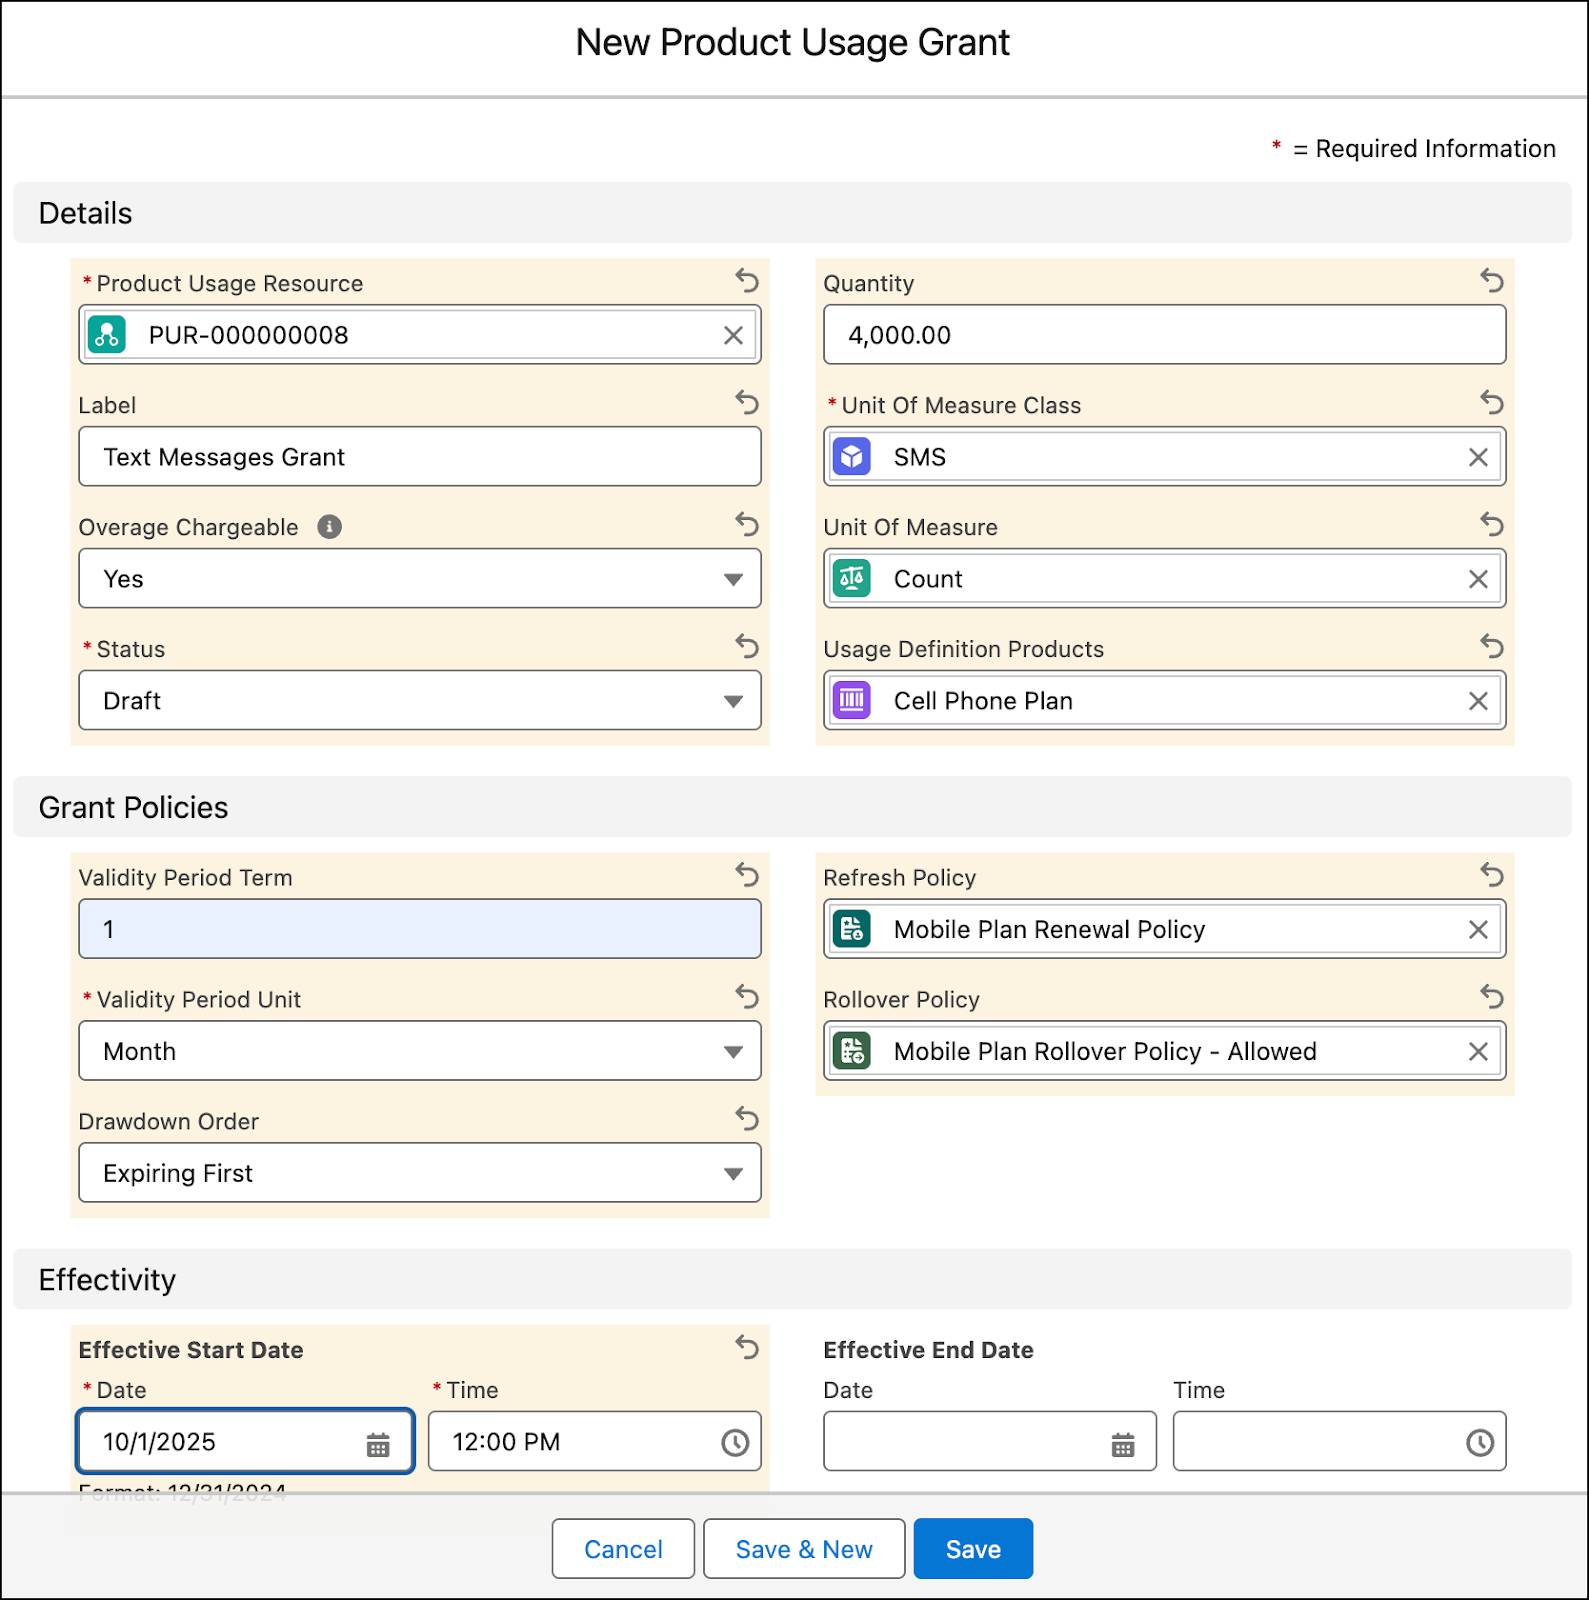
- Add these details to assign grants for Text Messages.
- Product Usage Resource: Enter the PUR for Text Messages.
- Label:
Text Messages Grant - Overage Chargeable: Yes
- Status: Draft
- Quantity:
4000
- Unit of Measure Class: SMS
- Unit of Measure: Count
- Usage Definition Products: Cell Phone Plan
- Validity Period Term: 1
- Validity Period Unit: Month
- Drawdown Order: Expiring First
- Refresh Policy: Mobile Plan Renewal Policy
- Rollover Policy: Mobile Plan Rollover Policy - Allowed
- Effective Start Date: For Date, select today’s date – 4 days, and for Time select 12:00 PM.
- Click Save & New.
- Add these details to assign grants for Data.
- Product Usage Resource: Enter the PUR for Data.
- Label:
Data Grant - Overage Chargeable: Yes
- Status: Draft
- Quantity:
2
- Unit of Measure Class: Data
- Unit of Measure: GB
- Usage Definition Products: Cell Phone Plan
- Validity Period Term: 1
- Validity Period Unit: Month
- Drawdown Order: Expiring First
- Refresh Policy: Mobile Plan Renewal Policy
- Rollover Policy: Mobile Plan Rollover Policy - Allowed
- Effective Start Date: For Date, select today’s date – 4 days and for Time select 12:00 PM.
- Click Save & New.
- Add these details to assign grants for Call.
- Product Usage Resource: Enter the PUR for Call.
- Label:
Call Grant - Overage Chargeable: Yes
- Status: Draft
- Quantity:
100
- Unit of Measure Class: Call Units
- Unit of Measure: Minutes
- Usage Definition Products: Cell Phone Plan
- Validity Period Term: 1
- Validity Period Unit: Month
- Drawdown Order: Expiring First
- Refresh Policy: Mobile Plan Renewal Policy
- Rollover Policy: Mobile Plan Rollover Policy - Allowed
- Effective Start Date: For Date, select today’s date – 4 days and for Time select 12:00 PM.
- Save your changes.
Review all the data for accuracy.
When ready, navigate to the product usage grants you just created and activate them. For each grant, click  , in the Status field and select Active. Make sure to save your changes.

Coming Up
In this unit, you built the fundamental usage framework by defining your usage resources and product usage grants. Your Cell Phone Plan is now fully configured to track consumption and apply the correct free allowances for Texts, Data, and Calls.
In the next unit, you complete the pricing model by building rate cards and rate card entries to establish the prices for all consumption that exceeds the grants you just created. Stay tuned!
Resources
- Salesforce Help: Create a Usage Resource
- Salesforce Help: Create a Product Usage Resource
- Salesforce Help: Create a Product Usage Grant
- Salesforce Help: Create Usage Grant Rollover Policy
- Salesforce Help: Create Usage Grant Refresh Policy
- Salesforce Help: Create Usage Aggregation Policy
- Salesforce Help: Create a Usage Overage Policy
- Salesforce Help: Create a Usage Resource Policy
- Salesforce Help: Create a Product Usage Resource Policy