Close Cases with Articles
Learning Objectives
After completing this unit, you’ll be able to:
- Add Knowledge to your console.
- Add the Knowledge component to a record page.
- Enable search settings for your knowledge base.
- Enable other core Knowledge settings.
- Map data categories to cases.
Add Knowledge to Your Console
Agents can only use Knowledge if they can see it. Maria checks that her users have Knowledge displayed as an option in their Service Console.
- From
 , find and select Service Console.
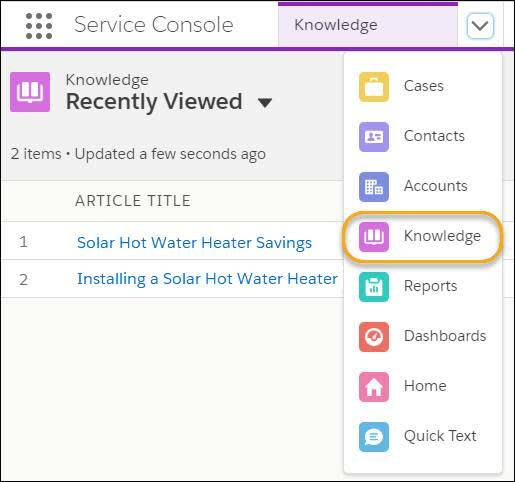
- Check the menus in the navigation bar for the Knowledge option.
Here’s what Maria sees in her console.

That’s a good start. The Knowledge component appeared in Maria’s Service Console automatically when she enabled Knowledge. If your org has been customized, you may need to add the Knowledge component to your home page. Check out the Lightning App Builder module.
Display Knowledge on Case Record Pages
Now Maria checks that agents see a Knowledge pane when they open a case. That’s where they view their articles.
- In the Service Console, choose Cases from the navigation bar.
- Click a case. Maria clicks 00001006. The case record opens. Maria doesn’t see the Knowledge pane on the case record, so she configures it.
- While still on the case record, click
 and select Edit Page.
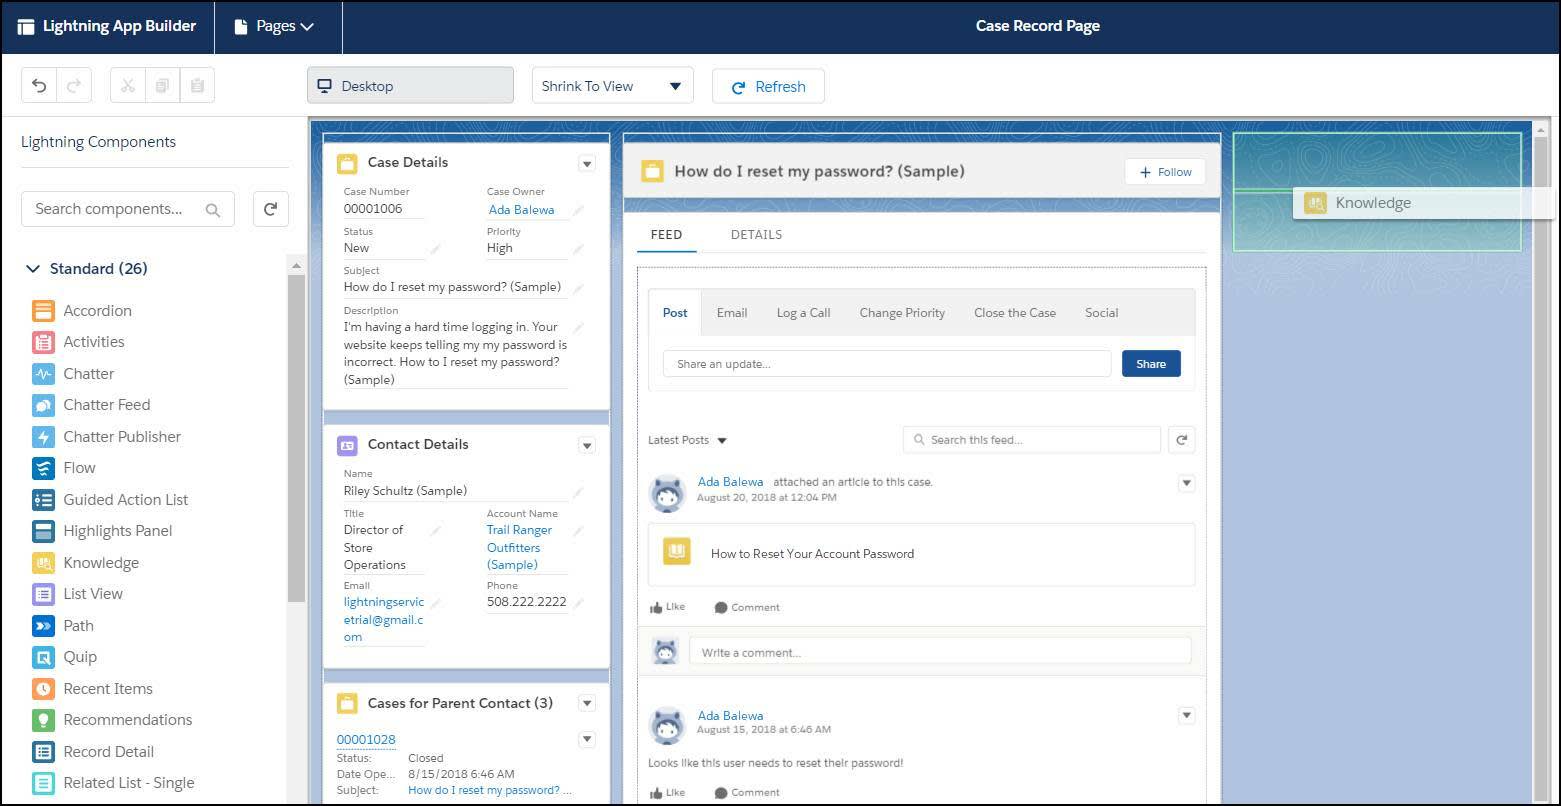
- Drag the Knowledge component from the Standard Components list to the record page. Maria drags it to the right side of her Case Record page. In new Trailhead Playgrounds, Knowledge is automatically on the page.

- Click Save.
- Click Activate.
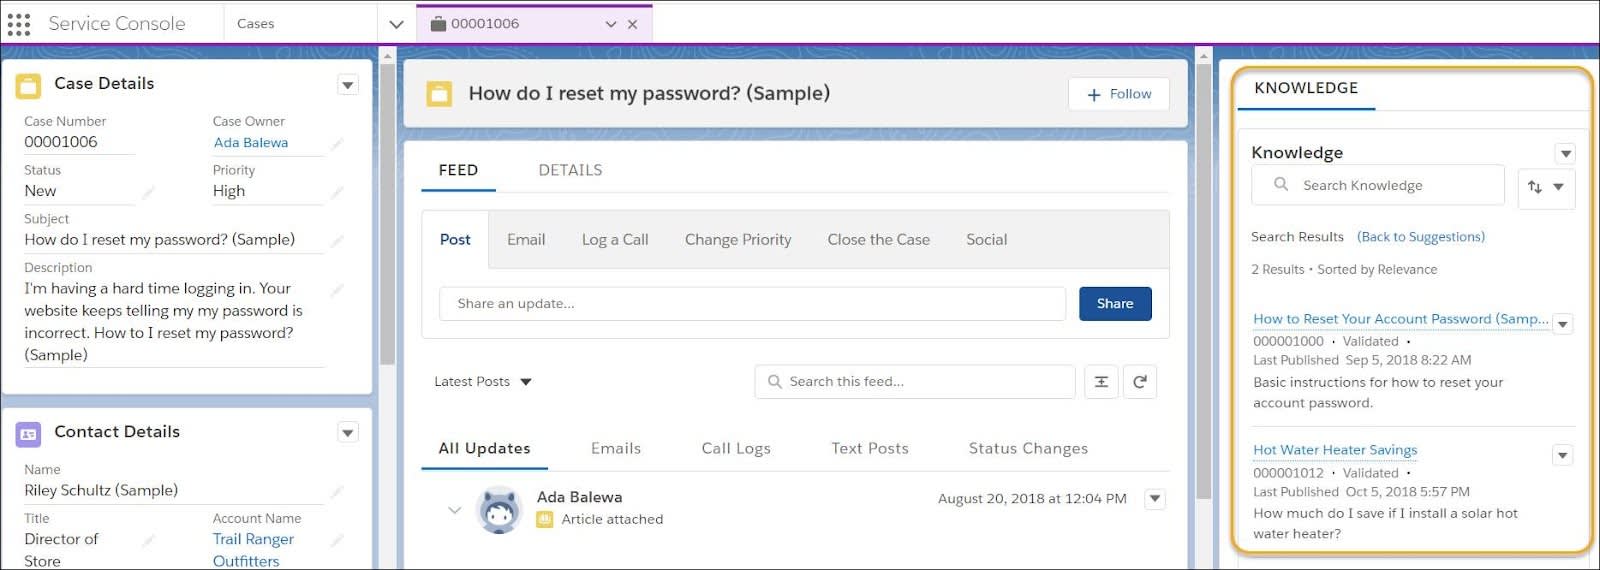
Maria always likes to test to make sure that everything goes as planned. She opens another case from the console and verifies that the Knowledge pane is on the right side.

Maria also adds a Related List component below the Knowledge component to show which articles have been related to this case. She follows the same steps and double checks Customize Related Lists for details.
Next she adds a Tabs component and puts the Knowledge component and its Related List inside. She doesn’t want her agents to have to scroll too much to see the information. She makes a note to ask Ada about adding other components. Lightning App Builder makes it so easy to change pages that Maria can quickly respond to Ada’s requests.
Help Agents Attach Articles to Cases
Maria also wants her agents to attach articles to cases. When they attach an article to a case, customers and agents have it for reference. If a case is reopened, a new agent knows what article the customer used to try to solve the problem. Here’s what Maria does.
First, she adds the necessary related lists to the Case page layout.
- From
 , select Setup.
- Click Object Manager and select Case.
- Click Case Page Layouts.
- Click Custom Case Layout. (If you're following along in your Trailhead Playground, you won’t see a Custom Case Layout option. Instead, click Case Layout.)
- Click Related Lists and drag the Articles related list to your page.
- Remove the Solutions related list from your page.
- Save your work. You’re asked whether or not to override users’ custom layouts. In this case we don’t.
- At the top of the page, click Feed View.
- Scroll down to Article Tool Settings and select Enable attaching Articles inline.
- Click Save.
Next, she tests to make sure that it works as planned.
- From
 , find and select Service Console.
- From the navigation bar, select Cases.
- Click a case number.
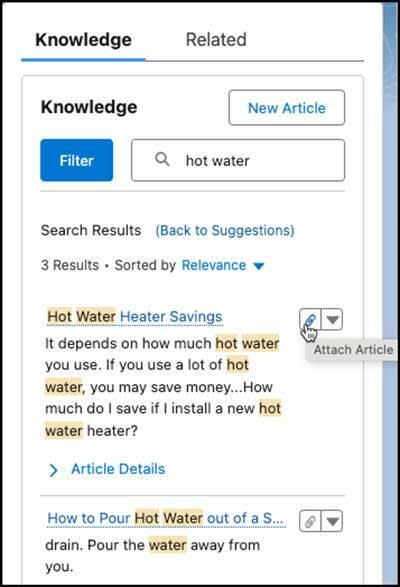
- In the Knowledge pane, enter a search term for articles in your org that relate to your case. Maria enters
hot waterto find articles on solar hot water heaters. Ursa Major has several articles in their knowledge base about hot water heaters. If you’re following along in a Trailhead Playground or other org, enter a term related to an article you created.
- In a result returned by the search, click on the paper clip icon to attach the article. Maria chooses to attach the article Hot Water Heater Savings.

The article is attached to the case. Maria clicks the refresh button on the case feed to see a link to the article.
Maria chooses Detach Article to remove it because it’s not really her case. She was just testing.
Enable Communication Channel Mappings
Ada and her team have started attaching articles to their cases. It works great. But now they’d like to email articles as well. Emailing articles guarantees that the customer can see them without having to log into an Experience Cloud site. It also allows an agent to send only the article details specific to the customer.
Maria makes that easy by setting up mappings by record type to determine which fields get included in a specific kind of article. Here’s what she does.
- From
 , choose Setup.
- Click Object Manager and select Knowledge.
- Click Communication Channel Mappings.
- Click New.
- Enter the label. Maria decides to set up mappings for FAQs first. She enters
FAQ. The name is generated to match.
- Choose the record type. Maria chooses FAQ.
- Select communication channels. Ursa Major uses only email right now, so Maria moves Email to Selected channels.
- Select the relevant field. Maria moves Question and Answer to Selected Fields.
- Click Save.
Now Maria tests it to make sure that everything works before she tells Ada.
- From
 , find and select Service Console.
- From the navigation bar, select Cases.
- Click a case number.
- From the Knowledge pane, select Insert Article into Email.
Maria scrolls through the email. It looks good, and it’s easy to edit if she wants to change it later. Salesforce has attached the article to the case automatically, so agents can see that the article has been used for this case before.
Enable Knowledge Settings for Search
Maria makes sure that she's enabled the correct search settings. These settings make it easier for agents and customers to find the most relevant article quickly. The bigger the knowledge base grows, the more important efficient search becomes. Maria wants to set up everything correctly from the very beginning.
- From
 , choose Setup.
- In the Quick Find box, enter
Knowledge.
- Click Knowledge Settings.
- On the Knowledge Settings page, click Edit.
- In the Knowledge One section, enable all four choices: Highlight relevant article text within search results, Auto-complete keyword search, Auto-complete title search, and Suggest related articles on cases. These settings help you turbocharge your searches.
- Scroll back to the Knowledge One section.
- Under Case Fields Used to Find Selected Articles, select the fields most useful for suggesting articles. Then move them up or down in the list on the right. Maria adds Case Reason and Case Type under Subject.
- Scroll to select Enable Case Data Category Mapping. Maria has set up data categories, including Solar Hot Water Heater Installations, and a field for that category. This setting helps enable filtering on cases.
- Click Save.
Everything is set up, but Maria still has a lot to learn about how search works. She heads over to the Knowledge Search Basics module and is excited by what she finds.
Map Cases to Data Categories
Ada’s team loves all things Knowledge. They’re using it to close cases more quickly than ever before and with a lot less work.
But when they work on several cases at once, they have to filter their search results on every window by the current product. Also, if they’re working on one product most of the time, they end up filtering for that product by hand for every single case. Is there a way to make that easier?
Maria is happy to answer that there is: data category mapping. She can map the product field on the case to the article category that corresponds to it. Then agents can filter their article search results by product. For example, she can map the Product field to the Solar Hot Water Heater Installation category. Maria gets to work.
- From
 , select Setup.
- In the Quick Find box, enter
Data Categories.
- Click Data Category Mappings.
- Choose the Case field. Maria chooses Product.
Note: If you’re following along in a Trailhead Playground or other org, you might not have any data categories set up yet to map. Read along to see how you would complete the steps.
- Choose the Data Category Group. Maria chooses Solar Hot Water Heater Installation.
- Choose the Default Data Category. Maria chooses All.
- Click Add.
Now whenever a customer calls in about a problem with a hot water heater, the agent can easily find the right articles. As an agent moves between hot water heater cases, the filter stays in place so the agent doesn’t have to keep selecting it. If the filter is too restrictive, the agent can always remove it and try another search.
Maria and Ada have built out their knowledge base. Now it supports two different kinds of articles using page layouts and record types. They’ve also configured the knowledge base to work better with search, and they’ve integrated it more closely with cases. It’s easier than ever for Ursa Major’s agents to use the power of Knowledge. Why not try it out at your company?
Resources
-
Salesforce Help: What’s a Case?
-
Trailhead: Knowledge Search Basics
-
Trailhead: Lightning App Builder
-
Salesforce Help: Customize Related Lists
-
Salesforce Help: Set Up Email-to-Case with a Guided Setup Flow
