Get Organized with Workbooks and Sheets
Learning Objectives
After completing this unit, you'll be able to:
- Describe the ways to use a workbook.
- Explain the difference between a worksheet, a dashboard, and a story.
- Describe ways to rearrange your work area.
Worksheets: Where You Create Views
So far, you’ve learned about all of the different ways that Tableau displays the data you’ve connected to. Now you might be asking: What do I do with it? To answer that you need to understand how worksheets work.
Worksheets are, as the name implies, where you do the work building your viz. In the image, you can see a tab labeled Sheet 1. Anything dragged into the view (or on shelves and cards) is part of the sheet. Next to the Sheet 1 tab are icons that let you create additional worksheets (1), as well as dashboards (2) and stories (3).
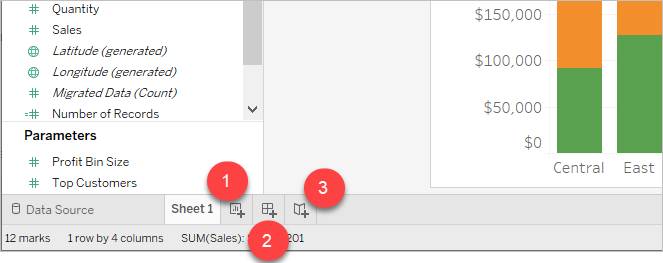
1)  – Worksheets contain a single view along with shelves, cards, legends, and the Data and Analytics panes in its side bar.
2)  – Dashboards are a collection of views from multiple worksheets. The Dashboard and Layout panes are available in its side bar. To find out more, read Dashboards.
3)  – Stories are a set of worksheets or dashboards in a series that work together to convey a message. Stories include the Story and Layout panes in the side bar. For more details about creating stories, see Stories.
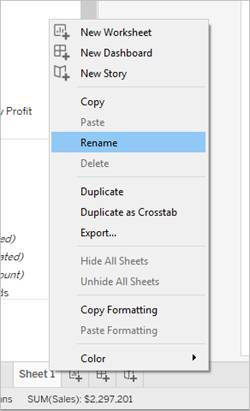
By default, Tableau names the new things you create (Sheet 1, Sheet 2, Dashboard 1, and so on). It’s better if you give them more meaningful names so that you can locate them easily.
Right-click the tab and select Rename.
Workbooks: Keep Your Work Together
When you save your work—including all of your worksheets, dashboards, and stories—it saves as a workbook. You use the workbook to organize, share, and even publish your work.
To open an existing workbook, click the thumbnail image of the workbook on the Start page.


Reorganize Your Workspace
Every worksheet contains a variety of cards, shelves, legends, and so on. You can reorganize the workspace by rearranging cards, hiding and showing specific parts of the workspace, and hiding everything but the view using presentation mode.
Rearrange Cards
Now that you know that a worksheet contains several cards, shelves, legends, and other controls, let’s see how you can customize your workspace by using them.
To move a card, point the cursor at the title area of the card you want to move. When the cursor becomes the move symbol  , click and drag the card to a new position.

As you drag the card around the worksheet, you’ll see a black bar indicating where you can drop the card.
Hide Parts of the Workspace
You can also hide the parts of your workspace that you don’t use. Just about everything in the workspace can be turned on and off.
To hide the toolbar or status bar, select Window and then select what you want to hide. (It’s a toggle, so if you want show the bar again, follow the same steps.)
- To hide the window on the left side, which is either the Data pane (for worksheets), the Dashboard pane (for dashboards), or the Dashboards and Sheets pane (for stories), click the Minimize button
 in the upper-right corner of the pane. The pane is minimized to the bottom-left corner of the workbook. Click the same button again to restore the pane.
- To hide a card, click Show/Hide Cards
 on the toolbar and then select the card you want to hide. Do the same when you want to re-show it.
- If you want to restore the worksheet windows to their original default state, you can do that too. Click Show/Hide Cards
 on the toolbar, and then select Reset Cards.
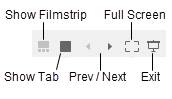
Presentation Mode
You might want to use Tableau to present your findings. Rather than hiding each card or shelf one at a time, you can switch to presentation mode. This mode hides everything on the sheet except the view and its associated legends, filter cards, parameter controls, and worksheet tabs.
- To switch in and out of presentation mode, click the Presentation Mode button
 on the toolbar.
- To navigate when you’re in presentation mode, use the presentation mode controls in the bottom-right corner:
Congratulations! You now know how to build a viz in Tableau Desktop, and you’re well on your way to becoming a data rockstar.
Resources