Request a Service from the Agentforce Employee Portal
Learning Objectives
After completing this unit, you’ll be able to:
- Review a catalog item configuration.
- Review a service process template.
- Request a service through the Agentforce Employee Portal.
- Review the resulting service request record.
Get Hands-on with Requests
Now that you’ve discovered how Request Management speeds up IT service delivery across your organization, it’s time to get hands-on experience with this intuitive system.
In this unit, you explore the underlying configuration of a catalog item that was created from a service process template, submit a request through the online portal, and review the record that helps IT teams manage fulfillment. Let’s get started!
Sign Up for a Custom Playground with IT Service
To complete this badge, you need a custom playground that contains IT Service.
- Select Create Playground.
- Your new org is automatically attached to your Trailhead account.
- Make note of your org’s expiration date and complete this badge before then.
- Select Launch to open the playground.
Review a Catalog Item
Before you explore the request submission process, take a moment to check out the underlying service process that powers intake, record creation, and fulfillment. We won’t check for these steps in the challenge section.
- From the App Launcher
 , find and select Unified Catalog.
- Select the Service Processes.
- Select Request New Laptop to open the catalog item.
- On the Attributes & Products tab, review the list of attributes associated with the service process.
- Select the Intake Form tab and click Open Editor. This opens the screen flow that the service process uses for the intake form that employees fill out when submitting their request. Click each flow element to learn how the form is set up.
- Select the browser tab with the Unified Catalog open.
Notice the other Configuration Steps, which you can use to add a fulfillment flow, associate knowledge articles, and define agent actions. You can also create eligibility rules for your service process to limit visibility to specific groups of users.
These service process components all work together to provide a seamless handoff between requesters and the IT team, and define the data captured during intake and the steps to accelerate fulfillment.
Review a Service Process Template
While you’re here, check out the service process template that the admin used to create the Request New Laptop catalog item. We won’t check for these steps in the challenge section.
- In the Unified Catalog app, select the Home tab.
- Select Templates and take a moment to explore the available templates that you can use to quickly set up your catalog.
- Search for and select the Request New Laptop template.
- In Template Details, click each tab to view information about the template configuration, including an overview, what’s included, and the usage guide. The Process Flow topic summarizes what information is captured during intake, the anchor entity that’s created, and the associated fulfillment action.
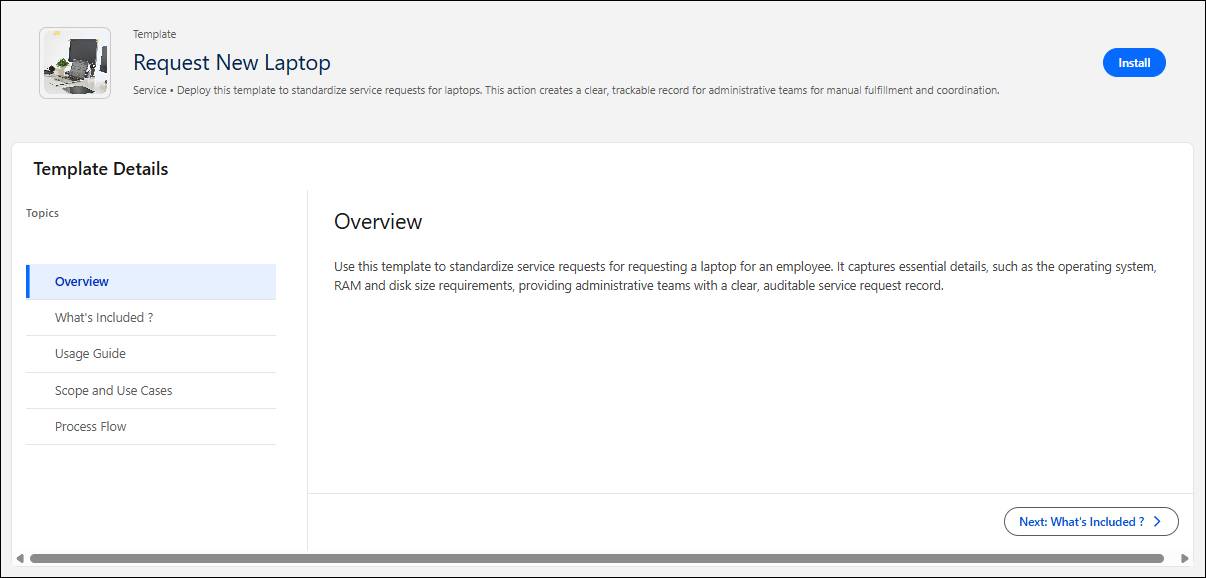
With service process templates, you can create and customize catalog items for common requests in just a few minutes, rather than building from scratch.
Submit a Request from the IT Portal
Next, let’s explore the request intake process. For this step, imagine you're an employee in need of a new laptop. You head to the Employee Services Portal to submit the request.
Follow these steps to submit a laptop request through the portal.
- From the App Launcher
 , find and select Digital Experiences.
- Under All Sites, find the AITSHOC site listed. Select Link to Site next to it.
- In the portal, select Request Service.
- Find the Request New Laptop card, and select Request.
- Fill out the fields in the request form using this information:
- Operating System: Mac
- Disk Size: 1 TB
- RAM: 36 GB
- Shipping Address:
12345 Cosville Rd., Cosville - Business Justification:
My current laptop is constantly overheating.
- Operating System: Mac
- Select Submit.
Did you notice that these form fields match the attributes and intake screen flow defined in the service process? That’s no coincidence!
Review a Service Request Record
After an employee submits the request, a record is created in the system to log the request and help the IT team track their work as they resolve the request. In this example, that record is a service request: the anchor entity defined in the Request New Laptop service process template.
Follow these steps to review the resulting service request record. We won’t check this.
- Navigate back to the browser tab with Digital Experiences open.
- From the App Launcher
 , find and select Service Requests.
- Change the list view to All Service Requests.
- Find and click the most recent service request, for example RQ-000000008.
- Review the service record, which includes the submitted intake form attributes in the Default Section.
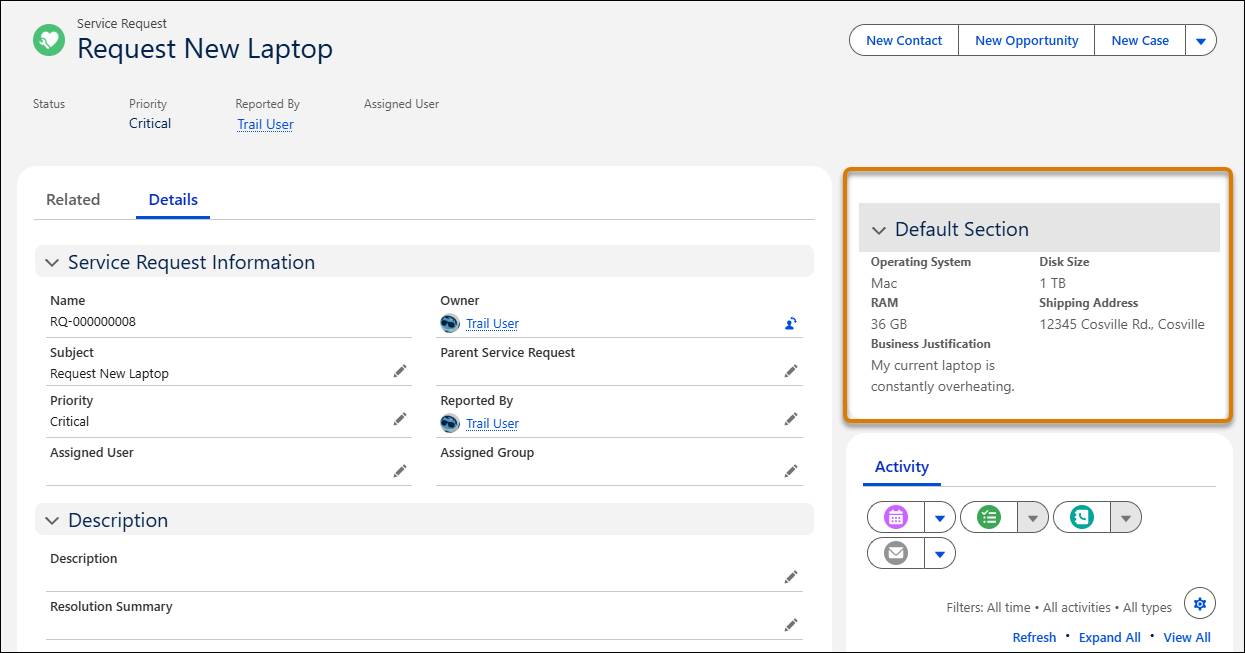
From the service request record, the IT team can assign priority and SLA dates, route approvals, assign tasks to support reps using action plan templates, and track progress towards resolution.
In this exercise, you learned how the Unified Catalog, Employee Service Portal, and anchor entities all work together to provide a seamless, end-to-end workflow, bridging the gap between employees and IT support.
To learn more about setting up your own custom service catalog, including how to install service process templates, check out Catalog Management in IT Service.
Wrap Up
You explored how IT Service gives you all the tools you need to provide world-class employee service. By combining an integrated service catalog, intelligent service processes, AI, and automation, you can create the perfect service delivery system for resolving any type of request.
To learn more about request management in IT Service, check out the Help articles listed below. It’s time to turn your vision of fast and efficient IT management into a reality!