Build a Briefcase
Learning Objectives
After completing this unit, you’ll be able to:
- Create a briefcase and add records to it.
- Assign a briefcase to mobile workers or groups.
- Select the apps that use a briefcase.
- Test and activate a briefcase.
Create a Briefcase and Add Records
Your field service team is ready to hit the ground running with Offline Briefcase. As a Salesforce admin, it's your job to make sure your technicians have access to the right data, even when they're offline. The first step in making that happen is creating a new briefcase, which you'll then populate with the records your team needs most. Here’s how to do that:
- From Setup
 , in the Quick Find box, enter
briefcase, and then select Briefcase Builder.
- To launch the setup wizard, click New Briefcase.
- For the briefcase name, enter
NY Machine Installers.
- Click on the Developer Name field to auto-populate it.
- Click Next.
The next step is to add the relevant objects to your briefcase. The objects you add define the type of records that get synced to your technicians' mobile devices.
The first object we need to add is Work Orders, since they capture everything a technician needs to know about a job: the customer, the location, the type of service required, the parts needed, and any special instructions. But here's the thing — you don't want to sync every single work order in your org to every technician's device. That would be a lot of unnecessary data, and it would slow things down.
That's where filters come in. Filters let you narrow down the records that get synced, keeping the briefcase lean and significantly reducing sync time. For this briefcase, let’s filter the Work Order object to show only open work orders, by following the steps below:
- In the Briefcase setup wizard, click the plus sign
 next to Briefcase Rules.
- In the lookup field, find and select Work Order.
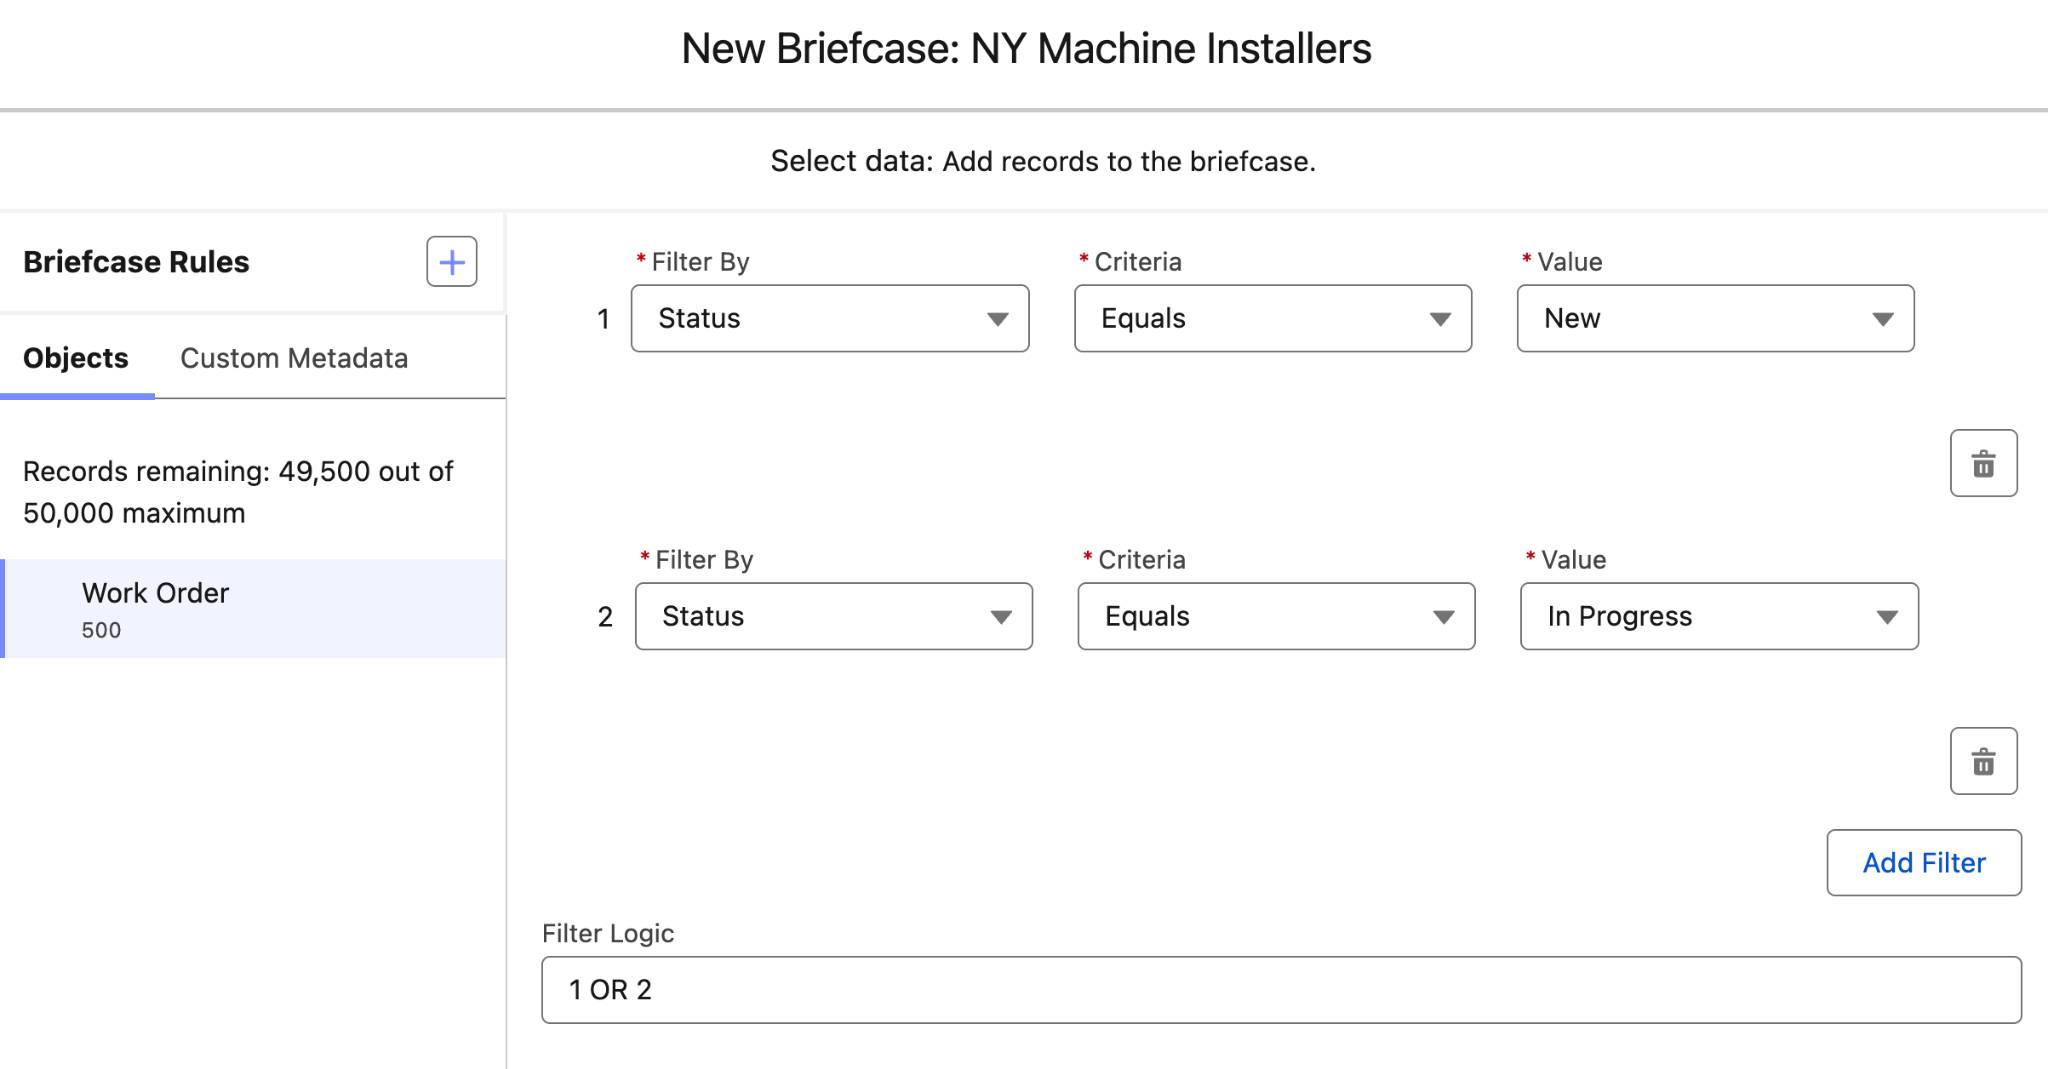
- In the filter window, enter the following values..
- Filter By: Status
- Criteria: Equals
- Value: New
- Click Add Filter, and create a second filter for work orders with In Progress status. .
- Filter By: Status
- Criteria: Equals
- Value: In Progress
- Since we have more than one filter, we need to enter the filter logic to determine how they’re combined. Since a work order can only have one of the two options as its status, enter
1 OR 2. - Click Next.
Assign the Briefcase to Mobile Workers
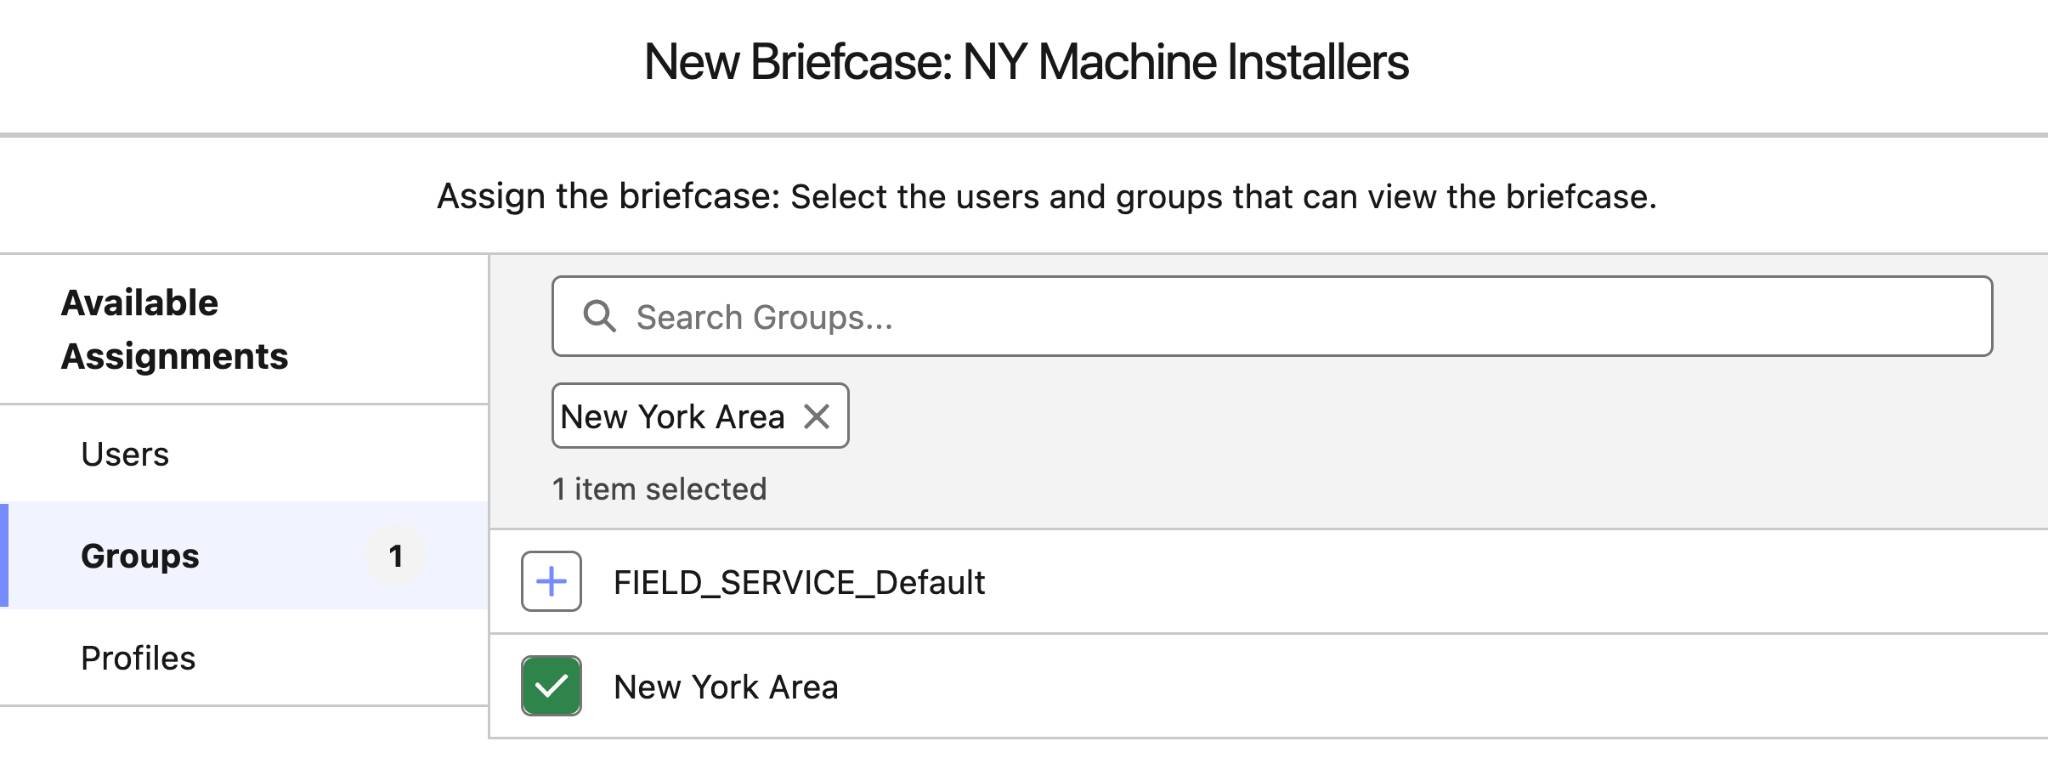
Next, you need to assign the briefcase to the right people. Rather than assigning it to individual users one by one, you can assign it to public groups, making it much easier to manage access at scale. If your organization has multiple teams or regions, you can create a separate group for each and assign the briefcase to all of them at once.
It is also worth noting that a mobile worker can have more than one briefcase assigned to them. A technician might see a role-specific briefcase tailored to their job type alongside a general briefcase that applies to everyone in the field, like a company-wide safety briefcase. Each briefcase works independently, giving you a flexible and organized way to get the right records to the right people.
- In the Briefcase setup wizard, under Users, select yourself.
- Click on Groups, then select New York Area.
- Click Next.
Connect the Field Service Mobile Apps
Your technicians will access their briefcases directly from their mobile devices. Depending on your organization, that might mean a mix of iPhones and Android phones, and the good news is that Offline Briefcase works seamlessly on both platforms. Let’s connect them below:
- In the Briefcase setup wizard, select both the apps, Salesforce Field Service for iOS and Salesforce Field Service for Android, to associate with the briefcase.
- If you want to activate the briefcase immediately, click Activate. If you’re not ready, click Save. Saving gets your configuration locked in while you take a closer look to make sure everything is working as expected.
Test and Activate the Briefcase
Before activating your briefcase, it is always a good idea to run a quick test to make sure it is pulling in the right records. You can do this by previewing the briefcase as a specific user, which lets you verify that the correct records are being synced before any of your technicians see it.
- From Setup, in the Quick Find box, enter
briefcase, and then click Briefcase Builder.
- Click the NY Machine Installers briefcase to open it.
- Click the Run As User tab.
- In the users search box, find and select your name.
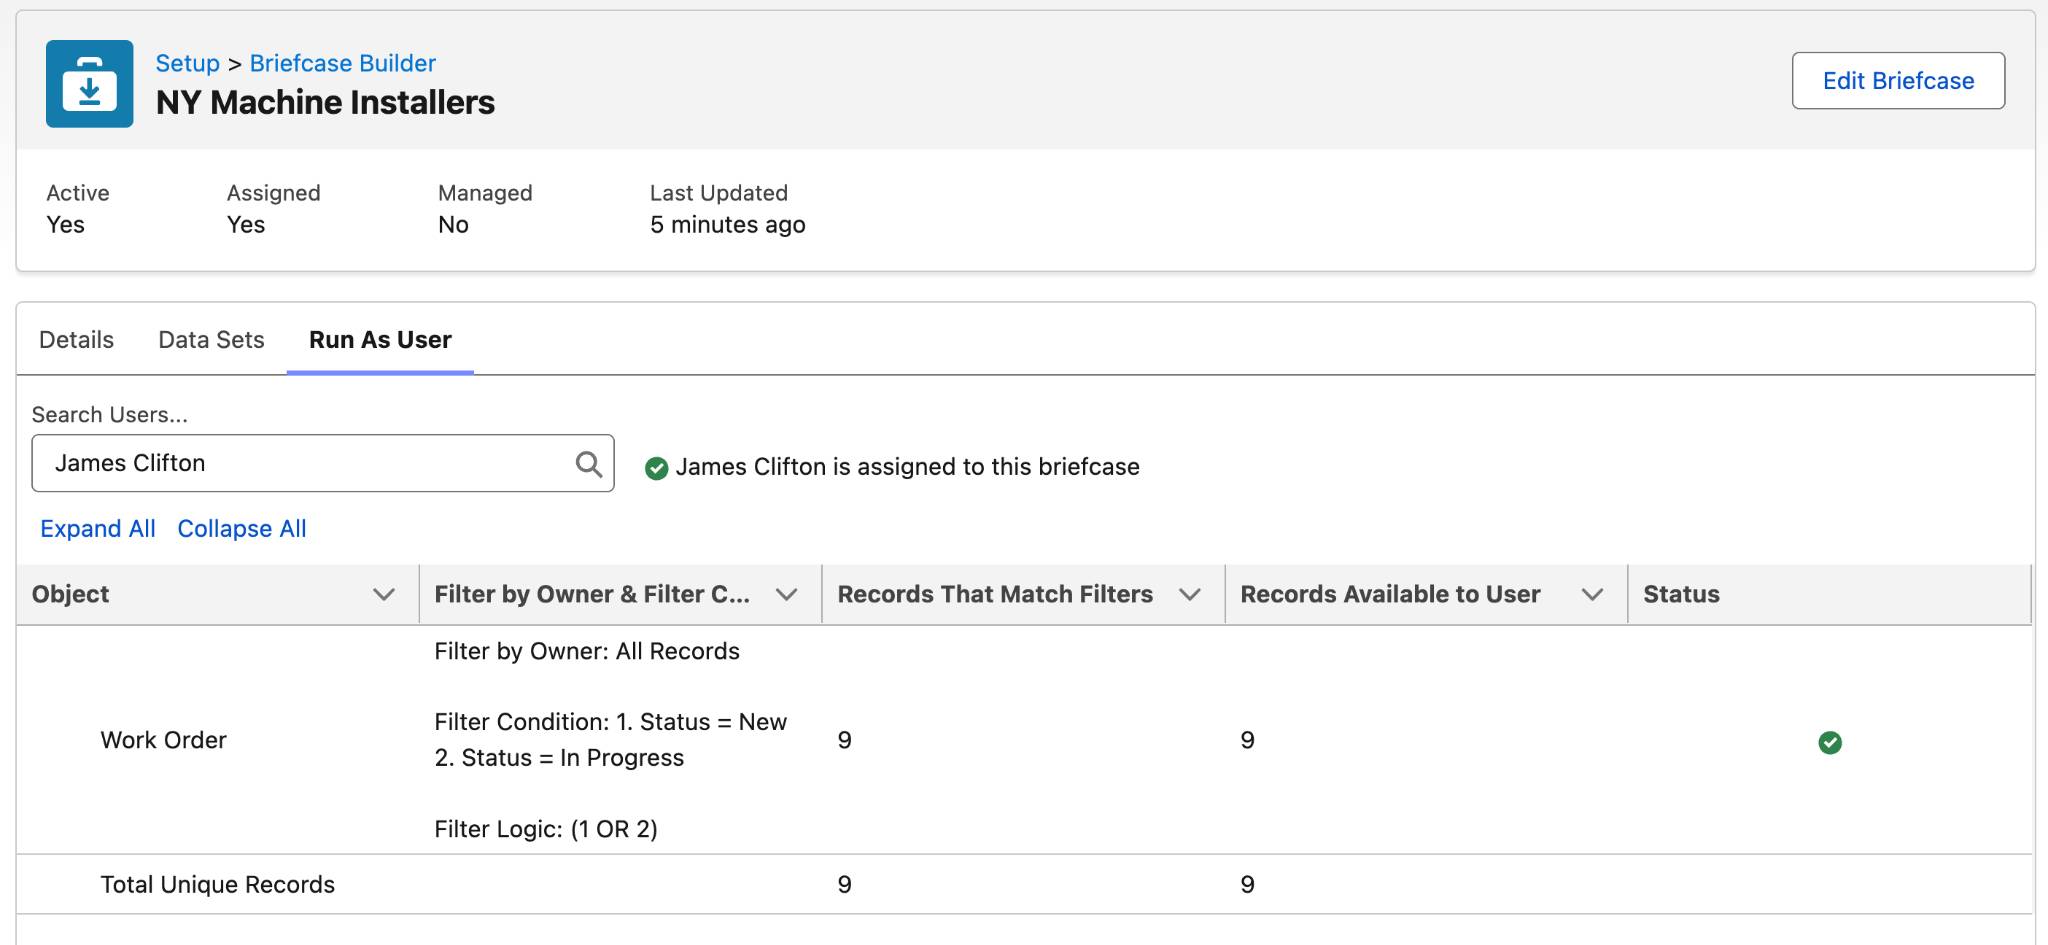
- If you hadn’t activated the briefcase earlier, click Edit Briefcase, then click Activate.
And that's all there is to it! Once your briefcase is active and syncing, your technicians will have instant access to the records they need, whether they are online, offline, or anywhere in between. As your team starts using their briefcases in the field, you will likely find new records and objects you want to add. The good news is that you can edit, clone, or delete a briefcase at any time, so keeping it up to date is simple.
Resources
- Salesforce Help: Briefcase Creation
- Salesforce Help: Edit, Activate, Deactivate, Delete, or Clone a Briefcase
- Salesforce Help: Validate Briefcase Settings
- Salesforce Help: Create and Edit Public Groups