Build Your Release Pipeline
Learning Objectives
After completing this unit, you’ll be able to:
- Describe the stages of a DevOps Center pipeline.
- Plan a pipeline based on your team's requirements.
- Describe the process for creating and activating a pipeline in DevOps Center.

What Is a Pipeline?
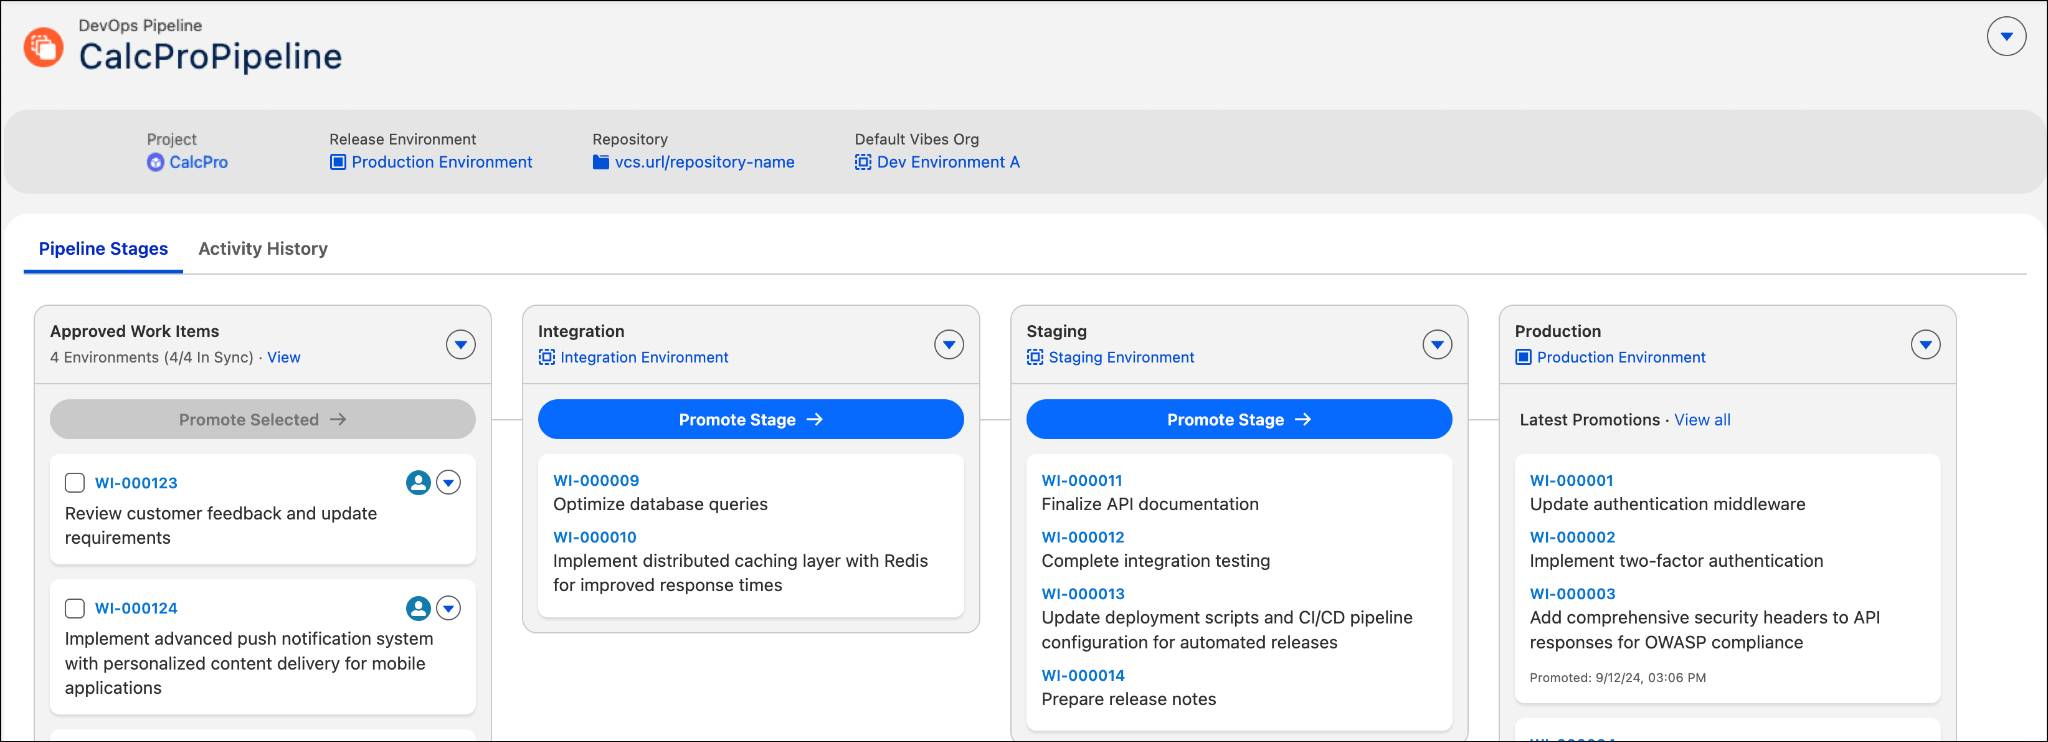
A pipeline in DevOps Center is an ordered sequence of stages that define how changes move from development to production. Each stage represents one environment and one branch in your source control repository. Changes move through stages from left to right, from development toward production.
DevOps Center provides a default pipeline that consists of stages: Development | Integration | User Acceptance Testing (UAT) | Staging | Production. However, you can customize this structure to meet your team's needs.
Plan Your Pipeline Stages
Every team’s pipeline is different. Some teams skip UAT. Others add a capacity testing stage. The key is to design your pipeline based on your business requirements, team size, and release cadence.
Before building your pipeline, answer these questions.
- Which environments do changes travel through? List them in order from development to production.
- Which branches correspond to each environment? Each stage needs its own branch. If the branch doesn't exist yet, you can create it during pipeline setup.
- Which projects will use this pipeline? You can connect a pipeline to one project.
CalcPro Pipeline Design
Your CalcPro project exists, but you need to answer a key question: How does a change get from a developer's sandbox to your customers?
Your team’s answer: A developer builds in the development environment, changes are integrated, and tested in Integration, users review in UAT, and changes go live in Production. You design a four-stage pipeline to make sure that every change follows the same route, every time.
Stage |
Environment Name |
Environment Type |
Branch |
Why This Stage? |
|---|---|---|---|---|
Development |
Dev |
Developer sandbox, Developer Pro sandbox, or scratch org |
feature/WI-{WI_Number} |
Developers build features individually in connected sandboxes and scratch orgs. |
Integration |
Integration |
Partial Copy sandbox |
int |
Multiple developer changes are merged and tested together. |
UAT |
UAT |
Full Copy sandbox |
uat |
Business users validate calculations. |
Production |
Prod |
Production |
main |
Live environment for users. |
Create a Pipeline
Name your pipeline and connect it to the CalcPro project.
- In DevOps Center, select the DevOps Pipelines tab.
- Select New.
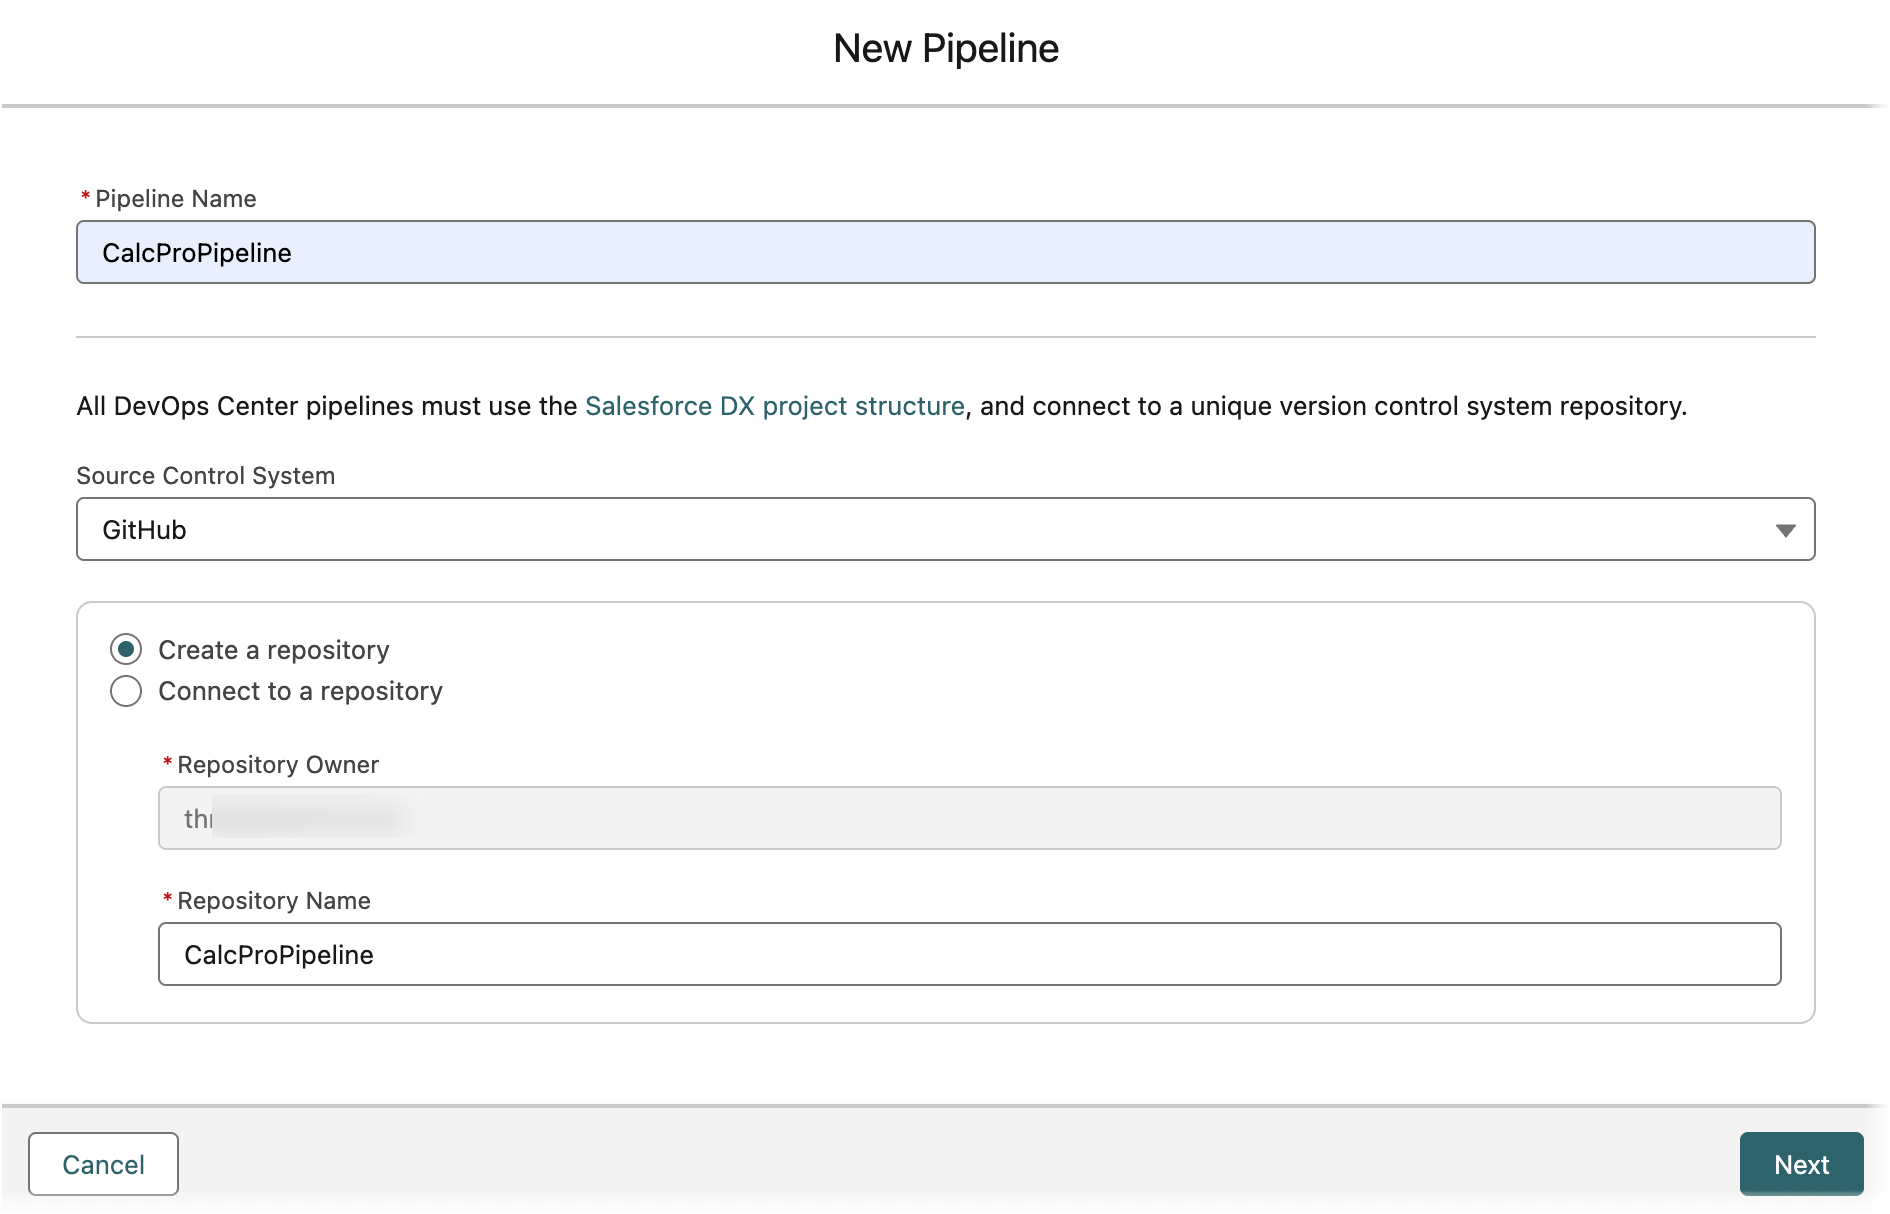
- In the Pipeline Name field, enter:
CalcProPipeline - Select your Source Control System as GitHub.
- Select Create a repository.
- In the Repository Owner field, verify your GitHub account name is listed.
- DevOps Center automatically populates the Repository Name field with the pipeline name.
- Select Next.
- From the Available Projects pane, select CalcPro.
- Select the Move button (>) to move it to the Connected Projects pane.
- Select Create Pipeline.
Your pipeline is ready with five default stages!
Configure Pipeline Stages
Your default pipeline has five stages: Development | Integration | UAT | Staging | Production. For CalcPro, you use a four-stage pipeline by removing the Staging stage.
- In DevOps Center, select the DevOps Pipelines tab.
- From the list, select CalcProPipeline.
- Click
 on the Staging stage to delete it.
Now you have four stages: Development, Integration, UAT, and Production.
Connect Environments
Connect each stage to a Salesforce environment.
- Select Connect Environment for the Production stage.
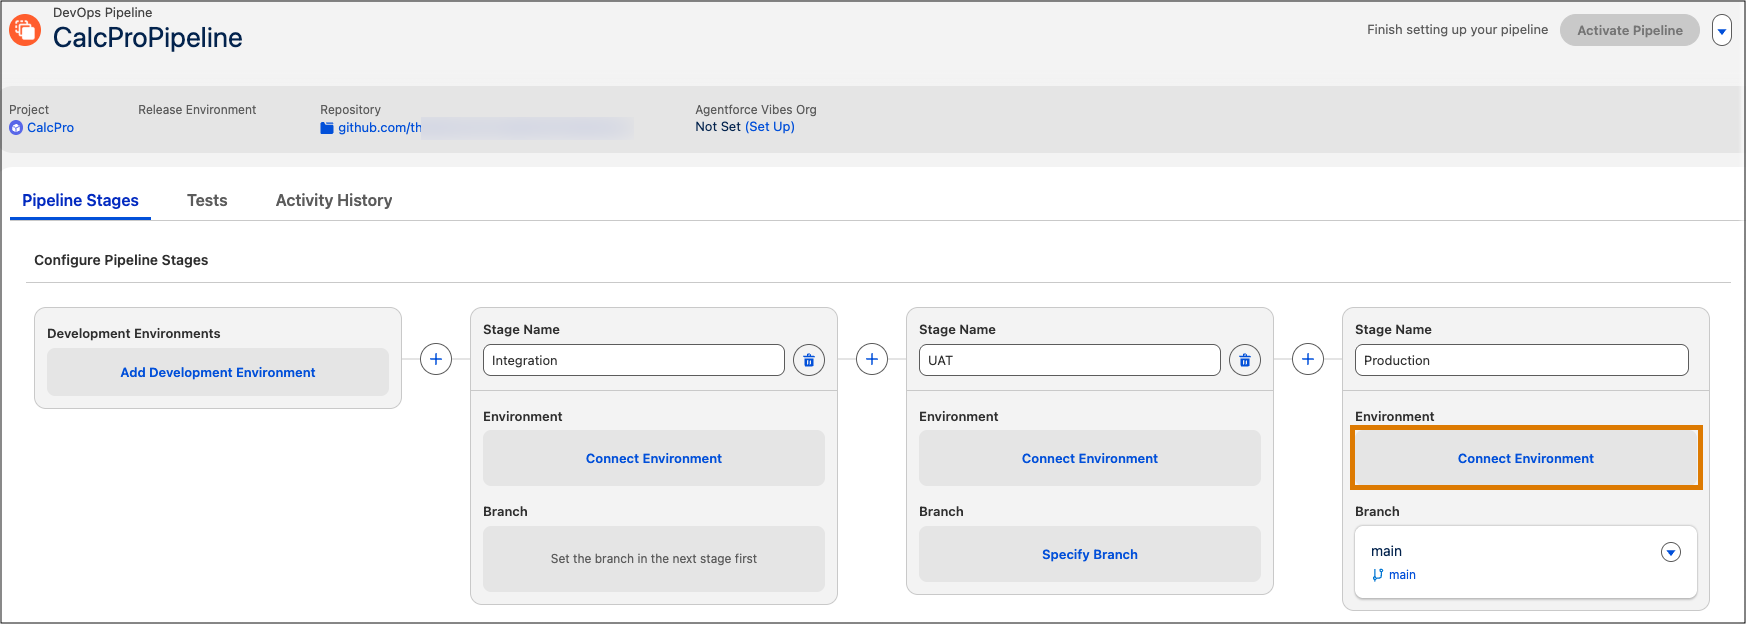
- In the Environment Name field, enter:
Prod.
- Select the Environment Type as Production Org.
- Select Connect and enter your production org credentials.
- Select Confirm to confirm external access. If you receive an authentication error, retry the authentication.
Repeat steps 2 to 4 for the Integration and UAT stages using the values in this table.
Stage Name |
Environment Name |
Recommended Sandbox Type |
Environment Type to Select |
|---|---|---|---|
Development Environment |
Dev |
Developer sandbox, Developer Pro sandbox, or scratch org |
Not required |
Integration |
Integration |
Partial Copy sandbox |
Sandbox |
UAT |
UAT |
Full Copy sandbox |
Sandbox |
Production |
Prod |
Production org |
Production |
Create Branches for Pipeline Stages
Each stage also needs a branch in your GitHub repository. DevOps Center creates the Production branch (main) by default. Create branches for Integration and UAT, working from right to left. Start with the UAT stage. For the Development Environment stage, the branch is auto-created when the first work item moves to In Progress.
Stage Name |
Branch |
How It’s Created |
|---|---|---|
Production |
main |
Created by default with the repository. |
UAT |
uat |
Manually created from the Production branch (main) during pipeline setup. |
Integration |
int |
Manually created from the uat branch during pipeline setup. |
- Select Specify Branch for the UAT stage.
- Select Create a branch from main for this stage.
- In the Branch Name field, enter:
uat.
- Select Save.
Repeat these steps for the Integration stage with branch name: int.
Each stage must have both an environment and a branch before you can activate the pipeline.
Activate Your Pipeline
After all stages are connected, activate the pipeline so your team can start moving work through it.
- Review the pipeline stages from left to right: Development | Integration | UAT | Production.
- Confirm each stage shows:
- A connected environment
- A specified branch
- A connected environment
- Select Activate Pipeline.
CalcPro Pipeline is now live!