Configure Product Sets, Bundles, and Options
Learning Objectives
After completing this unit, you’ll be able to:
- List strategies for using product sets and bundles.
- Explain the difference between a bundle and a product set.
- Describe how the searchable and online attributes work with product sets.
- Explain how bundles work with Salesforce Agentforce Commerce for B2C.
- Explain how options work with Agentforce Commerce for B2C.
How you package your products for sale impacts shopper engagement and average order value. Effective product grouping makes it easy for shoppers to discover and purchase complementary items. In this unit, you learn how to design and configure product sets, bundles, and options. You also learn strategies for grouping related products into attractive sets, creating value-driven bundles, and offering personalized service options, to create a seamless, one-stop shopping experience for your customers.
Create Sets, Bundles, and Options
In this unit, you learn how to combine products into sets, bundles and options.
Combining several products into a package with a reduced price is a great way for shoppers to see those products in a different light, and hopefully spend more. With Commerce for B2C, you configure product sets, bundles, and options to offer those different views.
-
Product set: A product set is a group of related products that aren’t necessarily sold together. You use product sets for merchandising purposes, such as showing a collection of related products on a category page.
-
Bundle: A product bundle is a collection of individual products that you sell together as a single unit. Shoppers can buy each product in the bundle separately, but the bundle offers a combined price.
-
Options: Optional accessories, upgrades, or extra services. Shoppers buy options with a product. You don’t sell them separately. Options have their own price and display name, but don’t have their own thumbnail images.
To create appealing sets and bundles that make sense, consider these primary strategies:
- Combine products that shoppers purchased together often. Make the combined price the draw.
- Pair products smartly. Make it shopper-focused. Show shoppers the benefits of buying these products as a set.
- Use sets when you also want to sell items separately. Shoppers compare the price of the set versus separate products.
- Keep sets and bundles simple. Use bundles for multiple products that are less useful when they sell separately.
Product Type
Example
Product set
Basic shorts and sweatshirt outfit
Product bundle
Tennis net package with two basic tennis rackets for a new player
Option
Skate sharpening
Create a Product Set
Product sets are useful for organizing and showing products that complement each other. For example, a "Summer Collection" product set includes various clothing items, accessories, and footwear that you want to showcase together. Product sets extend your product options. They:
- Have their own display attributes, such as name and images.
- Can be assigned to one or more categories.
- Have recommendations.
- Contain zero, one, or many products, and other product sets.
A specific catalog owns a product set. You can assign a product set to multiple categories, with a primary and classification category. You can position a product set within a category, along with other product sets and standard products.
Searchable and Online
In product sets, the searchable and online settings work together. A product set appears in the search results when it’s set to searchable and online. It’s considered online if the product set is online and at least one of its products is also online. The online/offline setting takes precedence over the searchable setting.
Search results return a product set regardless of the included products’ searchable settings. It’s the product set searchable setting that counts. If a product set’s searchable setting is off, the product set isn’t searchable.

In this example, you combine basic shorts and a sweatshirt to create a product set. Before you create a product set, create the base product plain-blue shorts, which has small, medium, and large variation products. After that, here’s how you create a product set:
- In Business Manager, select App Launcher, and select Merchant Tools | Site | Products and Catalogs | Product Sets.
- Select New.
- On the General tab, specify the following:
- Create an ID:
outfit-01 - Select the catalog: cloud-kicks-usa-prod
- Select Online: Yes
- Select Searchable: Yes
- Enter the name:
Running Outfit
- Select Apply.
- Select the Categories tab.
- Select Edit Categories.
- Select a catalog: cloud-kicks-usa-prod
- Expand the catalog and cloud-kicks category and select the Sportswear and Sales categories.
- Select Apply.
- Set the primary category: Sportswear
- Click the Products tab. You want to add base products to a product set so that shoppers can select the color or size of each of them.
- Select Add.
- Find healthfit, click OK, and set as Online and Searchable.
- Select Add.
- Find: plain-blue-shorts, click OK, and set as Online and Searchable.

See Einstein Product Recommendations for Commerce Cloud to learn how to configure product recommendations.
Create a Product Bundle
You use product bundles to offer a discount or special pricing when a shopper buys multiple products configured together in a unique bundle. For example, a tennis bundle includes a tennis net and lines package with two basic tennis rackets at a lower price than buying each item separately. You use product bundles as a way to group multiple products into one orderable product for shopper convenience.
Here’s how bundles work in Agentforce Commerce for B2C.
- Bundles are a separate product with its own SKU and price.
- Bundles are unaffected by the price of the individual products.
- Bundles contain specified products in specified numbers.
- Shoppers cannot purchase the individual products included in a bundle.
- You can create a bundle within a bundle.
For this example, you create the tennis bundle. You start by creating the individual products, pair-of-tennis-rackets-101 and tennis-net-poles-lines, and make them online and searchable. Then you create a product bundle with those products:
- In Business Manager, select App Launcher, and select Merchant Tools | Site | Products and Catalogs | Products.
- Click New.
- Enter the ID:
pair-of-tennis-rackets-101 - Select the catalog: cloud-kicks-usa-prod
- Select Online and Searchable: Yes
- Enter the name:
Pair of beginner tennis rackets - Select Apply.
- Select Back to List.
- Click New.
- Enter the ID:
tennis-net-pole-lines - Select the catalog: cloud-kicks-usa-prod
- Select Online and Searchable: Yes
- Enter the name:
Basic tennis net, poles, and lines - Select Apply.
- Click Back to List.
- Select New.
- Enter the ID:
tennis-kit-101 - Select the catalog: cloud-kicks-usa-prod
- Select Online and Searchable: Yes
- Enter the name:
Basic tennis kit - Select Apply.
- With tennis-kit-101 still open, click the Bundles tab.
- Select New.
- Search for and select pair-of-tennis-rackets-101 and select OK.
- Select New.
- Search for and select tennis-net-pole-linesand select OK.
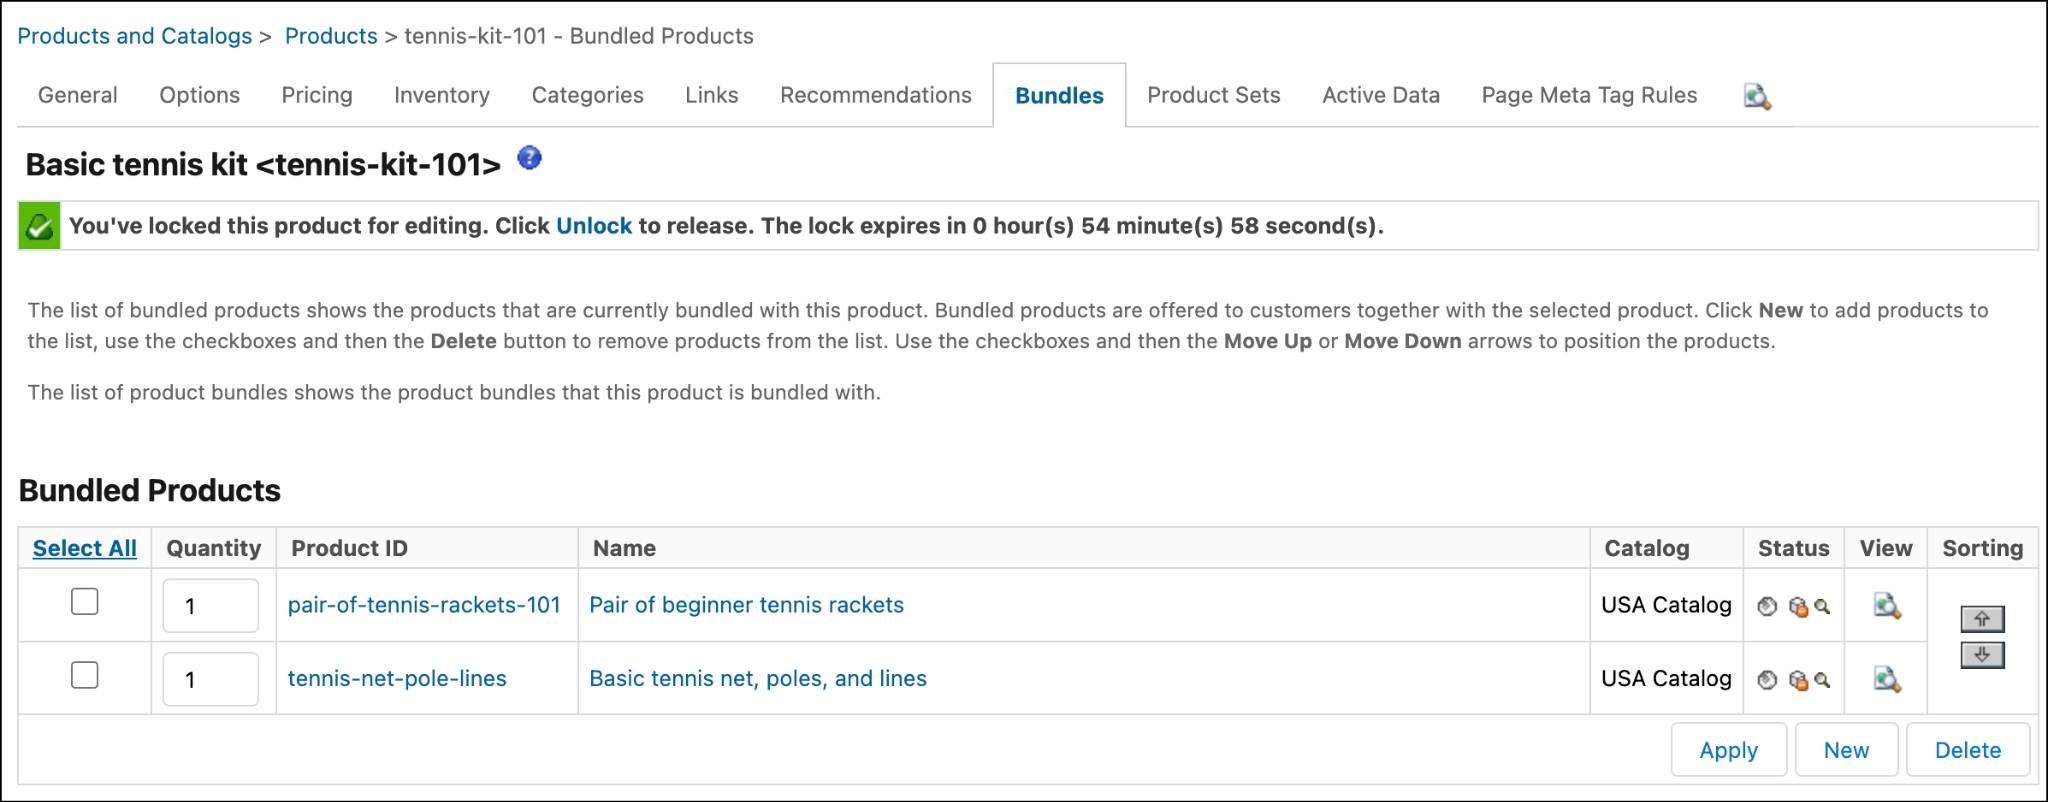
Beginner tennis rackets combined with basic net, poles, and lines are now bundled in a tennis kit.
Create Product Options
You use product options to offer a more personalized shopping experience by letting customers select specific attributes that meet their needs or preferences. Product options have their own price and display name, but don’t have their own thumbnail images. A shopper doesn’t search for them, but they’re visible on the product detail page. In Agentforce Commerce for B2C, you can:
- Create product system object attributes to define options.
- Create shared (global) product options.
- Assign global options to products.
- Create local options for products.
For this example, you add ice skates to your product offering, including:
- Figure skates
- Ice hockey skates
- Racing skates
- Double runner (for small children)
Ice skates come unsharpened (unless they’re custom-built). Many in-store retailers offer the first sharpening for free. You can’t skate on dull blades, and the first sharpening is the most important of all. The angle of sharpening depends on the skater’s weight. You want to provide a sharpening option for a nominal fee. Your company will do the sharpening before shipping the skates.
You create a double-runner base product, and add three variation products with attribute values 9, 11, and 13, as shown here.

Now, you create a sharpen option and use it for multiple skates. You configure it as shared among multiple products. You also create a childWeight option and test it for one variation product (size 9). While the sharpener can do a generic sharpening, the skates perform better if the technicians know the child’s weight.
Create a Product System Object Attribute
Here’s how you create the sharpen attribute definition:
- In Business Manager, click App Launcher, and select Administration | Site Development | System Object Types.
- Select the Product object.
- Select the Attribute Definitions tab.
- Select New.
- Enter the ID:
sharpen - Enter the name:
Sharpen - Enter the Help Text:
Pre-ship sharpening service - Set the value type: String
- Select Apply.

To configure a childWeight attribute definition, you create:
- A shared product option for a skate sharpening service
- Assign the option to the base product
- A local option for the childweight attribute input
Create a Shared Product Option
Here’s how you create a shared product option that multiple products can use.
- In Business Manager, select App Launcher, and select Merchant Tools | Site | Products and Catalogs | Product Options.
- Select the catalog: cloud-kicks-usa-prod.
- Select New.
- Select the ellipses (...) to select a Product system object attribute definition: sharpen
- Select the Currency: US Dollar
- Enter the custom name:
Pre-ship sharpening service - From the Value Sorting dropdown, select the sorting: By Option Price
- Select Apply to save the new option.
- Configure the option values.
- Enter
Nofor the ID,nfor the SKU extension, and set it as the Default.
- Select Apply.
- Enter
Yesfor the ID,yfor the SKU extension, and enter10as the option price.
- Select Apply.
- SelectClick Back to List.

Assign a Shared Option to a Product
Here’s how you assign the shared option to a base product.
- In Business Manager, select App Launcher, and select Merchant Tools | Site | Product and Catalogs | Products.
- Find and select the base product: double-runner
- Select the Options tab.
-
Lock the product.
- Select the ellipses (...) beside the ID field.
- Search for and select a shared product option: sharpen
- Select Add.
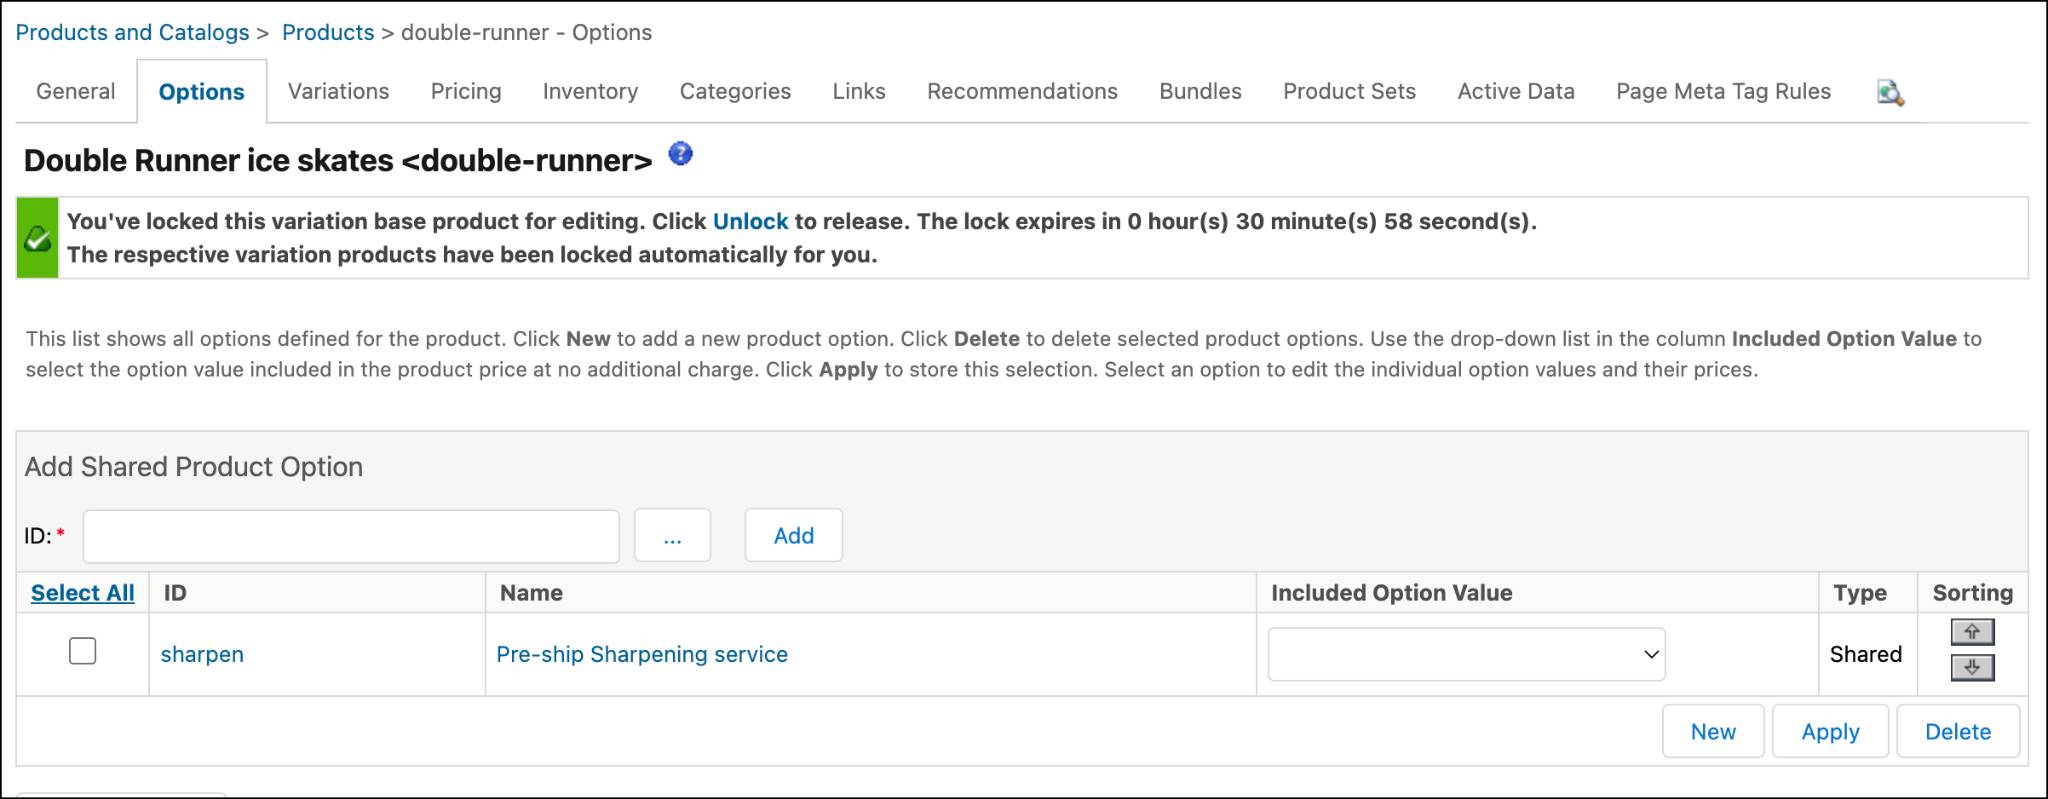
Create a Local Option
Local options apply to one product. Here’s how Brandon assigns the childWeight option to a specific (local) product.
- In Business Manager, select App Launcher, and select Merchant Tools | Site | Product and Catalogs > Products.
- Find and select a product: double-runner-9
- Select the Options tab.
- Select Lock and New.
- Select the shared product option: childWeight
- Select Apply.

Wrap It Up
In this unit, you learned how to configure Product Sets, Bundles, and Options. You created a product set for merchandising, bundles for single-unit sales, and options for add-ons like services. You also learned strategies and processes for these configurations, including how the searchable and online attributes work for product sets.
In this badge, you learned how to create and and deploy catalogs and how to manage products with strategic category design. You also learned to configure different product types including standard products, variations, variation groups, and composite products.
Resources
- Trailhead: Agentforce Commerce for B2C Merchandisers
- Trailhead: Salesforce B2C Commerce Import & Export
- Trailhead: Einstein Product Recommendations for Commerce Cloud
- Salesforce Help: Products