Decide When to Build React Apps with Agentforce Vibes and Create Your Project
Learning Objectives
After completing this unit, you’ll be able to:
- Compare the React framework and the Lightning Web Components framework.
- Identify the benefits of AI-assisted development with Agentforce Vibes.
- Outline the four-stage development lifecycle for React apps built with Agentforce Vibes.
- Create a React app project in Agentforce Vibes IDE.
When to Choose React Over Lightning Web Components
In the previous unit, you reviewed the kinds of apps that React is great for. But Lightning Web Components (LWC) is also a powerful way to build rich user interfaces on Salesforce. How do you choose between these frameworks?
Choose Lightning Web Components when you want to:
- Build reusable components that appear in multiple Salesforce contexts, such as Lightning pages, Experience Builder, and Salesforce mobile apps.
- Integrate tightly with Lightning Data Service and base Lightning components.
- Work with declarative admin tools such as the Lightning App Builder.
- Get top performance within the standard Salesforce UI.
Choose a React app when you want to:
- Build a self-contained app rather than a component that’s embedded in a Salesforce surface.
- Own routing, state management, and styling end-to-end.
- Use third-party React libraries, rather than Salesforce declarative admin tools.
- Depart from standard Salesforce UI patterns to deliver a fully custom experience.
Why Agentforce Vibes?
After you decide that React is the right fit, use Agentforce Vibes as your development partner to accelerate the entire React development lifecycle. What makes Agentforce Vibes distinct from general-purpose AI coding tools is that it already knows your org. Agentforce Vibes has a live connection to your org’s metadata, so it understands your custom objects, Apex dependencies, and existing code patterns. Agentforce Vibes performs these specialized tasks using Salesforce Model Context Protocol (MCP) servers and AI Skills.

Instead of scaffolding a project, writing boilerplate, and wiring up integrations manually, just describe what you want in natural language and let Agentforce Vibes handle the rest.
- Generate a React app from a template or a sample app.
- Create Salesforce data models, including custom objects and fields.
- Build business logic, such as validation rules, Apex triggers, and flows.
- Build styled UI components.
- Create and run unit tests.
- Deploy metadata to your org.
The code it generates automatically fits your architecture, so you don’t have to clean it up afterward.
Preview the Four-Stage Lifecycle
No matter what type of React app that Agentforce Vibes helps you build, the project follows the same four-stage rhythm. Every React app you create moves through these four stages, and you spend the rest of this badge working through them.
-
Prompt: Describe what you want to build in natural language.
-
Co-create: Collaborate with Agentforce Vibes as it builds your app and metadata.
-
Preview: Review your changes in real time with Live Preview as you build the data layer.
-
Deploy: Deploy your app to Salesforce, and then access it from the App Launcher or Experience Cloud.
This lifecycle is a two-way conversation. You can add features, refine the UI, and fix bugs with natural language. You move back and forth between stages as your app evolves.
With a clear sense of when React fits your goals, what Agentforce Vibes brings to the table, and the development lifecycle ahead, you’re ready to start building a React app.
Set Up Your Development Environment
Agentforce Vibes IDE, formerly known as Code Builder, is a web-based integrated development environment that delivers the full power and flexibility of Visual Studio Code (VS Code) in your browser. It includes Salesforce Extensions, the Salesforce CLI, and GitHub integration, so you don’t need to install extra software to start building.
Sign Up for a Developer Edition Org with Agentforce Vibes IDE
To complete this badge, you need a special, limited-time custom playground with Agentforce and Agentforce Vibes IDE.
- Select Create Playground, and then select Yes, Create Playground.
- Your new org is automatically attached to your Trailhead account.
- Make note of your org's expiration date and complete this badge before then.
- Select Launch to open the playground.
Confirm Agentforce Is Enabled
Einstein is the org-level toggle required for every AI feature. Nothing downstream works until it’s on.
- To open the Setup menu, select Setup
 .
- In the Quick Find box, search for and select Einstein Setup.
- Confirm that the Turn on Einstein toggle is On.
- Refresh your browser.
- In the Quick Find box, search for and select Agentforce Agents.
- Confirm that the Agentforce toggle is On.
Activate the Salesforce MCP Server
The Headless 360 MCP Server (Beta) lets Agentforce Vibes quickly discover and execute complex Salesforce setup and integration operations. It includes MCP tools that help Agentforce Vibes load the correct AI Skills and make the right API call for your requests.
- To open the Setup menu, select Setup
 .
- In the Quick Find box, search for and select MCP Servers.
- From the list of MCP servers, select Headless 360 (H360) MCP Server.
- Select Activate.
Launch Agentforce Vibes IDE
With the required platform features turned on, you’re ready to configure your React project in Agentforce Vibes IDE.
- To open Agentforce Vibes IDE, select Setup
 and select Agentforce Vibes from the dropdown menu.
- Review and accept the Terms and Conditions.
- The first time you launch Agentforce Vibes IDE, it runs through a setup process that may take a few minutes. You see the message: “Agentforce Vibes is loading…” After Agentforce Vibes IDE loads successfully, the Agentforce Vibes IDE editor window opens by default.
- If a “Do you trust the authors of the files in this folder?” window appears, select Trust the authors of all files in the parent folder ‘codebuilder’, and then select Yes, I trust the authors.
Here’s the Agentforce Vibes IDE editor window.

Create Your React Project
The simplest way to create a React app with Salesforce Multi-Framework is from the Agentforce Vibes Welcome Page. You can build from a project template or clone a sample app.
A project template gives you the UI bundle project structure and some basic features, but doesn’t include a prebuilt React app. There are two templates, which map to the two React app types.
-
Internal User App: For employees who sign in with their Salesforce credentials. This template includes an Agentforce Conversation Client and object search. It also includes the CustomApplication metadata type, which registers the App Launcher entry and points to your UI bundle.
-
External User App: For business-to-business (B2B) and business-to-consumer (B2C) use cases, such as partners or customers signing in from outside your org. This template provides a prebuilt shell with an Experience Cloud site, navigation, authentication, and object search.
A sample app is a complete project that already includes custom objects, sample data, dashboards, and more. Sample apps are great for exploring what you can create with Agentforce Vibes and Salesforce Multi-Framework. For example, you can use Property Management App, an internal operations app to manage rental records, approvals, and requests. To run a sample app, just clone the sample app project, and then follow the directions in the README.md file.
In this badge, you build a simplified version of the Property Management App from scratch. Instead of cloning the full sample app, start from a project template.
- In Agentforce Vibes IDE, select Agentforce Vibes
 from the side panel, which opens the Agentforce Vibes chat interface.
- Select I agree to the terms.
- Select Enable Agentforce.
- Select + New Project to open the Welcome Page. Alternatively, open the Command Palette (Ctrl+Shift+P on Windows or Command+Shift+P on macOS), and then enter Agentforce: Show Welcome Page.
- Select the React App tile.
- To create a project from a template, select Create a Project | Internal User App.
- Enter
PropertyHubas the project name. This project name is also used as the default UI bundle name.
- Keep the default location for the project, and then select Create Project.
Here’s the Agentforce Vibes side panel and the Agentforce Vibes Welcome page.
Take a moment to explore the new project. All the files you need are in the force-app/main/default/uiBundles/PropertyHub directory, organized in their associated metadata directories.
Install Project Dependencies
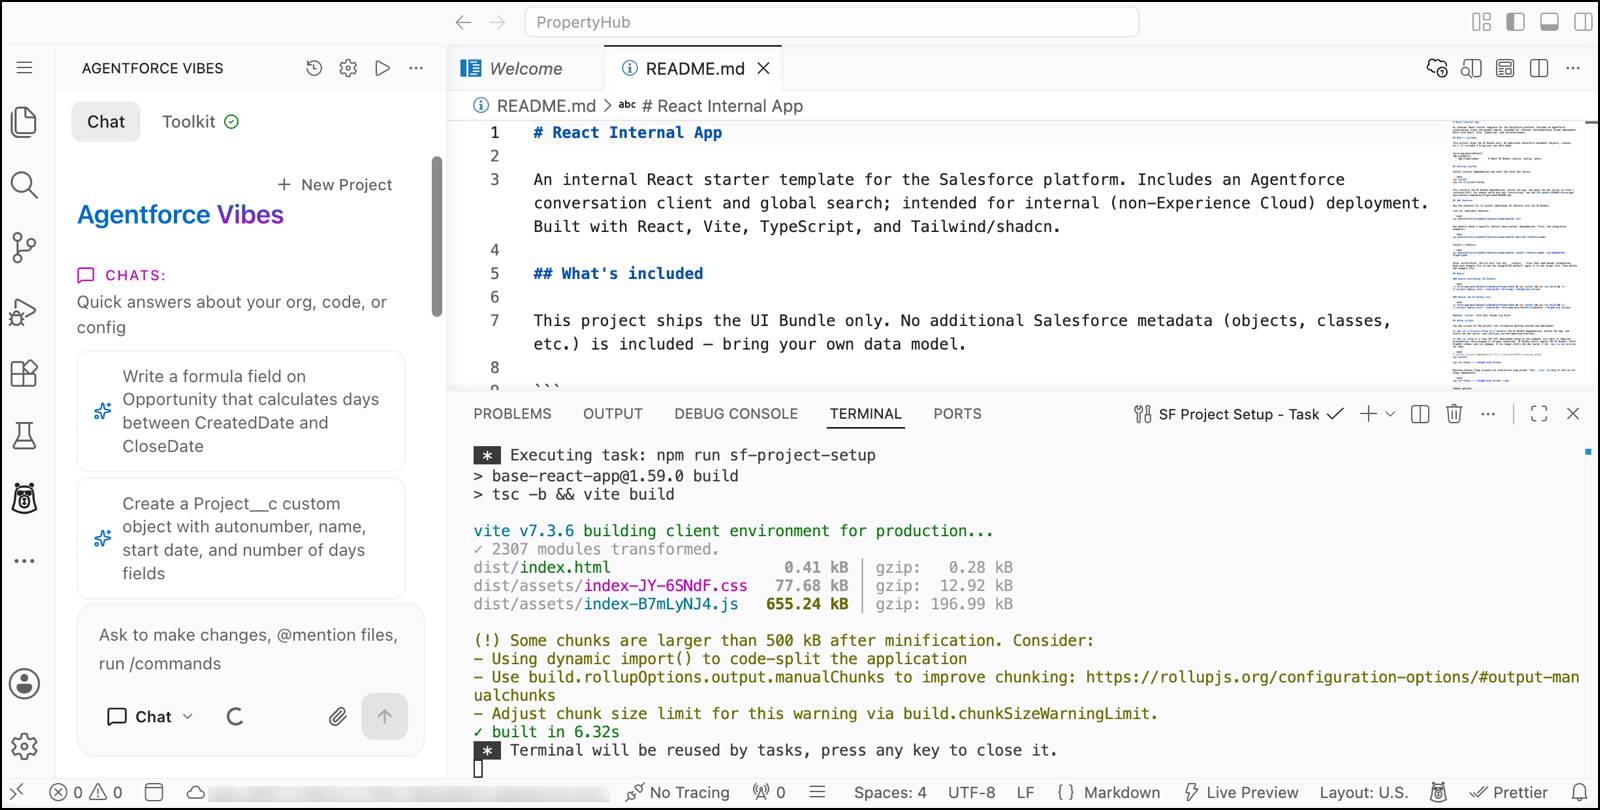
When you create the PropertyHub project, the npm run sf-project-setup command might begin running automatically in the Agentforce IDE terminal. This command installs project dependencies. If the command doesn’t start, follow these steps to install the dependencies manually.
Make sure that you install the dependencies from your UI bundle directory, not the project’s home directory.
- To open the terminal window, open the Command Palette (Ctrl+Shift+P on Windows or Command+Shift+P on macOS) and enter View: Toggle Terminal.
- Copy these commands into the terminal.
cd force-app/main/default/uiBundles/PropertyHub
npm install
The installation might take a few minutes to complete. It brings in standard React framework tooling, including Vite, so there’s no custom toolchain to learn.
Here’s the Agentforce Vibes IDE terminal after you install the project dependencies. You can ignore any package warnings that the npm install process reports.
Enable the Salesforce MCP Server
- In the Agentforce Vibes
 menu, select the Toolkit tab.
- In the MCP Servers section, turn on the Salesforce Headless 360 MCP Server.
Your project is ready. In the next unit, you prompt Agentforce Vibes to turn this template into a PropertyHub app.