Configure and Execute a Simple Order Orchestration
Learning Objectives
After completing this unit, you’ll be able to:
- Create an orchestration plan for a simple bundle.
- Verify the fulfillment progress.
Create a Fulfillment Workspace
So far, you’ve explored the basic tasks of orchestrating a bundle and completed the setup for your Developer Edition org. It’s time to put that work into action. In this unit, you follow Julian to design a simple orchestration plan for invoicing the Laptop Basic Bundle. Each step he takes mirrors the key building blocks of Dynamic Revenue Orchestration (DRO)—from creating a workspace to linking the plan with a product.
Before you do that, connect your new Developer Edition org to Trailhead to follow along and complete the challenge at the end of this unit.
- Make sure you’re logged in to your Trailhead account.
- In the Challenge section at the bottom of this page, click the playground name and then click Connect Org.
- On the login screen, enter the username and password for the Developer Edition org you set up in the previous unit.
- On the Allow Access? screen, click Allow.
- On the Want to connect this org for hands-on challenges? screen, click Yes! Save it. You’re redirected back to the challenge page and ready to use your new Developer Edition org to earn this badge.
Now that your org is connected, use it to create a new fulfillment workspace.
- From the App Launcher, find and select Dynamic Revenue Orchestrator.
- Click
 , and select Fulfillment Workspaces.
- Click New.
- Enter the name as
Laptop Basic Invoicing Plan.
- Save your work.
This workspace acts as a container for all the orchestration steps related to bundle invoicing.
Create the Step Groups
As this is a single fulfillment unit, add a step group for invoicing steps.
- In the Laptop Basic Invoicing Plan workspace, click New Step Group.
- In the New Fulfillment Step Definition Group window, for Fulfillment Step Definition Group Name, enter
Invoicing.
- Save your changes.
This step group holds all the invoice-related fulfillment steps.
Create the Steps
Now, generate and email the invoice.
- In the Invoicing group section, click + Add Step.
- In the New Fulfillment Step Definition window, add these details.
- Fulfillment Step Definition Name:
Generate Invoice
- Step Type: Auto Task
- Flow Definition Name:
FlowForSuccess
- Run As User: Your user record
Note that the Scope is set to Plan by default, ensuring it generates a single invoice for the entire fulfillment plan.
- Click Save & New.
- In the New Fulfillment Step Definition window, add these details.
- Fulfillment Step Definition Name:
Email Invoice
- Step Type: Milestone
- Fulfillment Step Definition Name:
- Save your work.
Your Laptop Basic Invoicing Plan looks like this in the Fulfillment Workspace.
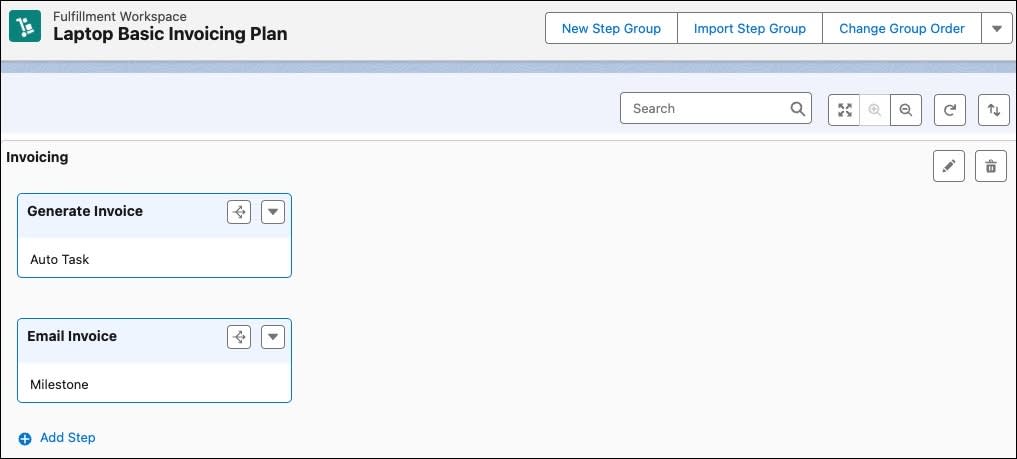
These steps define how the invoice is generated and sent. Next, Julian makes sure the invoice gets emailed only after it’s generated. For this, he defines dependencies.
Define the Dependencies
Define the sequence in which steps are executed.
- Go to the Laptop Basic Invoicing Plan workspace.
- On the Generate Invoice fulfillment step definition, click
 .
.
- As Email Invoice is dependent on Generate Invoice, click + on Email Invoice.
- In the New Fulfillment Step Dependency Definition window, enter the name as
GenInv_EmailInv. Also, note that the Scope is set to Plan.
- Save the changes.

With the dependencies in place, you are now ready to link the plan to a product to trigger the orchestration.
Create a Product Fulfillment Scenario
Create a scenario to link the Laptop Basic Bundle to the Laptop Basic Invoicing Plan.
- In the Laptop Basic Invoicing Plan workspace, click anywhere in the Invoicing fulfillment step group.
- A side panel opens. Click the Related tab.
- In the Scenarios section, click New, and add these details.
- Name:
Laptop Basic Invoicing Scenario - Action: Add
- Product: Laptop Basic Bundle
- Name:
- Save your changes.
Go back to the Laptop Basic Invoicing Plan workspace. The Scenarios section now shows the new scenario.

Now, when a user orders the Laptop Basic Bundle, the Laptop Basic Invoicing Plan triggers automatically.
Create an Order
Time to create an order for the Laptop Basic Bundle to see the orchestration plan in action.
- From the App Launcher, find and select Quotes.
- Click New Quote.
- In the New Quote window, add these details.
- Quote Name:
Laptop Basic Bundle Test - Account for Quote: EdgeMX
- Save your work.
- In the new Laptop Basic Bundle Test quote page, click Browse Catalogs.
- In the Choose Price Book window, if prompted, make sure Standard Price Book is selected, and save your changes.
- In the All Catalogs list, select Hardware Catalog, and click Next.
- Under Categories, select Laptops.
- From the product list, select Laptop Basic Bundle. Make sure the quantity is 1.
- Click Add and Save Quote.
- Click
 , and select Create Order.
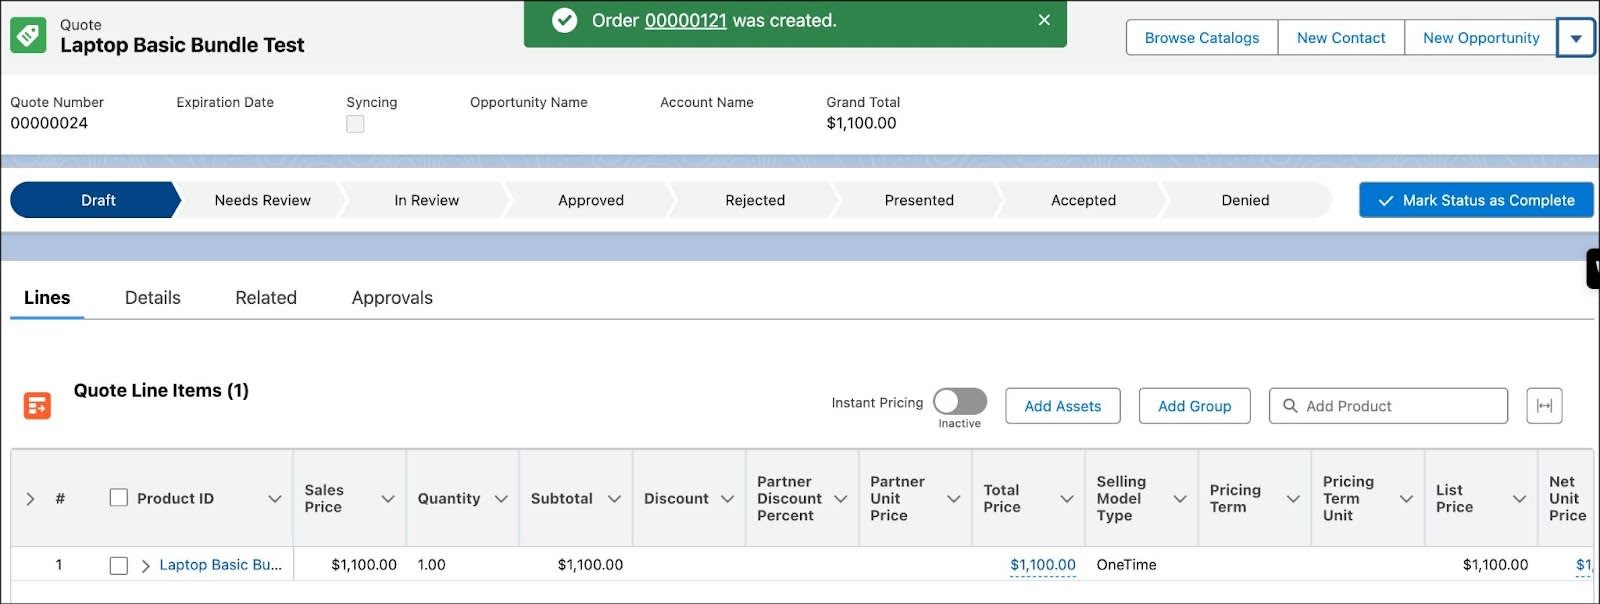
- Select Create Single Order and click Finish.
Almost there! The CPQ system is generating your order. You see your order in a few moments.
Submit an Order
Next, submit the order you just created.
- Open the order you just created. Alternatively, click the Related tab in the Quote page and scroll down to the Orders section to find your new order.
- To make the order eligible for orchestration, activate it. Click
 , and select Activate.
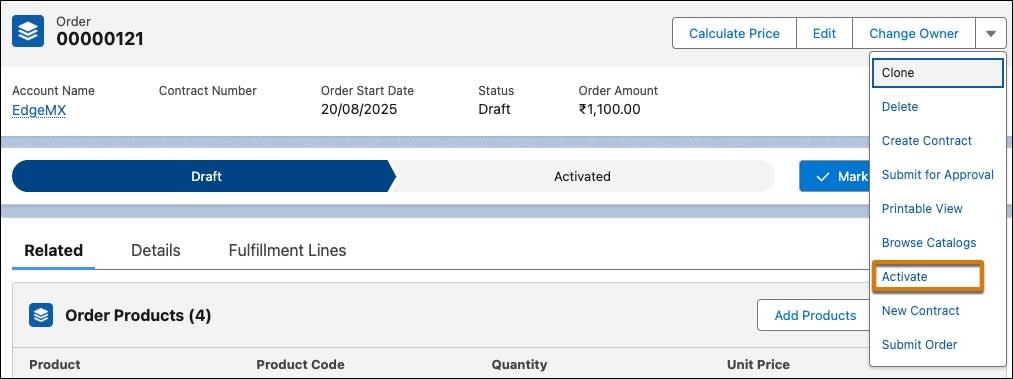
- Click Activate.
- Click
 , and select Submit Order.
- Wait for the successful Submit Status message and click Finish.
Now that you’ve submitted the order, the system sends the order to the DRO, and initiates the simple fulfillment plan.
The Outcome
Check how the order progresses through the orchestration plan.
View Fulfillment Plan
First, verify the fulfillment plan.
- On the order page, go to the Decomposition Details tab.

- Click View Orchestration Plan.
- Refresh the page until all steps show Completed.
Congratulations! Your new Laptop Basic Invoicing Plan is ready.
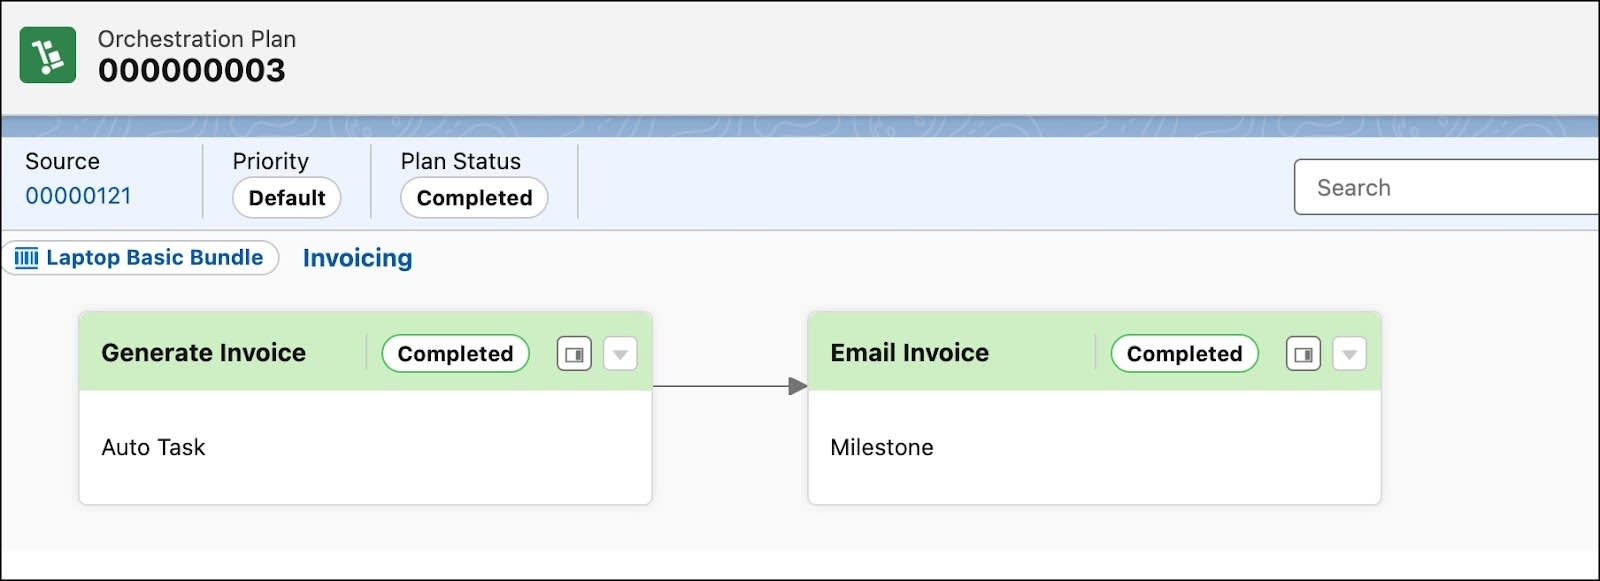
The Generate Invoice and Email Invoice steps run automatically. This fulfillment plan uses DRO orchestration to complete the order you submitted, with each step running against your order and its line items.
Verify the Assets
After the system submits and fulfills the order, it creates asset records that reflect the products or services the customer now owns. Up next, verify these assets.
- Go back to the order.
- On the order page, click account name EdgeMx.
- On the account page, go to the Assets tab.
In the Managed Assets section, check if the Laptop Basic Bundle product is listed as an asset.

The system creates only one orchestration plan because the scope is set to Plan. It generates multiple instances only when you change the scope to Line Item or Bundle. Optionally, create a quote and order with two Laptop Basic Bundles and review the orchestration plan to see how it executes. This step isn’t required to pass the challenge at the end of this unit.
Congratulations! You successfully fulfilled, invoiced, and turned the bundle into an asset, all through your DRO plan.
Next Steps
At InfinitraBytes, Julian streamlines simple bundle fulfillment with DRO to boost efficiency.
In this module, you’ve built a solid foundation by configuring a simple orchestration plan.
After you finish here, continue to complete the Complex Order Decomposition and Orchestration with Agentforce Revenue Management module to build a more complex fulfillment flow that involves decomposition. Use the same Developer Edition org you set up in this module for the hands-on challenges in that module.
To pass the challenge and earn the badge, click Check Challenge to Earn Points.