Create Formula Fields
Add a Static Resource
Next, you create a field on the Travel Approval object that shows a visual indicator (that is, image file) based on the value of the Status field. For example, one image displays for Rejected approvals and a different image for Approved approvals. This provides a quick and simple way for users of the system to get an indicator of the status of a travel approval.
First, you need to upload a zip file to your Salesforce environment that contains all the images you use. You should have a file titled StatusImages.zip that is part of the files you downloaded at the beginning of the badge. Upload that zip file as a static resource file in Salesforce.
- Click the Home tab to navigate back to the main setup page.
- From Quick Find, search for and select Static Resources.
- Click New.
- Enter these values for your static resource:
- Name:
StatusImages
- File: StatusImages.zip
- Cache Control: Public
- Name:
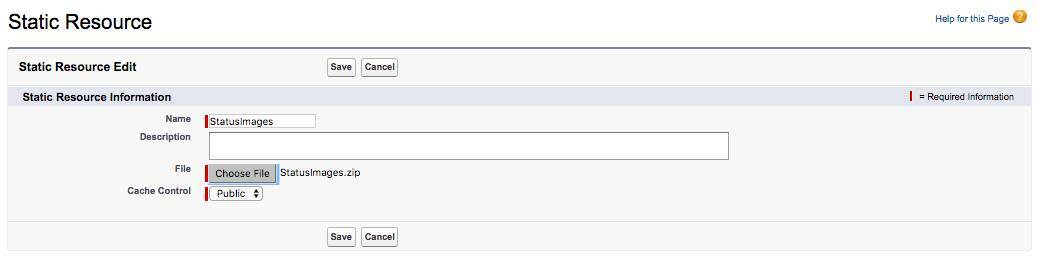
- Click Save.
Add a Field
Next, create a new field on the Travel Approval object to show an image based on the Status field. Salesforce has a formula field data type that can be used for this.
- Click the
 icon next to the Object Manager tab. This provides a shortcut to the Object Manager for the recent objects you have edited.
- Select Travel Approval.

- Select Fields & Relationships.
- Click New
- Select Formula data type.
- Click Next.
- Enter these values:
- Field Label:
Status Indicator - Field Name:
Status_Indicator(This automatically gets sent when you tab out of the Field Label field.)
- Formula Return Type: Text
- Click Next.
- Copy and paste the following formula into the formula editor.
IF( ISPICKVAL( Status__c , 'Approved') , IMAGE("/resource/StatusImages/thumbs-up.png", "Accepted", 20, 20),
IF ( ISPICKVAL( Status__c , 'Rejected'), IMAGE("/resource/StatusImages/thumbs-down.png", "Rejected", 20, 20),
IMAGE("/resource/StatusImages/draft.png", "In-Process", 20, 20)))- Click Next, Next, and Save.
Congratulations, you now have a new field Status Indicator setup on your Travel Approval object. In the next step, you learn how to automate your application with Flow Builder.