Build Guided Processes with Omniscripts
Learning Objectives
In this badge, you’ll:
- Create an Omniscript to update order shipping details.
- Add steps and actions to the Omniscript.
- Invoke Integration Procedures in the Omniscript.
- Test the Omniscript.
Before You Start
Before you complete any steps in this badge, make sure you complete these hands-on checks and hands-on challenges (HOCs).
-
Order and Country Data Management with Omnistudio Data Mappers
-
Order and Country Data Processing with Omnistudio Integration Procedures
The work you do in the HOCs here builds on the work you complete in those badges. Use the same Developer Edition org that you used in the Data Mappers and Integration Procedures badges for this badge.
Badge Series Recap
After completing the prerequisite badges, you have all the data integrations to configure a custom dashboard-style page layout for a customer service rep. Remember that you are working to build Flexcards to give reps a 360-degree view of customer order details. So far, you created these data mappers to extract, transform, and load data.
-
DMExtractOrderDetails: A Data Mapper Extract that fetches order information.
-
DMTransformOrderAndCountryData: A Data Mapper Transform that restructures and maps order and country data to a format that can be used by other components.
-
DMLUpdateOrderDetails: A Data Mapper Load that updates shipping address information on an order.
And these two Integration Procedures:
-
Process Customer Order calls the extract and transform Data Mappers you created previously to fetch and process order and country data. It also uses the Data Mapper Load you created earlier to update the order data. This Integration Procedure uses conditions to divide the process into two workflows—fetch and update. The Omniscript you create in this badge uses the update workflow.
-
Fetch External Country Details uses a Data Mapper Extract to fetch the new shipping country information.
Get Started with Omniscripts
In this badge, you create an Omniscript to update the customer’s shipping details in an order. Note that you use the same Omnistudio Developer Edition org across all the badges in the series, with each subsequent badge building on the last one.
You create three main screens to show the current shipping details, add the new shipping details, and show the updated shipping country information.
Here’s the structure of the Update Customer Order Omniscript that you configure. It consists of these step and action elements: View Current Order Details Step, Edit Order Step, Set Order Data Set Values Action, Save Order Data Integration Procedure Action, Get Updated Country Data Integration Procedure Action, Confirmation Step, and Navigate Action.

An action button on a Flexcard you build in the next badge opens the Omniscript in a new modal window. The Navigate Action at the end of the Omniscript structure directs you back to the order record page from where it was called.
Create an Omniscript
Let’s create the Omniscript.
- Click
 , then find and select Omniscripts.
- Click New.
- In the New Omniscript window, enter these details.
- Name:
Update Customer Order
- Type:
UpdateOrder
- Sub Type:
UpdateOrder
- Name:
- Click Save.

The Omniscript opens in Omniscript Designer in a new tab. A Step element is added by default in the designer when you create an Omniscript.
Add the Current Order Details Step
Next, add the current order details step.
- In the Omniscript Designer, click the Step 1 element on the canvas.
- In the Step Properties panel, enter these details.
- Name:
ViewCurrentOrder
- Field Label:
View Current Order Details
- Name:
Now, add text elements inside the step element to capture the current order details.
- In the Omniscript designer, drag a Text element from the Input category of the Elements panel and drop it at the beginning of the step element.

- In the Text Properties panel, enter these details.
- Name:
AccountName
- Field Label:
Account Name
- Name:
- Select the Read-only checkbox.
- For Default Value, enter
%AccountName%.
- Grab the right boundary of the Account Name text element and set it at the middle of the step element. You can now add another text element beside it.

All the changes are automatically saved as you work with an Omniscript.
Add another text element beside the Account Name element so that the two appear in the same row on the screen.
- In the Omniscript designer, drag another Text element from the Input category of the Elements panel and drop it beside the Account Name element.
- In the Text Properties panel, enter these details.
- Name:
OrderNumber
- Field Label:
Order Number
- Name:
- Select the Read-only checkbox.
- For Default Value, enter
%OrderNumber%.
- Similarly, add these Text input elements in the next row and configure them in the order given here. To add a Text element in the next row, drag the Text element from the Input category of the Elements panel and drop it beside the Order Number text element.
Name |
Field Label |
Read-only Checkbox |
Default Value |
|---|---|---|---|
CurrentOrderStatus |
Current Order Status |
Selected |
%OrderStatus% |
CurrentShippingMethod |
Current Shipping Method |
Selected |
%ShippingMethod% |
6. Drag a Line Break element from the Display category and drop it after the CurrentShippingMethod element.
7. Add the remaining Text input elements (two in each row) and configure them in the order given here.
Name |
Field Label |
Read-only Checkbox |
Default Value |
|---|---|---|---|
CurrentShippingStreet |
Current Shipping Street |
Selected |
%ShippingStreet% |
CurrentShippingCity |
Current Shipping City |
Selected |
%ShippingCity% |
CurrentShippingState |
Current Shipping State |
Selected |
%ShippingState% |
CurrentShippingPostalCode |
Current Shipping Postal Code |
Selected |
%ShippingPostalCode% |
CurrentShippingCountry |
Current Shipping Country |
Selected |
%ShippingCountry% |
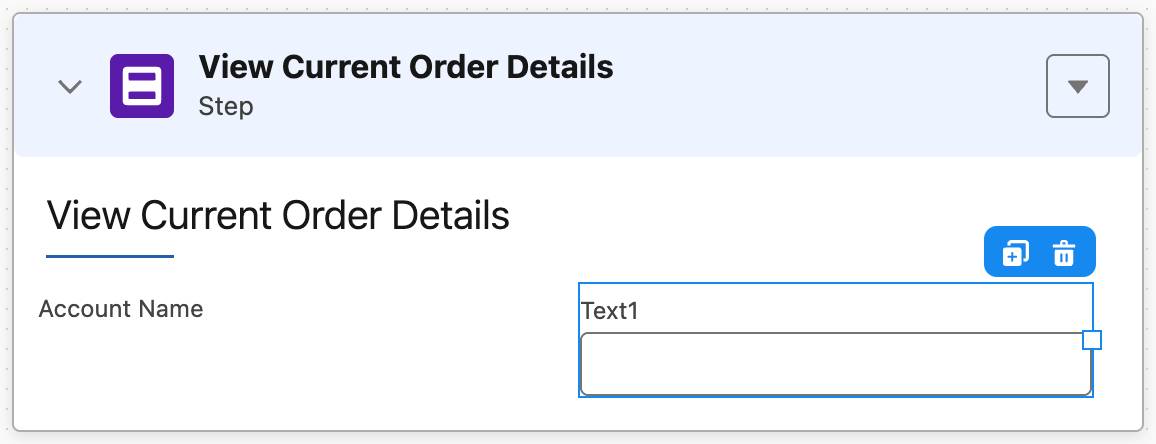
After you configure all the elements, your View Current Order Details step looks like this.

The Omniscript uses the merge fields input added in the Default Value field of each element to automatically fetch the data from the Flexcard. You set up this connection when you configure the Omniscript action button in a Flexcard in the next badge.
Your first step element is now ready. All the fields in this step have read-only inputs. You update these values in the next step.
Add the Edit Order Details Step
Add a second step element to capture the new shipping details.
- In the Omniscript designer, drag a Step element from the Groups category and drop it after the View Current Order Details step.
- In the Step Properties panel, enter these details.
- Name:
EditOrder
- Field Label:
Edit Order
- Name:
- Drag a Text element from the Input category and drop it at the beginning of the step.
- In the Text Properties panel, enter these details.
- Name:
NewStatus
- Field Label:
New Order Status
- Default Value:
%OrderStatus%
- Name:
- Similarly, add these Text input elements and configure them in the order given here.
Name |
Field Label |
Default Value |
|---|---|---|
NewShippingMethod |
New Shipping Method |
%ShippingMethod% |
NewShippingStreet |
New Shipping Street |
%ShippingStreet% |
NewShippingCity |
New Shipping City |
%ShippingCity% |
NewShippingState |
New Shipping State |
%ShippingState% |
NewShippingPostalCode |
New Shipping Postal Code |
%ShippingPostalCode% |
NewShippingCountry |
New Shipping Country |
%ShippingCountry% |
Here’s the Edit Order step set up.

The Edit Order page uses the Default Value merge fields to auto-populate the current order details from the Flexcard. You set up this connection when you configure the Omniscript action button in a Flexcard in the next badge.
Add a Set Values Action
Next, you add a Set Values element to structure and format the input data. Then you send this data to the Integration Procedure to update shipping details. Apart from the new shipping details, the Integration Procedure needs the OrderId and actionType condition to complete the update action.
Let’s add the element.
- In the Omniscript designer, drag a Set Values element from the Standard Actions category and drop it after the Edit Order step.
- In the Set Values Properties panel, enter these details.
- Name:
SetOrderData
- Field Label:
Set Order Data
- Name:
- Under the Element Value Map section, click + Add Element Value.
- In the Add Element Value window, enter these details.
- Element Name:
OrderId
- Value:
%ContextId%. Omniscript stores the recordId of an order in ContextId.
- Element Name:
- Click Save & New.
- Repeat steps 4 to 5 and these mapping details. After adding the last mapping detail, click Save.
Element Name |
Value |
|---|---|
actionType |
update |
UpdatedShippingPostalCode |
%EditOrder:NewShippingPostalCode% |
UpdatedShippingCountry |
%EditOrder:NewShippingCountry% |
UpdatedShippingState |
%EditOrder:NewShippingState% |
UpdatedShippingStreet |
%EditOrder:NewShippingStreet% |
UpdatedShippingCity |
%EditOrder:NewShippingCity% |
UpdatedShippingMethod |
%EditOrder:NewShippingMethod% |
UpdatedStatus |
%EditOrder:NewStatus% |
The set values element captures the updated data from the Edit Order step.
What’s Next
In this unit, you learned how to build and configure an Omniscript to update order shipping details. You created a step with read-only text elements and another with fields that can be modified. Finally, you added a Set Values action to structure and format input data.
What do you do with this data now? In the next unit, you configure two Integration Procedure actions that update the shipping details in the order object and fetch the updated external country details.