Create and Convert Leads
Learning Objectives
After completing this unit, you’ll be able to:
- Explain the difference between a lead and a contact.
- Create a new lead record.
- Convert a lead into a contact.
Leading the Way
In Salesforce, a lead represents possibility. Well, a lead actually represents a person, but it’s a person that doesn’t have a well established relationship with your organization—yet.
A lead is someone who expressed interest in working with or donating to your organization, but who’s not yet a volunteer, partner, or donor. If a lead engages more deeply, they can be converted into a contact.
For example, you may gather leads through a monthly newsletter signup form on your website. Everyone who signs up becomes a lead in NPSP. The newsletter includes profiles of clients, information on becoming a volunteer, and links to donate. Should any of the leads donate or volunteer, you would convert the lead into a contact and the entire history of the relationship is included on that contact record.
Including a form on a website is a common way of finding new leads. So common, in fact, there’s a name for it (web-to-lead), and your awesome Salesforce admin can work with your webmaster to set them up. Although creating leads from a web form is awesome, leads don’t have to be created that way. A lead can come from almost anywhere, like a phone call, email, postal mail, an in-person event, or as a referral from a current constituent. No matter how you establish contact with a person, when they share their information with you and express interest in your organization, it’s an opportunity to start building the relationship.
Create a New Lead
As an example, let's imagine that you have a booth at a local community event and ask for attendees' names and email addresses if they'd like to learn more about your organization. You need to enter these contacts as leads in NPSP.
So let's create a lead record directly in NPSP.
- Find and select Nonprofit Success Pack from the App Launcher (
 ).
).
- Click the dropdown arrow on the Leads tab.
- Click + New Lead.

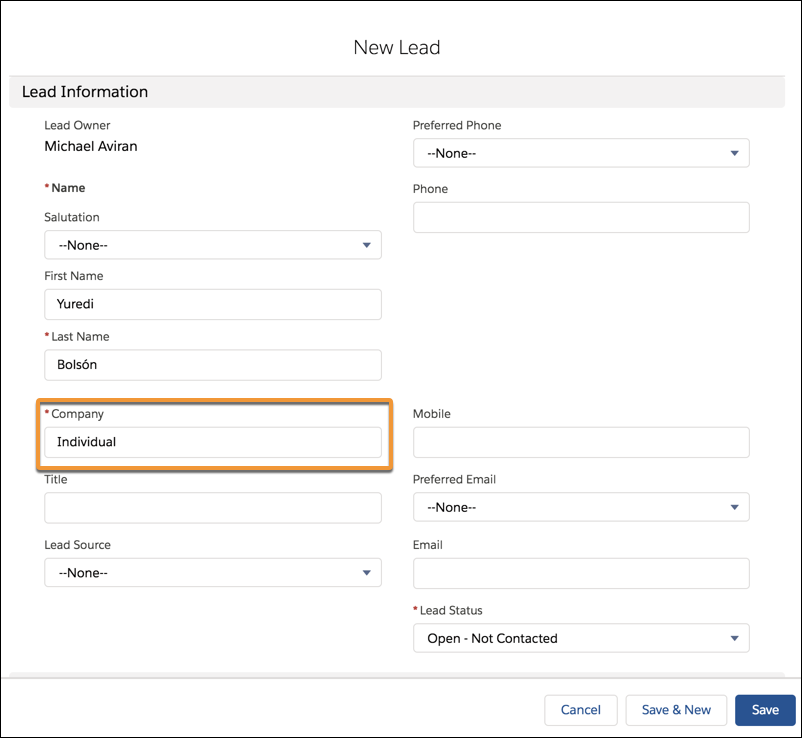
- Complete the required fields in the form. In our example, we'll add First Name, Last Name, Lead Source, Email, and Lead Status. The Company Name field is also required, and you can enter the word
Individualhere. We’ll tell you why in a moment.
- Click Save.
Like nearly everything in Salesforce, the new leads entry form is customizable. You can ask your admin to add or delete fields and change which ones are required.
Bypass Company Name (If You Need To)
Let’s take a moment to talk about that Company Name field in the New Lead form.
At most nonprofits, your leads will likely be individual people, not other organizations or companies. You can enter the word Individual to get around the required field, as we just did. If your leads are other organizations or companies, like a list of potential suppliers, go ahead and complete the Company Name field.
When the lead is converted to a contact, the word Individual triggers NPSP to create a household account for the contact. If you were to put another name in this field, like an actual company name, NPSP would create an organization account and affiliate it with this contact, and that’s probably not what you’re going for when you mostly convert leads to contact records for clients, donors, and volunteers.
Wait. Convert a lead to a contact? Yes. It’s conveniently our next topic.
Convert a Lead to a Contact
Say one of our leads decides to volunteer. It's time to convert them to a contact. Here's how.
- Find and select the lead record.
- Click Convert.

- Leave the Record Owner field default as your name.
- Make sure the Send Email to the Owner box is deselected.
- Confirm the name is correct in the Contact field. If the lead already exists as a contact, you’ll see a choice to either merge with the existing contact or create a new contact. Choose wisely!
- Confirm the Do not create a new Opportunity upon conversion option is selected. This step is important! Be sure to leave this box checked if all you’re doing is creating a contact from a lead.
- Leave the Contact Account as the Opportunity Account selection.
- In the Converted Status, selected Closed - Converted. It should be the only option in this menu and means that the lead record has become a contact record.
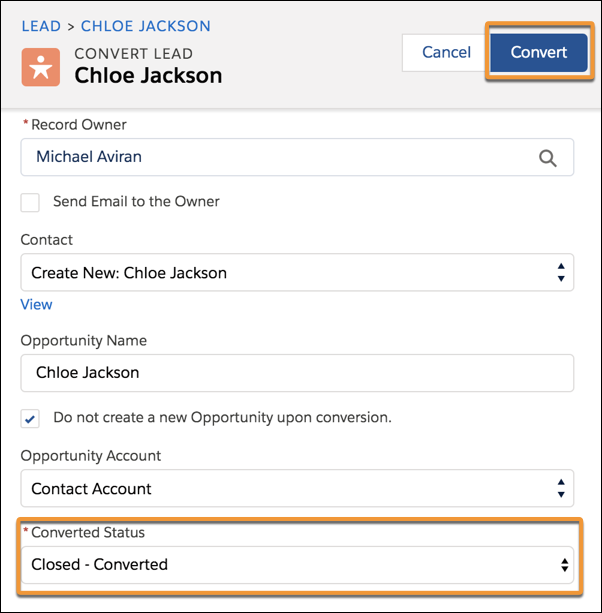
- Click Convert.
Now that our lead is a contact record, we can add more information and connect it to other records, like accounts and opportunities, in Salesforce.
But let’s go back to a few things that we skipped over in the process of converting this lead into a contact.
The conversion form would have looked different if something other than the word Individual was in the Company Name field when the lead was originally created. When there’s a company (or organization) name in that field, the lead to contact conversion form includes options to create either a household or an organization account, and an option to create an affiliation for the contact. We didn't see those options, because the Individual value entered in the Company Name field for the lead told NPSP to create a household account for the contact.
By default, the Do not create a new Opportunity option is selected and an opportunity is not created. We made sure that this checkbox was selected, so we only created a contact record. However, if the box is not selected, a new donation opportunity related to the new contact is automatically created, using the contact name as the opportunity record name, with the Stage field set to Prospecting and an amount of zero dollars. We’re not going to go into opportunities in this module, but the possibilities of what you can do with this are pretty exciting. There’s more information on this topic included in an article linked in the Resources section below. Review that, and talk to your admin if this is something you’d like to explore.
Record ownership can be transferred manually at the time of conversion or be automated. We ignored the Record Owner field when converting the lead to a contact. This made you the contact record owner, too. If we entered another staff member’s name, that person would be the owner of the new contact record. Straightforward, yes, but the reason we bring this up is because there are some automation things that your admin can do with this field, like route the record to different people based on the dollar amount the lead pledges.
If you followed along with all the steps in this module, you now know how to create and manage contacts, leads, households, organizations, relationships, and affiliations.
Success breeds success, so why stop now?
Review the resources below for more in-depth information or search Trailhead for another topic on NPSP to keep the momentum of your learning journey.
Resources
- Salesforce Help: Why and How to Use Leads
- Salesforce Help: Convert a Lead to a Contact
- Video: Nonprofit Salesforce How-To-Series: NPSP Convert a Lead
- Salesforce Website: What is Lead Generation? Guide and Best Practices