Set Up Your Agentforce Voice Agent
Learning Objectives
After completing this unit, you’ll be able to:
- Explain the benefits of using Agentforce Voice.
- Create a voice agent.
- Configure the voice for your agent.
Say Hello to Agentforce Voice
The modern contact center isn’t just evolving, it’s leveling up, transforming into an AI-first engagement center built to deliver smooth customer experiences. At the heart of this shift sits AI agents, the always-awake, and eager to help digital workers living inside platforms like Agentforce Contact Center. Powered by Agentforce Voice, these virtual dynamos cheerfully tackle the routine, the repetitive, and the relentlessly mundane, all day, every day.
And customers are seeing the value. In fact, 51% say they’d rather chat with an AI agent than wait for a human when they need immediate help. But when a situation does call for human finesse, the handoff is seamless. The human rep receives the full interaction transcript, sentiment analysis included, so the customer never has to repeat themselves.
This creates an immense payoff for businesses. These AI agents supercharge efficiency, slash costs, and free human reps to focus on the strategic, high-value work that moves the needle: complex problem-solving, relationship building, and other high-value, tasks that agents can't do. This automation positively impacts key metrics like average handle time and first call resolution, making operations not just faster, but smarter.
With Agentforce Contact Center powered by integrated voice and Agentforce capabilities, your contact center becomes an AI-first Engagement Center that unifies Public Switched Telephone Network (PSTN), high-quality digital voice and all your channels, AI-driven virtual agents, and omnichannel workflows. This combination delivers exceptional customer support and case resolution while providing a seamless and context-aware handoff to human reps whenever their expertise is needed.
Configure Agentforce to Handle Inbound Voice Calls
Setting up an agent to handle inbound calls through Agentforce is a two-step process that brings structure, intelligence, and efficiency to your voice channel. First, you create an Agentforce agent that is configured to receive and respond to inbound voice calls. This agent becomes the AI-powered frontline of your contact center, equipped to understand intent, answer questions, and resolve routine inquiries with speed and consistency.
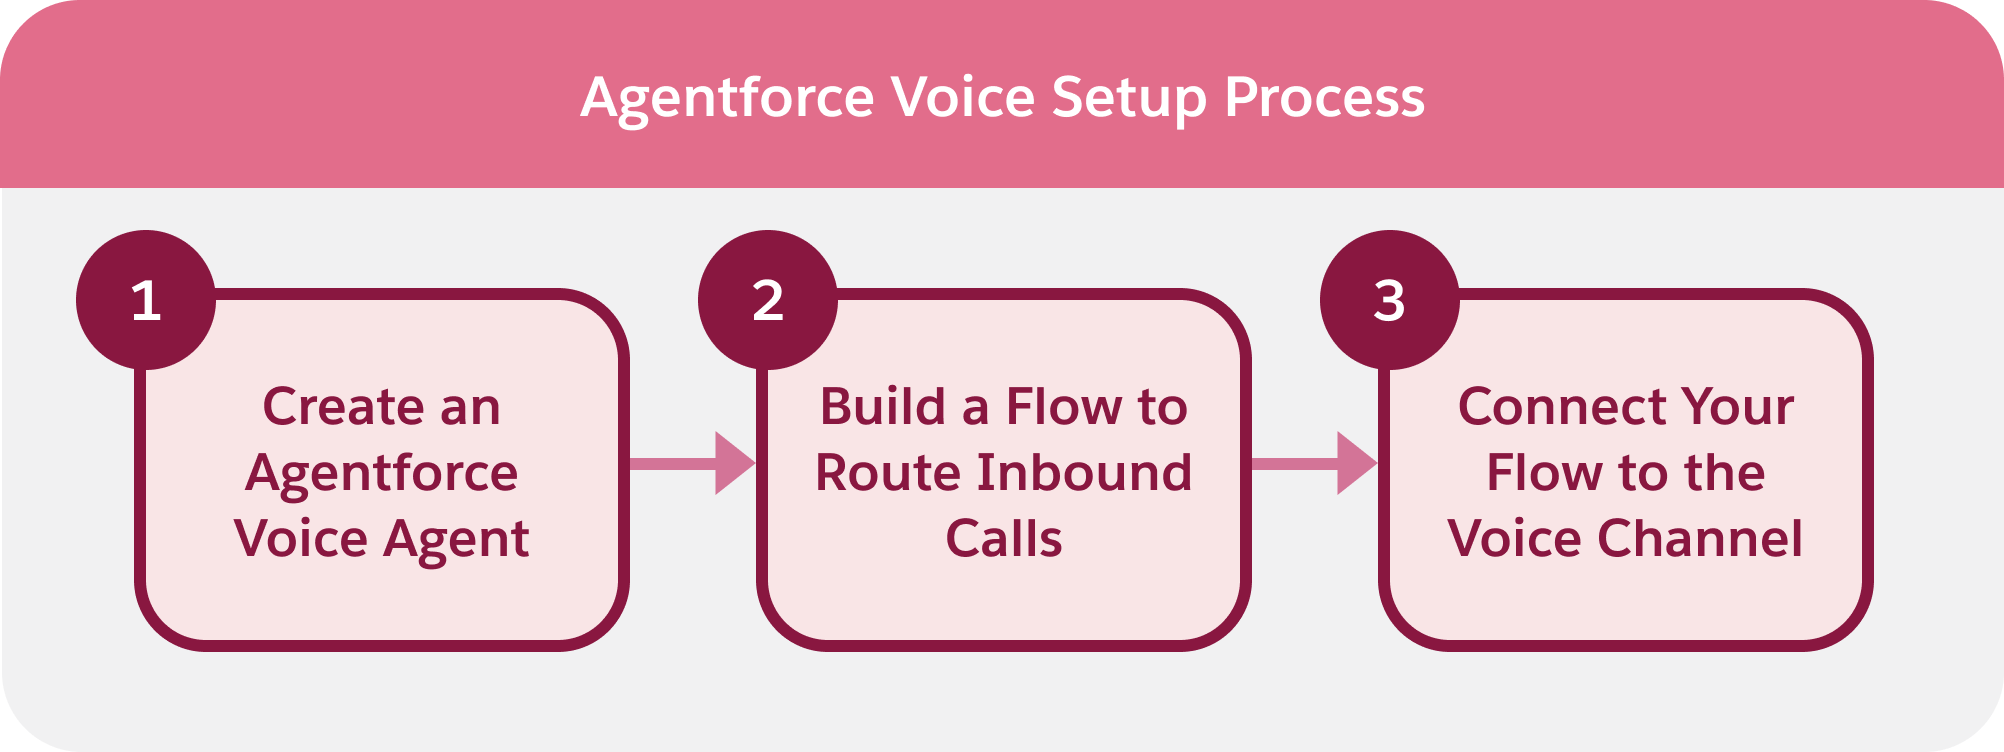
Next, you build a flow that connects this agent to your telephony routing. This flow determines how calls are passed to the agent, how customer context is captured, and when a conversation should transition to a human representative. Together, these steps create a scalable voice experience that elevates customer support.
Create an Agentforce Voice Agent
- Click
 and select Setup.
- In the Quick Find Box, search for and select Agentforce Agents.
- Enable Agentforce if it is not already active. Agentforce must be turned on to create AI agents and use its full set of capabilities.

- Click New Agent.
- On the Select an agent page, choose the Agentforce Service Agent template, then click Next.
- All subagents associated with the template are added by default. Click Next.
- In the Customize your agent page, enter the following information:
-
Name:
Inbound Voice Service Agent -
API Name:
Inbound_Voice_Service_Agent -
Description:
Deliver personalized customer interactions with an autonomous AI agent. Inbound Voice Service Agent intelligently supports your customers with common inquiries and escalates complex issues. -
Role:
An AI customer service agent whose job is to help customers with support questions or other issues. -
Company:
Ursa Major Solar provides reliable, high-efficiency solar solutions for homes and businesses. You can trust them for customized system design, smooth installation, and long-term support that makes clean energy simple and cost-effective. - Agent User: Select New Agent User
-
Name:

- Click Next.
- Skip the data setup process and click Create.
You’ve successfully created a new agent to handle the inbound voice traffic. The next step is to connect this agent to your telephony system, so it can receive routed calls and participate in live customer conversations.
Add a Telephony Connection
- On the Agent Builder page for the agent you just created, click Connections.
- Click Turn It On under Connections and wait a few seconds for the page to refresh.

- Click the Connections tab again, then click New.
- In the Add Connections pop-up window, select Telephony, then click Add to Agent.
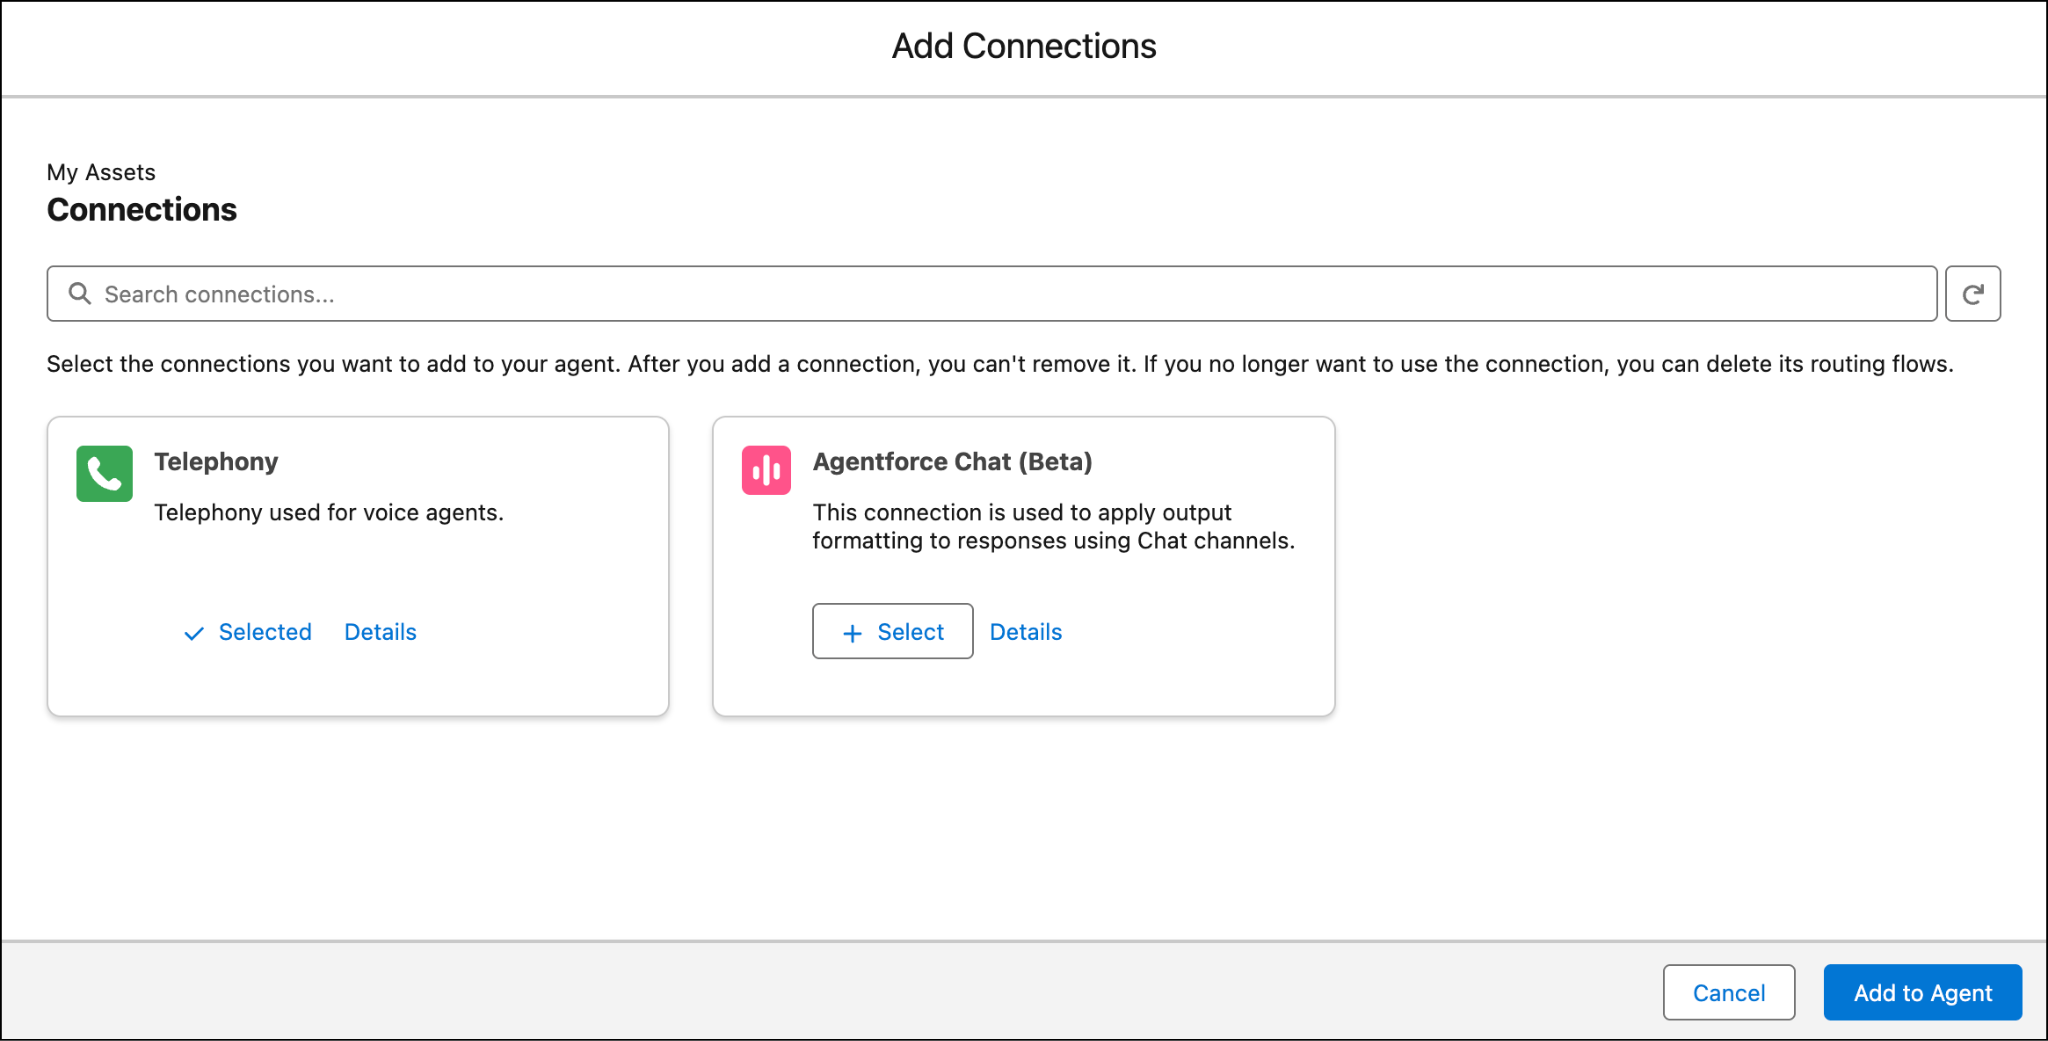
- Review the recommendations for optimizing the agent for voice, then click Yes, Optimize for Voice.
Just like that, you’ve added the telephony connection to your agent and you’re ready to complete the setup.
Set the Voice for Your Agent
When your agent speaks in a voice that reflects your brand and resonates with your audience, every interaction feels more natural, trustworthy, and human. Choosing the right voice improves clarity, reduces caller frustration, and reinforces the experience you want customers to have whenever they reach your service center.
Now that the telephony connection is in place, the next step is to fine-tune how your agent sounds to customers.
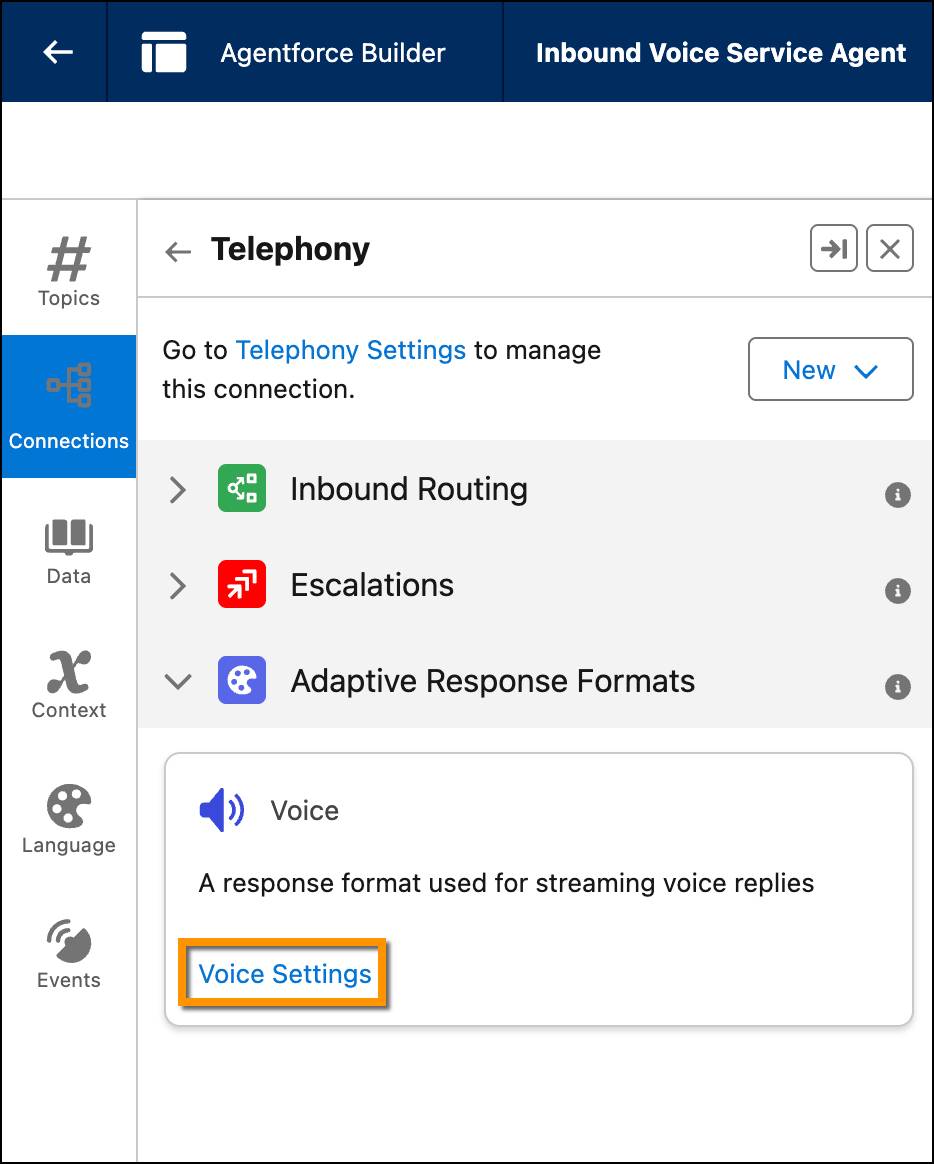
- Ensure the Connections tab is selected on your agent’s Agent Builder page, then click Needs Setup next to Telephony to customize your agent’s voice.

- For now, skip inbound routing and escalations and click Voice Settings under Adaptive Response Formats.
- Under Basic, select a voice from the dropdown list. For each option, review the description and parameters such as gender, primary language, style, age, and accent to understand what the voice offers, and click Listen to hear a preview. This is the voice your customers will hear when they engage with the AI agent, so choose one that complements your brand.
- Under Advanced, fine-tune the selected voice by adjusting speed, similarity, and stability so the agent sounds as natural, dynamic, or consistent as you need. You can slow the delivery or speed it up, make the voice more or less similar to the base style, and control how much variation or monotone delivery it uses. You can also define a pronunciation dictionary to specify exactly how the agent should say key words or phrases, and use key-term prompting to improve recognition of critical terms such as brand names or internal jargon, ensuring transcripts remain accurate.

- Once you’re satisfied with the agent’s voice, click Save, then Activate the agent.
Wrap It Up
You’ve successfully configured and activated a voice agent to engage with customers and scale contact center operations. In the next unit, you set up the flow that routes calls to the agent. Then, you connect that flow to the voice channel to bring the full experience together.