Customize Your Lightning Service Console Pages
Learning Objectives
After completing this unit, you’ll be able to:
- Customize a Lightning console page using Lightning App Builder.
- Assign a custom compact layout to the Highlights Panel.
Create Case Record Page
In order for Ada and her team to be as productive as possible, Ada would like a custom layout for viewing case information. A well-designed case page puts the most important information front and center—no scrolling, no hunting, no switching screens. She wants the case record page to include all the information the team needs to resolve cases quickly.
Here’s Ada’s wish list for her custom screen.
- A highlights panel for quick access to the most important case information
- A Knowledge section where reps can access Knowledge articles to help them close cases more quickly
- Related lists for access to any other information related to the case, such as accounts and contacts
- A Chatter feed to see any posts related to the case
To create the case record page that meets all the needs of Ada’s team, use the Lightning App Builder. And when you’re done customizing your Lightning page, assign the page to your console app.
- Click the gear icon
 and select Salesforce Go.
- In the Quick Find Box, search for and select Lightning App Builder.
- Click New, then select Record Page.
- Click Next and fill in the details.
- Label:
Case Console Record Page - Object: Case
- Click Next.
- Under Choose Page Template, select Pinned Header and click Done.
Next, add some components.
- Drag Highlights Panel from the palette on the left to the top of the canvas where it says Add Component(s) to Pinned Region Here.
- Drag Accordion to the Add Component(s) Here box on the left side of the canvas.
- In the information panel on the right, under sections, drag the Details section above the Related section.
- Click Details, and choose Knowledge from the dropdown.
- Click Done.
- Drag Knowledge from the palette on the left to the Add Component(s) Here box under the Knowledge section.
- Click the arrow to expand the Related section on the canvas, and drag Related Lists from the palette on the left to the box under the Related section.
- Drag Record Detail to the middle region of the canvas.
- Drag Chatter to the right-hand side of the canvas.

Your page should look like this.
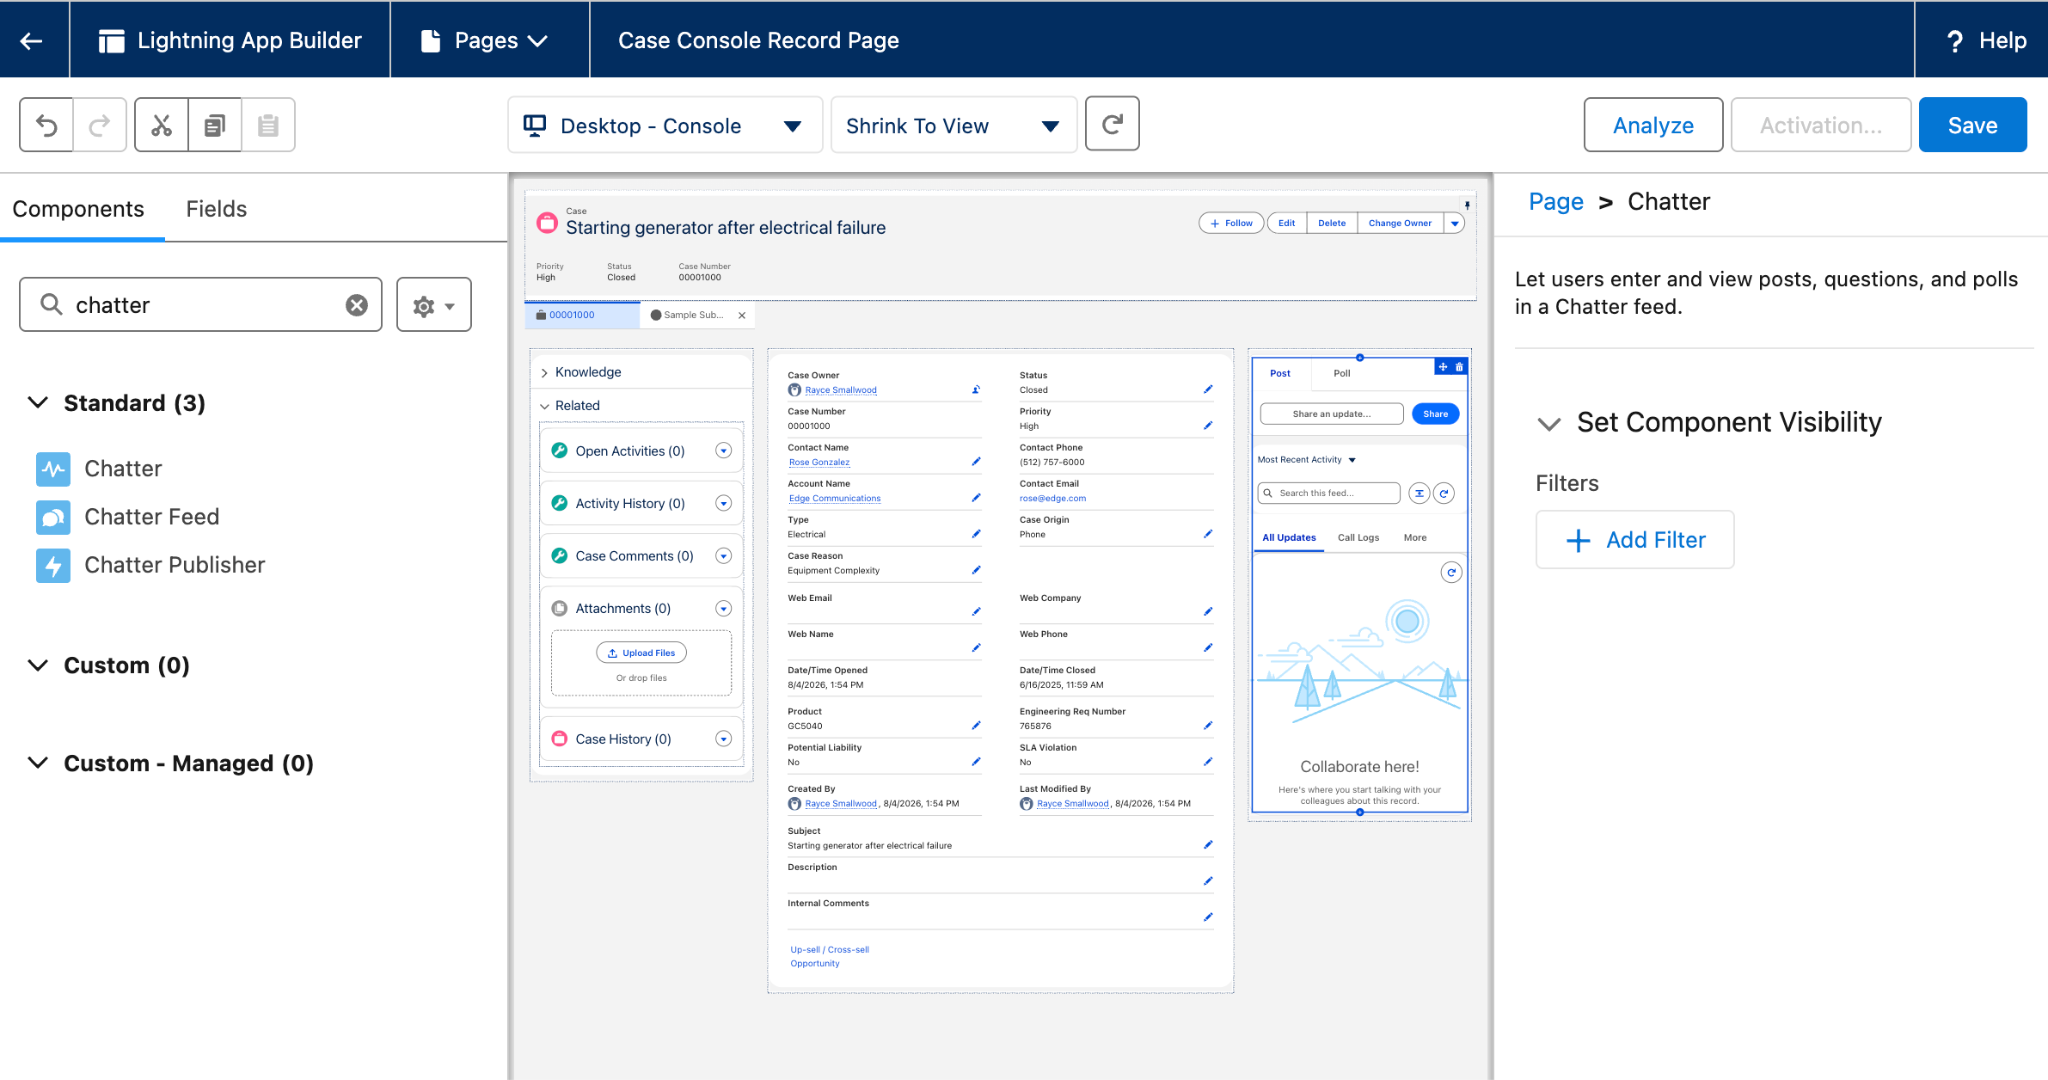
Now that your page components are added, activate the page and add it to your service console app.
- Click Save and then Activate.
- On the Activation: Case Console Record Page, click Assign as Org Default on the Org Default tab.
- Click Next and Save.
- Click the Activation button.
- Click the App, Record Type, and Profiles tab and select Assign to Apps, Record Types, and Profiles.
- Select Ursa Major Solar Service Console, then click Next and Next.
- For Record Types, select Master, then click Next.
- On the Selected Profiles page, select Custom: Support Profile and System Administrator, and click Next.
- Click Save.
- Click Save again, then click
 .
.
Test It!
- From the App Launcher, search for and select the Ursa Major Solar Service Console app.
- Take a look at the layout on your case record page, and make sure everything you added is there.
Create a Custom Compact Layout
Ada requests specific information be shown in the highlights panel of the service console app. She’d like you to add Account Name, Case Owner, and Date/Time Opened fields related to the case so she and her team can access this information quickly when viewing and managing a case. Do this by creating a custom compact layout for the highlights panel.
- Click the gear icon
 and select Salesforce Go.
- Click the Object Manager tab.
- Click Case.
- Click Compact Layouts from the menu on the left.
- Click System Default, then click Clone.
- Fill out the details for the compact layout.
- Label:
Ursa Major Highlights Panel - Name: (let default)
- From the Available Fields list, use the Add arrow to move Account Name, Case Owner, and Date/Time Opened, and click the fields to the Selected Fields list. Keep Subject, Priority, Status, and Case Number in the Selected Fields list.
- Click Save.
- Click Compact Layout Assignment, then click Edit Assignment. From Primary Compact Layout, select Ursa Major Highlights Panel.
- Click Save.
- To test it, go back to the Ursa Major Solar Service Console app and check out your Highlights Panel.

Good job! You just customized Ursa Major Solar’s console to meet Ada and her team’s needs for case management. The console is now ready for reps to manage cases efficiently, and when you’re ready to add channels like chat, messaging, or voice, you can configure those through Omni-Channel routing and add the corresponding utilities (like Phone or Chat) to the utility bar. The foundation you built here supports all of those channels.