Activate Session-Based Permission Sets Without Code
Learning Objectives
After completing this unit, you'll be able to:
- Name the ways in which you can activate a session-based permission set.
- Explain why you might want to use declarative tools to activate a session-based permission set.
- Activate a session-based permission without code.
Follow Along with Trail Together
Want to follow along with an expert as you work through this step? Take a look at this video, part of the Trail Together series.
(This clip starts at the 11:24 minute mark, in case you want to rewind and watch the beginning of the step again.)
Accessibility
This unit requires some additional instructions for screen reader users. To access a detailed screen reader version of this unit, click the link below.
Open Trailhead screen reader instructions.
Activation Options for Session-Based Permission Sets
Now that you’ve created a session-based permission set of your own, let’s make it usable. To make it usable, you need to have a way to activate a session for the permission set. If you like getting your hands dirty with APIs, you can do that, and we won’t stop you. The PermissionSet object in the Soap API contains a field called HasActivationRequired, a boolean that indicates whether the permission set requires an associated active session (true) or not (false). Insert a record into the SessionPermSetActivation object with the combination of session ID and permission set to achieve the activation.
Don’t know how to code? That’s OK. Salesforce has a nice declarative tool that you might already use: Flow Builder. We’ll use a flow to help make your session-activation process smooth, even if you don’t code.
Get Started
Before you jump in, it helps if you’re familiar with using Flow Builder. If you’re not familiar with flows, no problem. We create a simple one here. In fact, this flow functions with only one step! However, you probably already guessed that Trailhead has you covered if you want to learn more—and we encourage you to do so. Check out the Build Flows with Flow Builder trail. Make sure that you have permissions to access flows to continue, though! Let’s check permissions right now.
- Go to your profile. In Setup, go to Users and select your profile. You’re more than likely using the System Administrator profile.
- Look for Manage Flow and make sure it’s selected.
When we test our session-based permission set later, we’ll also be logging in as another user. Let’s make sure Salesforce admins have this ability while we’re at it.
- In Setup, go to Login Access Policies.
- Enable Administrators Can Log in as Any User.
- Click Save.
Now back to our flow for session-based permission sets.
- Click the App Launcher (
 ).
).
- In the Search apps and items box, enter
autoand then select Automation.
- In the Flows panel, click New.
- Under Frequently Used, select Screen Flow.
- On the flow canvas, on the path after the Start element, click
 . Select Action.
- In Search Actions, begin typing
Activateand select Activate Session-Based Permission Set.
- For Label, enter
Activate Employment Contracts Access. The API Name defaults to Activate_Employment_Contracts_Access.
- Under Set Input Values for the Selected Action, for Permission Set Name, enter
Employment_Contracts_Access. (This value is the API name of your permission set!
- Save your flow with the name
Activate Contracts Access as a Screen Flow.
Here’s what the flow looks like.
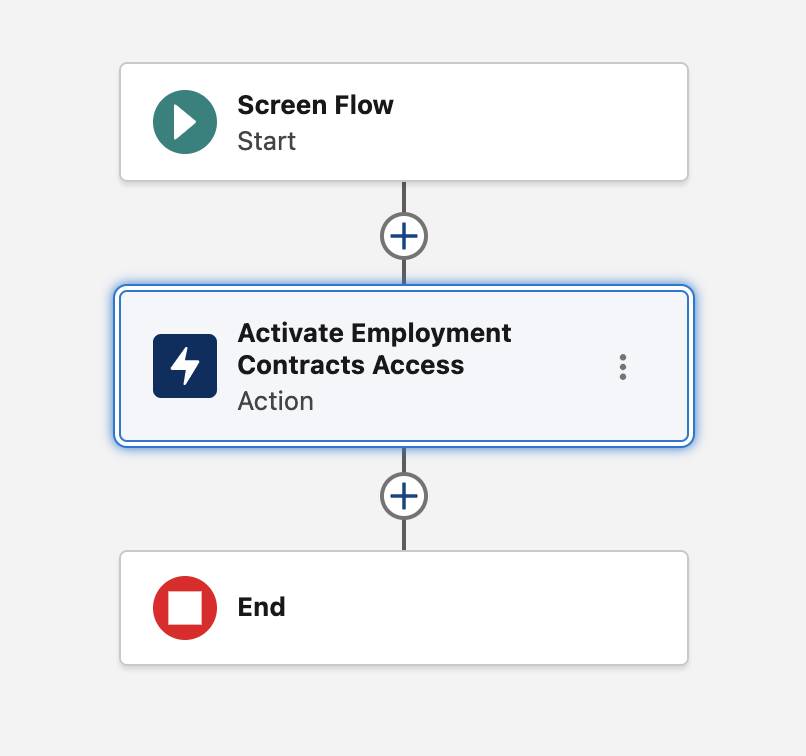
The flow creation steps were easy, right? So easy, in fact, that if you’re an experienced user of flows, you’re probably thinking, “Can’t we do more than a one-step flow?” We can. Right now, though, we’re focused on using session-based permission sets, so let’s proceed. Run the flow from Flow Builder by clicking Run. Running the flow activates the permission set. But after you click Run, you see an error screen. Oops. Now, check your email.
What? “Check your email”?
Yup. The reason why is that you’ll also receive a message explaining the error you saw in Salesforce. It seems that no one is assigned yet to the Employment Contracts Access permission set. If you run across problems when working with your flow, check if you received any emails about errors. Remember that we’re working with three different areas: permission sets, user assignments, and flows. The detail in the emails can help you troubleshoot quickly. For example, you receive an error if you reference a non-existent permission set name in your flow, if your flow contains logical issues, or if you haven’t assigned the permission set referenced in the flow to a user. In this case, you get an email that includes detail about the lack of user assignment.
Error Occurred: The permission set must be pre-assigned to the user before being activated
Remember that we said you could ignore the warning you got earlier, because we're still building this flow? You can ignore this error too. (We assign the permission set to a user next.) Typically you probably assign users to your permission set first. However, let’s say you forgot to assign a new employee to the permission set. What would happen if this person attempted to run the flow? You guessed it.
It’s good to be aware of some of the errors you or users can run across that have easy solutions. Now activate your flow: return to Flow Builder, and click Activate. Activating your flow without a user assigned to the permission set causes no harm. However, our flow can't accomplish what we need until someone is assigned to the permission set.
We want our user to be able to edit and create contracts when the session-based permission set is activated. This person is a hiring manager and needs access to employment contracts for contractors. Make sure that the person currently has read-only (no edit or create) access to the Contracts object. The person must also be able to run flows.
Remember Lynda Herman, whom you created in the hands-on challenge in the first unit? Let’s use her! We just need to enable a few additional permissions before we continue.
- In Setup, go to User Management Settings. Enable the Enhanced Profile User Interface setting.
- In Setup, go to Profiles. Select Minimum Access - Salesforce Clone (you created this profile in the last unit and assigned it to Lynda).
- In the Find Settings box, search for and click Lightning Experience User. On the System Permissions page, click Edit, enable Lightning Experience User, then click Save.
- In the Find Settings box, search for and click Manage Flow. On the App Permissions page, click Edit, enable Manage Flow, then click Save.
- In the Find Settings box, search for and select the Contracts object. Click Edit, enable the Read permission, then click Save.
- In Setup, go to Permission Sets.
- Assign the Employment Contracts Access permission set that you previously created to Lynda.
Now sign in as Lynda and go to the Contracts object. You can see contracts. However, there’s no New button, so you can’t create one right now.

Stay logged in as Lynda, go to Flows in Setup, and run the Activate Contracts Access flow. If you go to the Contracts object, notice that there’s now a New button available to create a contract.


For the rest of the current session, the user has Create, Read, Edit, and Delete access to the Contracts object, and edit access for Contract Name, Contract Start Date, and Contract Terms (months). But we probably don't want to make our users run flows from Setup every time they want to create or change a contract. In the next unit, we make the process easier for everyone.
Resources
- Salesforce Help: Create a Flow That Can Activate or Deactivate a Session-Based Permission Set
- Trailhead: Build Flows with Flow Builder