Use Bulk API 2.0
Learning Objectives
After completing this unit, you’ll be able to:
- Describe how an asynchronous request differs from a synchronous request.
- Create a bulk job using the Postman web app.
- Import data to your Salesforce org by adding data to a job.
- Monitor a job’s progress.
- Get a job’s results.
Bulk API and Asynchronous Requests
Bulk API is based on REST principles and is optimized for working with large sets of data. You can use it to insert, update, upsert, or delete many records asynchronously, meaning that you submit a request and come back for the results later. Salesforce processes the request in the background.
In contrast, SOAP and REST API use synchronous requests and are optimized for real-time client applications that update a few records at a time. You can use both of these APIs for processing many records, but when the data sets contain hundreds of thousands of records, they’re less practical. Bulk API’s asynchronous framework is designed to make it simple and efficient to process data from a few thousand to millions of records.
The easiest way to use Bulk API is to enable it for processing records in Data Loader using CSV files. With Data Loader, you don’t have to write your own client app. Sometimes, though, unique requirements necessitate writing a custom app. Bulk API lets you take the ship’s wheel into your own hands and steer the course toward a solution that works for you.
For this unit, you use a newer version of Bulk API called Bulk API 2.0. If you want to apply the things you learn in this unit to the previous, still supported version of Bulk API, you need to use different resource URIs, and create and manage batches as well as jobs. For more information on the previous version of Bulk API see Bulk API Developer Guide.
Set Up Your Playground and Postman
To explore Bulk API, you’ll use Postman to create some account records.
- Log in to your Trailhead Playground.
- Log in to the Postman web app.
- Connect your Playground to Postman by getting a new token.
- Test that your connection is working with the REST GET Limits resource.
You learned how to do this in Quick Start: Connect Postman to Salesforce, so revisit that project if you aren’t sure about any of the steps.
Create a Bulk Job
The first step is to create a job in your fork of the Salesforce API Collection. A job specifies the type of operation and data object you’re working with. It functions as a bucket into which you add data for processing.
- In Collections, open the Bulk v2 folder.
- Click POST Create job.
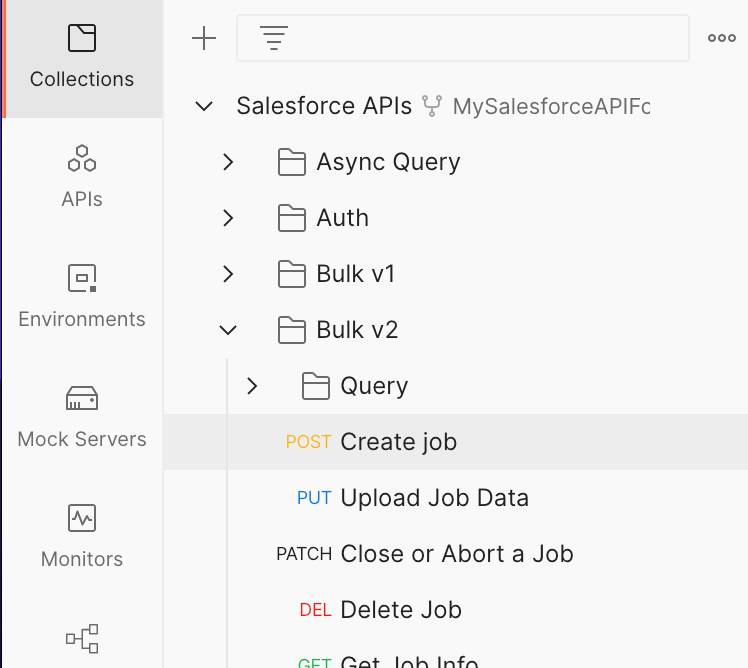
Because Bulk API is REST-based, the request takes the familiar form of a REST request with four components: URI, HTTP method, headers, and body. The HTTP method is POST.
Notice the URI built in the main window when you clicked the resource in the collection: /services/data/v{{version}}/jobs/ingest. Let’s note a few things about this URI.
- You’re using /services/data, which is the same endpoint used for the REST API. Bulk API uses the same framework that the REST API uses, which means that Bulk API supports many of the same features, such as OAuth authentication.
-
/jobs/ingestindicates that you’re accessing the resource for creating Bulk API jobs.

Create the request body.
To create a Bulk API 2.0 job, use the lineEnding request field to specify the line ending used to create the CSV formatted text . Bulk API 2.0 supports two line-ending formats: linefeed (LF), and carriage-return plus linefeed (CRLF). The default lineEnding value, if not specified, is LF . Different operating systems use different characters to mark the end of a line:
- Unix / Linux / OS X uses LF (line feed, '\n', 0x0A)
- Windows / DOS uses CRLF (carriage return followed by line feed, '\r\n', 0x0D0A)
Note that text editors used to create a CSV file might be configured for a specific line-ending format that supersedes the default operating system format.
- Copy and paste the sample CSV body from your browser into a text editor to clear the formatting. Indicate the appropriate line ending with the
lineEndingrequest field based on the OS and text editor you are using. In the example, we're using a Windows machine with "CRLF" as the value for thelineEndingparameter.
{
"operation" : "insert",
"object" : "Account",
"contentType" : "CSV",
"lineEnding" : "CRLF"
}- Copy and paste the sample CSV body from the text editor to the Body tab in Postman.
- Click Save.
- Click Send and check out the response.

The response includes all sorts of properties about the job, most of which aren’t useful to us right now because you haven’t added data yet. However, let’s take a look at a few things.
- Look at the
"id"row. This shows the returned job ID for this job.
- Click the Scripts tab to see a script that uses the variable __jobId to set the context. This script automatically adds the job ID to the __jobId variable. This injects the job ID into future requests so you don’t need to copy and paste it.
- You can see the value of __jobId in the collection’s Variables tab.
- Next look at the
"state"property.
- When you create a job, it’s immediately set to the Open state. That means it’s ready to start receiving data.
- Finally, look at the
"contentUrl"property.
- This property shows the URL that you use to load data for the job.
Add Data to the Job
Now you can insert account data to our job. Data for a job is sent to the server as a set of records in a PUT request. The server processes the set of records, determining the optimal way to load the data into Salesforce. All you have to do is upload the data.
Create a new request in Postman. In your fork of the Salesforce APIs Collection, in the Bulk v2 folder, click PUT Upload Job Data. Note that the HTTP method is PUT.
For this example, you’re adding a set of records with only four accounts. Usually, you use Bulk API to add thousands or millions of records, but the principle is the same. You can upload a CSV file by selecting the binary radio button and uploading your .csv file, or you can paste in a list. In this example, we'll paste in a list.
- Click the Body tab and select Raw from the dropdown.
- Copy the following text into a text editor to clear any extra formatting, then copy it from the text file into the request body field.
"Name"
"Global Treasures & Mapping Company"
"Ahab’s Mighty Masts"
"Planks R Us"
"Cap’n Cook’s Kitchen Supplies"

- Click Headers. Notice that Content Type says
text/csv.That’s because you specified the content type in your first request.

- Click Save.
- Click Send.
The response contains just a status code of 201 Created, which indicates that Salesforce successfully received the job data.

Close the Job
Now that you’ve submitted your data, you need to let Salesforce know that it’s time to process the data.
- In your Salesforce API fork, Bulk v2, Query folder click PATCH Close or Abort a Job.
- Click the Body tab and notice that
"state": is already populated with “UploadComplete.”

- Click the Headers tab and notice that the Content-Type is set to
application/json.

- Click Send.
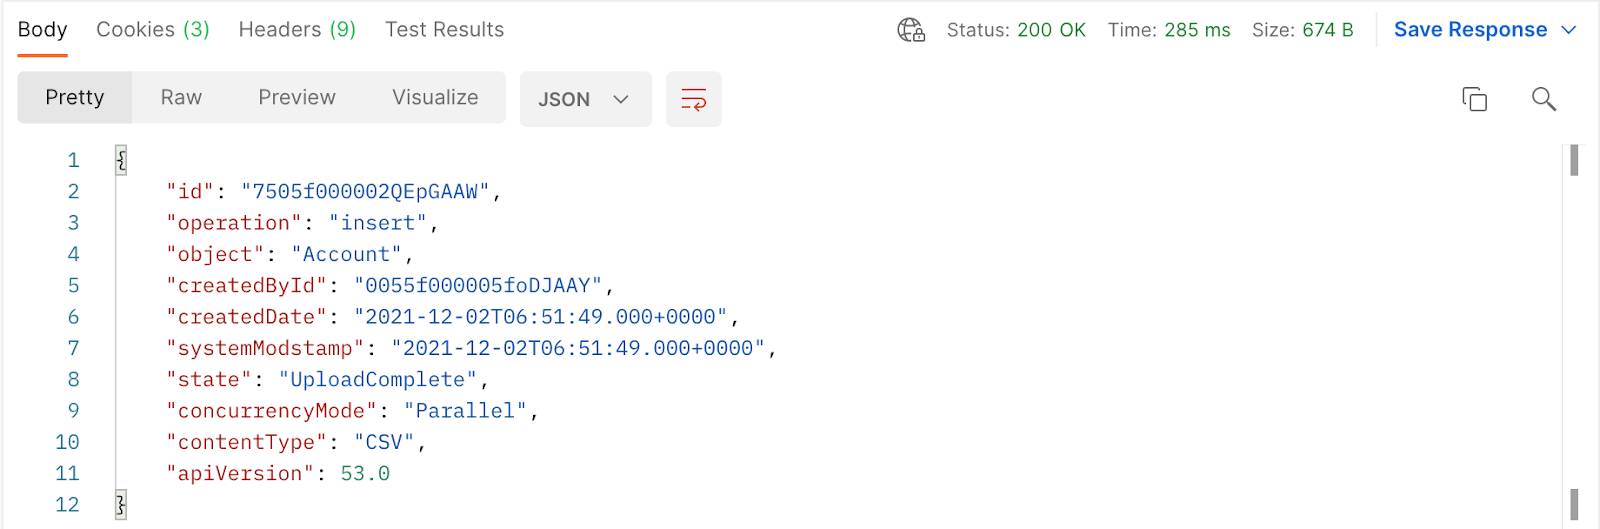
The response contains job status information. The state property indicates that the job state is UploadComplete. At this point, Salesforce starts processing the job.
Check the Status of the Job
You’ve submitted your data and you’ve let Salesforce know you’re done uploading data. Now it’s up to the server to process the request. You can monitor the server’s progress by checking the status of the job through the Salesforce UI, or through the API. Let’s take a look at each method.
Here’s how to check the status of the job in your Trailhead playground.
- From Setup, enter
Bulk Data Load Jobsin the Quick Find box
- Select Bulk Data Load Jobs.
You can check the status of a job on this page. Or, you can click a job ID to check the status and get detailed results for that job.

Here’s how you check the status of the job in Postman from the Bulk v2 folder.
- Select GET Job Info. Notice that the http method used for this type of request is GET.
- Click Send.
You see something like this.

If your state is still UploadComplete instead of JobComplete, Salesforce is still processing the job. Don’t worry, it’ll be processed in a few minutes. In the meantime, go treat yourself to a mug of coconut milk and try the same request again when you get back. If you’re lucky and your job is already processed, continue on to retrieve the job results.
Get the Job Results
Once a job is in the JobComplete state (or Failed state) you can get results information in the form of successfully and unsuccessfully processed records.
Let’s look at the successfully processed records in the Bulk v2 folder.
- Click the GET Get Job Successful Record Results resource. Notice that the HTTP method is GET.
- Click Send. You see something like this.

Salesforce returns a list of all the records in the job that were successfully processed. In this module, you created several Account records. Line 1 shows the value types of the responses returned below it. The list data contains the record IDs of the records created, a value of true for the sf__Created columns, and the names of the accounts created. Great job!
Occasionally some records can’t be processed. Maybe the job tried to create Account records that already existed. Maybe the job data was missing some required fields. In these scenarios, you can ask Salesforce for a list of records that had an error during processing, along with more information on what went wrong. Let’s take a look at failed records in the Bulk v2 folder.
- Select the GET Get Job Failed Record Results resource. Note that the HTTP method is, again, GET.
- Click Send. The results look something like this.

Postman provides a list that contains a list of records that encountered errors during processing, along with the record ID and the error message. In this case, all your records were successfully inserted, so the list of records is empty. Tidy work, Captain!