Get Started with DevOps Center
Learning Objectives
After completing this unit, you’ll be able to:
- List the requirements for setting up DevOps Center.
- Create team members with the correct license and profile.
- Assign the required permission sets to team members.
- Connect your org to a source control provider.
Before You Start
Before you start this badge, make sure you complete this content. The work you do here builds on the concepts and work you do in that content.
To complete the hands-on challenges in this badge, you need a GitHub account. DevOps Center connects to GitHub to track your changes. To create a GitHub account, check out Creating an Account on GitHub. It's free and takes just a few minutes.
Get to Know DevOps Center
DevOps Center brings modern DevOps practices to everyone on your team, whether you’re an admin or a developer. It automatically manages source control branches behind the scenes and provides a single source of truth for the entire team.
With DevOps Center, you can track work, manage, and promote changes with confidence from one centralized location. The result? Full visibility, predictable releases, and more time building value for your users.
Meet the CalcPro Team
You’re a Salesforce admin at AW Computing, a company that builds productivity tools for small businesses. Your team is developing CalcPro, a calculator app that helps sales reps estimate deal values, discounts, and commissions.
Currently, the team deploys changes manually. You export metadata from one org, import it into another, and hope nothing breaks. This process is slow, error-prone, and impossible to trace.
Your task is to set up DevOps Center to bring governance, a defined release path, and a clear audit trail to the CalcPro project.
You’ll work with two teammates on the CalcPro project.
Name |
Role |
Alias |
|---|---|---|
You |
DevOps Center Admin. Sets up DevOps Center. |
Logged-in user |
Cassie Evans |
Developer. Builds and tests features in the sandbox. |
cevan |
Ryan Jackson |
Lead Programmatic Developer. Approves and promotes changes to production. |
rjack |
Now that you know who’s on the team and what you’re building, let’s launch DevOps Center and get started.
Sign Up for a Developer Edition Org with DevOps Center
To complete this badge, you need a custom playground that contains DevOps Center.
- Click Create Playground, and then click Yes, Create Playground.
- Your new org is automatically attached to your Trailhead account.
- Make note of your org's expiration date and complete this badge before then.
- Click Launch to open the playground
Launch DevOps Center
DevOps Center is available in your Trailhead Playground.
- Once signed in, from the App Launcher (
 ) , search for and select DevOps Center.
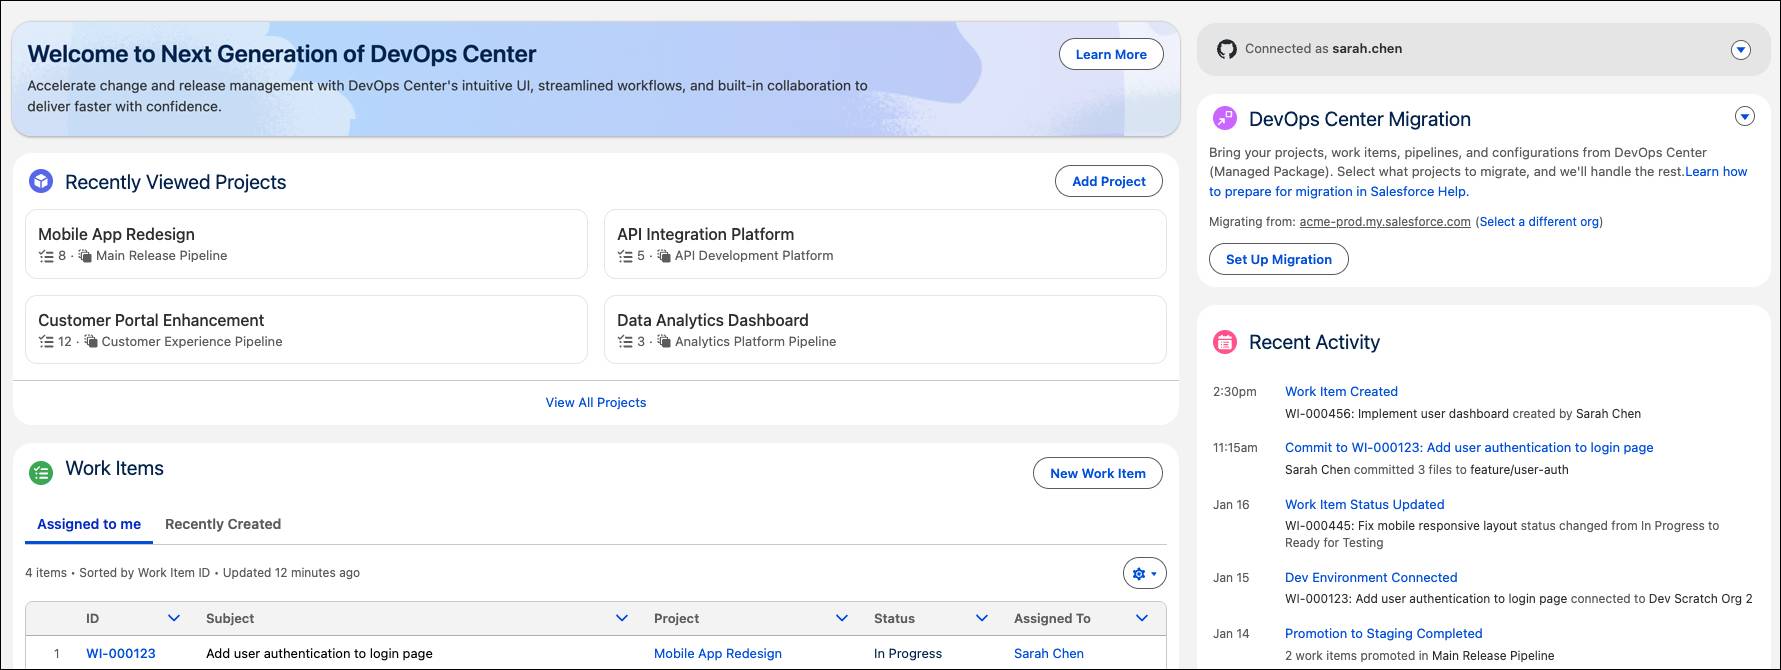
DevOps Center opens to the Home tab. You'll see options to connect to source control, create projects, and manage pipelines. Don’t worry about these yet, you explore them as you build the CalcPro setup.
Add Your Team Members
Add two of your team members who will use DevOps Center. You’ll create Cassie Evans (Developer) and Ryan Jackson (Lead Programmatic Developer).
Here are the details you need for each user:
Full Name |
Alias |
User License |
Profile |
Role |
|
|---|---|---|---|---|---|
Cassie Evans |
cevan |
cevan@example.com |
Salesforce |
Standard User |
Western Sales Team |
Ryan Jackson |
rjack |
rjack@example.com |
Salesforce |
Standard User |
Western Sales Team |
- From
 , select Setup.
- In the Quick Find box, search for and select Users.
- Select New User.
- Enter the user details:
- First Name:
Cassie - Last Name:
Evans - Alias:
cevan - Email:
cevan@example.com - Username:
<YourInitials>_testuser_<YYYYMMDD>@example.com(Usernames must be unique across all Salesforce orgs.)
- Role:
Western Sales Team
- User License:
Salesforce - Profile:
Standard User
- First Name:
- Uncheck Generate new password and notify user immediately so it is not selected.
- Select Save and New.
Repeat the steps for the second user, Ryan Jackson.
You've created both team members! Next, you assign them the correct permission sets.
Assign Permission Sets
Permission sets manage access levels for DevOps Center. Let's assign the appropriate permission sets to you and your team members. Here's exactly what to assign to each person.
First Name |
Last Name |
Permission Sets to Assign |
Why |
|---|---|---|---|
You |
(logged-in user) |
DevOps Center Admin
|
Admins set up DevOps Center, create projects, and manage pipelines. |
Cassie |
Evans |
DevOps Center User |
Developers need access to work items and source control but don’t manage projects or promote releases. |
Ryan |
Jackson |
|
Release managers create projects, manage pipelines, and approve promotions to production. |
Let's start by assigning yourself the DevOps Center Admin permission set.
- In the Quick Find box, search for and select Permission Sets.
- Select DevOps Center Admin.
- Select Manage Assignments.
- Select Add Assignment.
- Select the checkbox next to your name (the logged-in user).
- Select Next.
- Leave No expiration date selected.
- Select Assign, then Done.
You may experience some errors but refreshing the page should clear those out.
You now have admin access to set up DevOps Center. Next, you'll assign the DevOps Center User permission set to your team members.
- Go back to Permission Sets.
- Select DevOps Center User.
- Select Manage Assignments.
- Select Add Assignment.
- Select the checkboxes next to Cassie Evans and Ryan Jackson.
- Select Next.
- Leave No expiration date selected.
- Select Assign, then Done.
Both Cassie and Ryan now have basic access to DevOps Center.
Next, you give Ryan the DevOps Center Deployment Manager permission set.
- Go back to Permission Sets.
- Select DevOps Center Deployment Manager.
- Select Manage Assignments.
- Select Add Assignment.
- Select the checkbox next to Ryan Jackson.
- Select Next.
- Leave No expiration date selected.
- Select Assign then Done.
Your team members now have the correct permissions. Cassie can work on features, and Ryan can manage releases and deployments.
Next, you connect DevOps Center to GitHub so your team can track changes.
Connect to Source Control
DevOps Center tracks changes through a source control system. Connect to your GitHub account to get started.

- From the App Launcher (
 ) , search for and select DevOps Center.
- On the Home tab, in the section titled Connect to Version Control, select Connect
- Select GitHub as your source control provider. This opens a new window to confirm external access.
- Select Confirm.
If you don’t have GitHub details stored in your browser session, you may need to review permissions and grant access. In the GitHub authorization window, log in to your GitHub account if prompted.
- Review the permissions DevOps Center is requesting.
- Select Authorize to grant DevOps Center access to your GitHub account. After authorization, you return to DevOps Center automatically.
- Verify you see the connection banner at the top of the Home tab. If you don’t, select Connect again and authorize access.
You’ve successfully set up DevOps Center with team members and source control connected. In the next unit, you create the CalcPro project to organize your team's work.