Create a Support Program
Learning Objectives
After completing this unit, you’ll be able to:
- Sign up for a Developer Edition org.
- Create a support program for self-enrollment.
- Add benefits and a benefit schedule.
Before You Start
Before you start this module, consider completing this recommended content.

Explore Support Programs
Support programs give students structured access to advising, financial guidance, well-being resources, and other services when they need them most. Programs like these can boost student satisfaction and grades, and on a whole, contribute to greater retention and graduation rates. So they’re one of the main ways your success teams deliver targeted help to learners.
In Agentforce Education, a support program represents a specific initiative such as study skills, coaching, disability services, or a study abroad office. When creating a support program, you set up one or more benefits, including a primary advising benefit. Advising benefits are appointment-based benefits that connect to a support program and an associated advising team. You can also configure and connect other types of benefits, such as participatory for group sessions and workshops, or monetary for direct transactions.
When you publish programs and benefits to the Learner Portal, students discover what’s available and self-enroll instead of waiting for manual referrals. You attach intake assessments so that, as students enroll, they answer a few focused questions that help advisors understand their goals and confirm that the program is a good fit.
In this hands-on badge, you learn how to set up a support program to assist students who take part in a study abroad program. You ensure that students can discover it on the Learner Portal, self-enroll, and share a bit about their goals. You configure the program and its benefits, build an intake assessment, then test the experience as both a student and an advisor.
Sign Up for a Developer Edition Org with Education Cloud
To complete this badge, you need a special Developer Edition org that contains Agentforce Education and our sample data. Get the free Developer Edition and connect it to Trailhead now so you can complete the challenges in this badge. Note that this Developer Edition is designed to work with the challenges in this badge, and may not work for other badges. Always check that you’re using the Trailhead Playground or special Developer Edition org that we recommend.
- Sign up for a free Developer Edition org with Agentforce Education.
- Fill out the form:
- For Email, enter an active email address.
- For Username, enter a username that looks like an email address and is unique, but it doesn't need to be a valid email account (for example, yourname@example.com).
- For Email, enter an active email address.
- After you fill out the form, click Sign me up. A confirmation message appears.
- When you receive the activation email (this might take a few minutes), open it and click Verify Account.
- Complete your registration by setting your password and challenge question. Tip: Save your username, password, and login URL in a secure place—such as a password manager—for easy access later.
- You are logged in to your Developer Edition.
Now connect your new Developer Edition org to Trailhead.
- Make sure you're logged in to your Trailhead account.
- In the Challenge section at the bottom of this page, click the org name and then click Connect Org.
- On the login screen, enter the username and password for the Developer Edition you just set up.
- On the Allow Access? screen, click Allow.
- On the Want to connect this org for hands-on challenges? screen, click Yes! Save it. You are redirected back to the challenge page and ready to use your new Developer Edition to earn this badge.
Create a Support Program and Benefits
Support programs define the services students can access, and benefits represent the concrete offerings inside those programs, such as advising sessions or information workshops. In this unit, you set up a Study Abroad support program, add benefits that students will see on the Learner Portal, and configure a schedule for recurring information sessions.
Create the Study Abroad Support Program and Advising Benefit
Start by creating the Study Abroad support program and its primary advising benefit in one guided flow. When a student self enrolls in the Study Abroad program from the Learner Portal, they are automatically enrolled in this advising benefit.
- Click
 , then find and select Student Success from the App Launcher.
- Click
 and select Programs.
- Change the list view to All Programs and click
 to pin the list view.
- Click New Support Program (not New). This button gives you the ability to create a support program and a related advising benefit from a single guided setup.
- In the New Support Program window, enter these details:
- Name:
Study Abroad - Start Date: today’s date
- Status: Active
- Summary:
Provides personalized guidance and support to help learners navigate every step of their journey.
- Name:
- In the Success Team field, search for and select the Study Abroad Success Team.
- Toggle on the Active checkbox.
- Toggle on the Show on Learner Portal checkbox.
- In the Benefit section, select Advising, and enter these details.
- Benefit Name:
Study Abroad Advising - Benefit Type: Advising
- Description:
The Study Abroad advising benefit provides one-on-one adhoc advising sessions, personalized planning, logistical support, and cultural and academic preparation for study abroad students.
- Benefit Name:
- Toggle on the Active checkbox in the Benefit section.
- Save your work.

Notice that you can also set the enrollment count for the benefit, set minimum and maximum benefit amounts, and define a goal for the benefit.
Add Additional Benefits
Now that the Study Abroad program and core advising benefit are in place, add participatory benefits that cover group information sessions and ongoing support. This lets the program reflect the different ways students receive help, not just one to one advising.
Follow these steps to create additional benefits for the support program.
- On the Study Abroad support program record, click the Related tab.
- Click New in the Benefits related list.
- On the New Benefit screen, enter these details.
- Benefit Name:
Study Abroad Information Sessions - Benefit Type: Participatory
- Benefit Name:
- Toggle on the Active checkbox.
- Click Save & New.
- Repeat steps 3 to 4 to create a benefit named
Incoming Student Supportwith a Participatory benefit type.
- Click Save.
Configure a Benefit Schedule
Some benefits occur over time and include a series of sessions. A benefit schedule defines how often those sessions occur over a specific period, such as an academic term. For Study Abroad, you set up a regular schedule of information sessions.
Follow these steps to set up a benefit schedule for the Study Abroad Information Sessions benefit.
- Navigate to the Study Abroad support program record, and click the Related tab.
- Click the Study Abroad Information Sessions benefit.
- Click New Benefit Schedule (not the New button in the related list).
- On the New Benefit Schedule screen, enter these details.
- Name:
Weekday Schedule - Benefit Quantity:
1
- First Session Start Date: Monday of next week
- First Session Start Time: 10:00 AM
- Session End Time: 11:00 AM
- Session Recurrence Frequency: Weekly
- Days of the Week: Mon and Wed
- Benefit Schedule Ends: After
- Number of Sessions:
12
- Name:
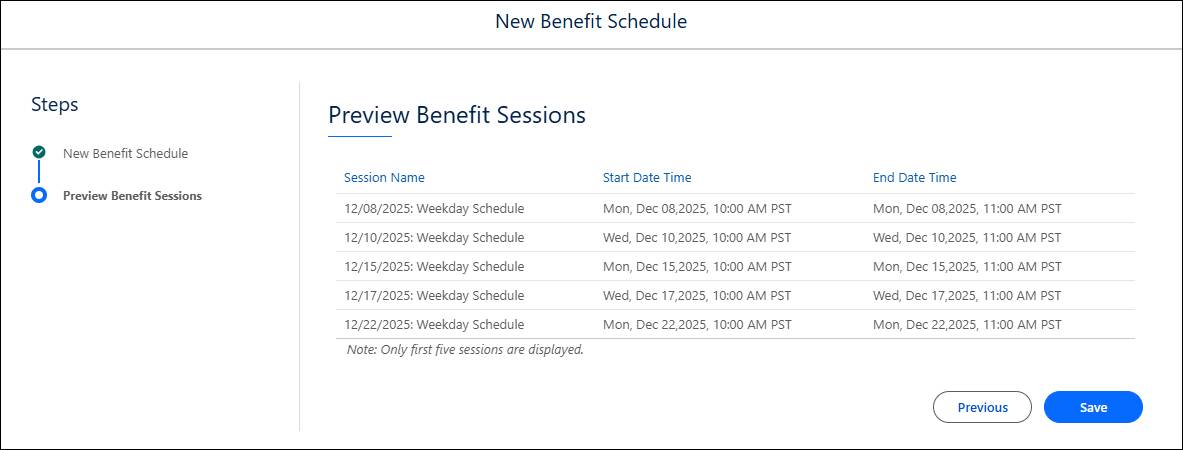
- Click Next.
- View the Monday and Wednesday benefit sessions.
- Save your work.
Optionally, repeat these steps to create another benefit schedule for the Incoming Student Support benefit. For example, you might create a monthly schedule with three sessions. We won’t check this.
Well done! In this unit, you configured a Study Abroad support program, created associated benefits, and set up a benefit schedule for recurring information sessions. In the next unit, you create an intake assessment that students fill out when self-enrolling in the Study Abroad support program.
Resources
- Salesforce Help: Student Success App
- Salesforce Help: Model Support Programs
- Salesforce Help: Create a Support Program in Agentforce Education
- Salesforce Help: Create Programs, Benefit Types, and Benefits
- Salesforce Help: Manage Benefit Schedules and Sessions
- Trailhead: Student Success with Agentforce Education