Sviluppare con il generatore Agentforce

Creare l'agente
Il primo passaggio nella creazione di un agente dell’assistenza Coral Cloud Resorts che sia in grado di prenotare attività per i clienti consiste nel fornire alcune informazioni di base: cosa deve fare l’agente, qual è il suo nome e che tipo di accesso deve avere.
- Fai clic su
 per aprire l’App Launcher (Programma di avvio app), quindi cerca e seleziona Agentforce Studio.
- Fai clic su New Agent (Nuovo agente). L’Agentforce Builder (Generatore Agentforce) si apre in una nuova scheda.
- Nella casella di testo What do you want your agent to do? (Che cosa dovrà fare questo agente?), inserisci
You are a customer service representative, helping our guests make reservations, update bookings, and navigate all that Coral Cloud Resorts has to offer.(Sei un addetto all’assistenza clienti che aiuta gli ospiti a prenotare, aggiornare le loro prenotazioni ed esplorare le offerte disponibili presso Coral Cloud Resorts.)
- Premi il tasto Invio della tastiera.
- Inserisci
CC Service Agent(Agente dell’assistenza CC) come nome dell’agente. Il campo Developer Name (Nome sviluppatore) viene compilato automaticamente. Nota: è molto importante inserire il nome esattamente come indicato nelle istruzioni.
- Nella sezione Assign a user record to your agent to manage its access (Assegna un record utente all’agente per gestirne l’accesso), seleziona Select User (Seleziona utente).
- Fai clic nella casella di testo Search users… (Cerca utenti…) e seleziona EinsteinServiceAgent User (Utente EinsteinServiceAgent).
- Fai clic su Let’s Go (Partiamo).
- Fai clic su Skip Ahead (Salta questa fase).

Esplorare il Generatore Agentforce
Il Generatore Agentforce è suddiviso in tre sezioni: visualizzazione Explorer (Esplorazione) (1), visualizzazione Editor (2) e Assistente Agentforce (3).

Esplorazione
Il riquadro Explorer (Esplorazione) (1) è esattamente quello che sembra: un luogo in cui puoi esplorare tutti i dettagli del tuo agente. Questi dettagli comprendono: Settings (Impostazioni), Subagents (Agenti secondari), Connections (Connessioni) e Data (Dati). Queste sottosezioni sono presenti per tutti i tipi di agente.
-
Settings (Impostazioni): questa sezione include i dettagli dell’agente come il nome, il ruolo, la descrizione, la lingua e altre impostazioni di configurazione.
-
Subagents (Agenti secondari): questa sezione contiene l’Agent Router (un componente chiave che determina quale agente secondario l’agente deve utilizzare in base all’input dell’utente e alla cronologia della conversazione) e un elenco degli agenti secondari associati. Ogni nuovo agente dell’assistenza è dotato di tutti gli agenti secondari elencati sopra. Ciascun agente secondario ha la propria cartella che contiene la sua configurazione e le sue azioni.
-
Variables (Variabili): questa sezione ospita un elenco di valori che consentono di controllare le prestazioni dell’agente. Le variabili memorizzano e riutilizzano valori presenti nella logica e nel ragionamento dell’agente e controllano il modo in cui l’agente prende decisioni.
-
Connections (Connessioni): questa sezione contiene informazioni relative alle connessioni e ai canali dell’agente. Le connessioni sono impostazioni di configurazione che collegano gli agenti a specifici canali rivolti agli utenti, come la messaggistica, Slack o Voice, consentendo loro di interagire con gli utenti.
-
Data (Dati): questa sezione include un elenco di fonti che l’agente può utilizzare per il recupero di conoscenze, ad esempio un file pdf con domande frequenti caricato su Data 360 a cui l’agente può fare riferimento per rispondere alle domande.
Editor
Ogni volta che interagisci con una delle opzioni presenti in Explorer (Esplorazione), nell’editor (2) viene visualizzata una scheda che mostra il contenuto della selezione.
I contenuti possono essere visualizzati sotto forma di area di disegno o di script. Nella visualizzazione Canvas (Area di disegno) viene utilizzato l’editor in linguaggio naturale per la modifica degli agenti. Include scorciatoie per operazioni comuni, tra cui azioni rapide per aggiungere logica all’agente e un selettore per risorse come gli agenti secondari, le azioni e le variabili. La visualizzazione Script può essere utilizzata per scrivere e modificare gli script direttamente, con strumenti intuitivi pensati per gli sviluppatori come l’evidenziazione della sintassi, il completamento automatico e la convalida.
Assistente Agentforce
L’Agentforce Assistant (Assistente Agentforce) (3) è sempre disponibile per aiutare nella creazione dell’agente attraverso il linguaggio ordinario. Ad esempio: “Aggiorna il nome di questo agente usando Agente dell’assistenza Coral Cloud” oppure “Crea un nuovo agente secondario e chiamalo Gestione dei casi”. L’assistente IA potrebbe chiedere chiarimenti per assicurare l’accuratezza. L’assistente mostra le modifiche proposte e richiede la conferma dell’utente prima di implementarle.
Creare e personalizzare un agente secondario
L’agente dell’assistenza di Coral Cloud Resorts ha bisogno di un agente secondario personalizzato che fornisca assistenza per la gestione delle attività del resort (immersioni, kayak, escursioni e così via), quali la disponibilità, le richieste di informazioni, la prenotazione e altro ancora. In Coral Cloud Resorts queste attività sono note come “esperienze”. È il momento di creare un agente secondario specifico per la gestione delle esperienze.
- Nel riquadro Explorer (Esplorazione), fai clic sull’icona del segno più accanto a Subagents (Agenti secondari).

- Seleziona +New Subagent (+Nuovo agente secondario).
- Assegna al nuovo agente secondario il nome
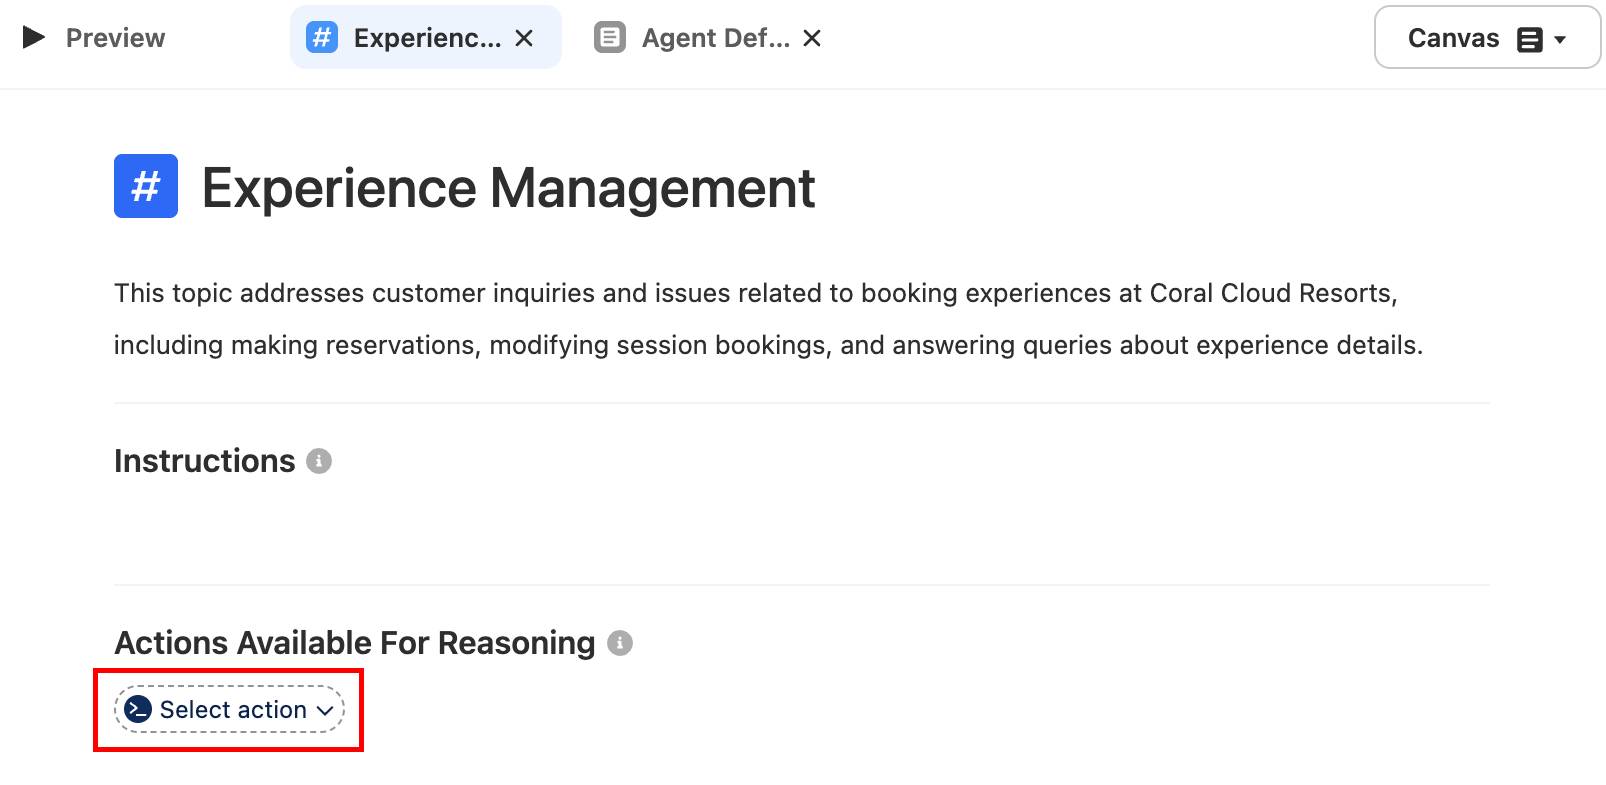
Experience Management(Gestione esperienze).
- In Description (Descrizione), inserisci
This subagent addresses customer inquiries and issues related to booking experiences at Coral Cloud Resorts, including making reservations, modifying session bookings, and answering queries about experience details.(Questo agente secondario affronta le richieste e i problemi dei clienti relativi alla prenotazione di esperienze presso Coral Cloud Resorts, tra cui l’inserimento di prenotazioni, la modifica di prenotazioni di sessioni e la risposta a domande sui dettagli delle esperienze.)
- Fai clic su Create and Open (Crea e apri).
- Nota che la scheda dell’agente secondario Experience Management (Gestione esperienze) si apre nell’editor.
- Fai clic su Save (Salva) nell’angolo superiore destro dello schermo.
Aggiungere azioni all’agente secondario
Le azioni sono gli strumenti presenti all’interno degli agenti secondari che gli agenti possono utilizzare per svolgere dei compiti. Ad esempio, se un cliente pone una domanda su un dato argomento, quali azioni dovrebbe produrre l’agente? Se deve rispondere a domande su un’esperienza (attività disponibile presso il resort), l’agente deve essere in grado di trovare i dettagli su quell’esperienza.
- Con la scheda Experience Management (Gestione esperienze) ancora aperta, fai clic su Select Action (Seleziona azione) nella sezione Actions Available For Reasoning (Azioni disponibili per il ragionamento).
- Select +Create a custom action (+Crea un’azione personalizzata.
- Assegna all’azione il nome
Get Experience Details(Recupera dettagli esperienze).
- Aggiungi il testo seguente alla sezione Description (Descrizione):
Provides details about an Experience__c that a user would like more information about.(Fornisce dettagli relativi a un’Experience__c su cui un utente vuole ricevere ulteriori informazioni.) - Fai clic su Create and Open (Crea e apri).
Nota: se per errore hai fatto clic su Create (Crea) invece che su Create and Open (Crea e apri), espandi l’agente secondario Experience Management (Gestione esperienze) e fai clic sull’azione Get Experience Details (Recupera dettagli esperienze) per aprirla nella visualizzazione editor.
- Con la scheda Get Experience Details (Recupera dettagli esperienze) aperta nella visualizzazione Explorer (Esplorazione), seleziona Flow (Flusso) nell’elenco Reference Action Type (Tipo di azione riferimento).
- In Reference Action (Azione riferimento), seleziona Get Experience Details (Recupera dettagli esperienze).

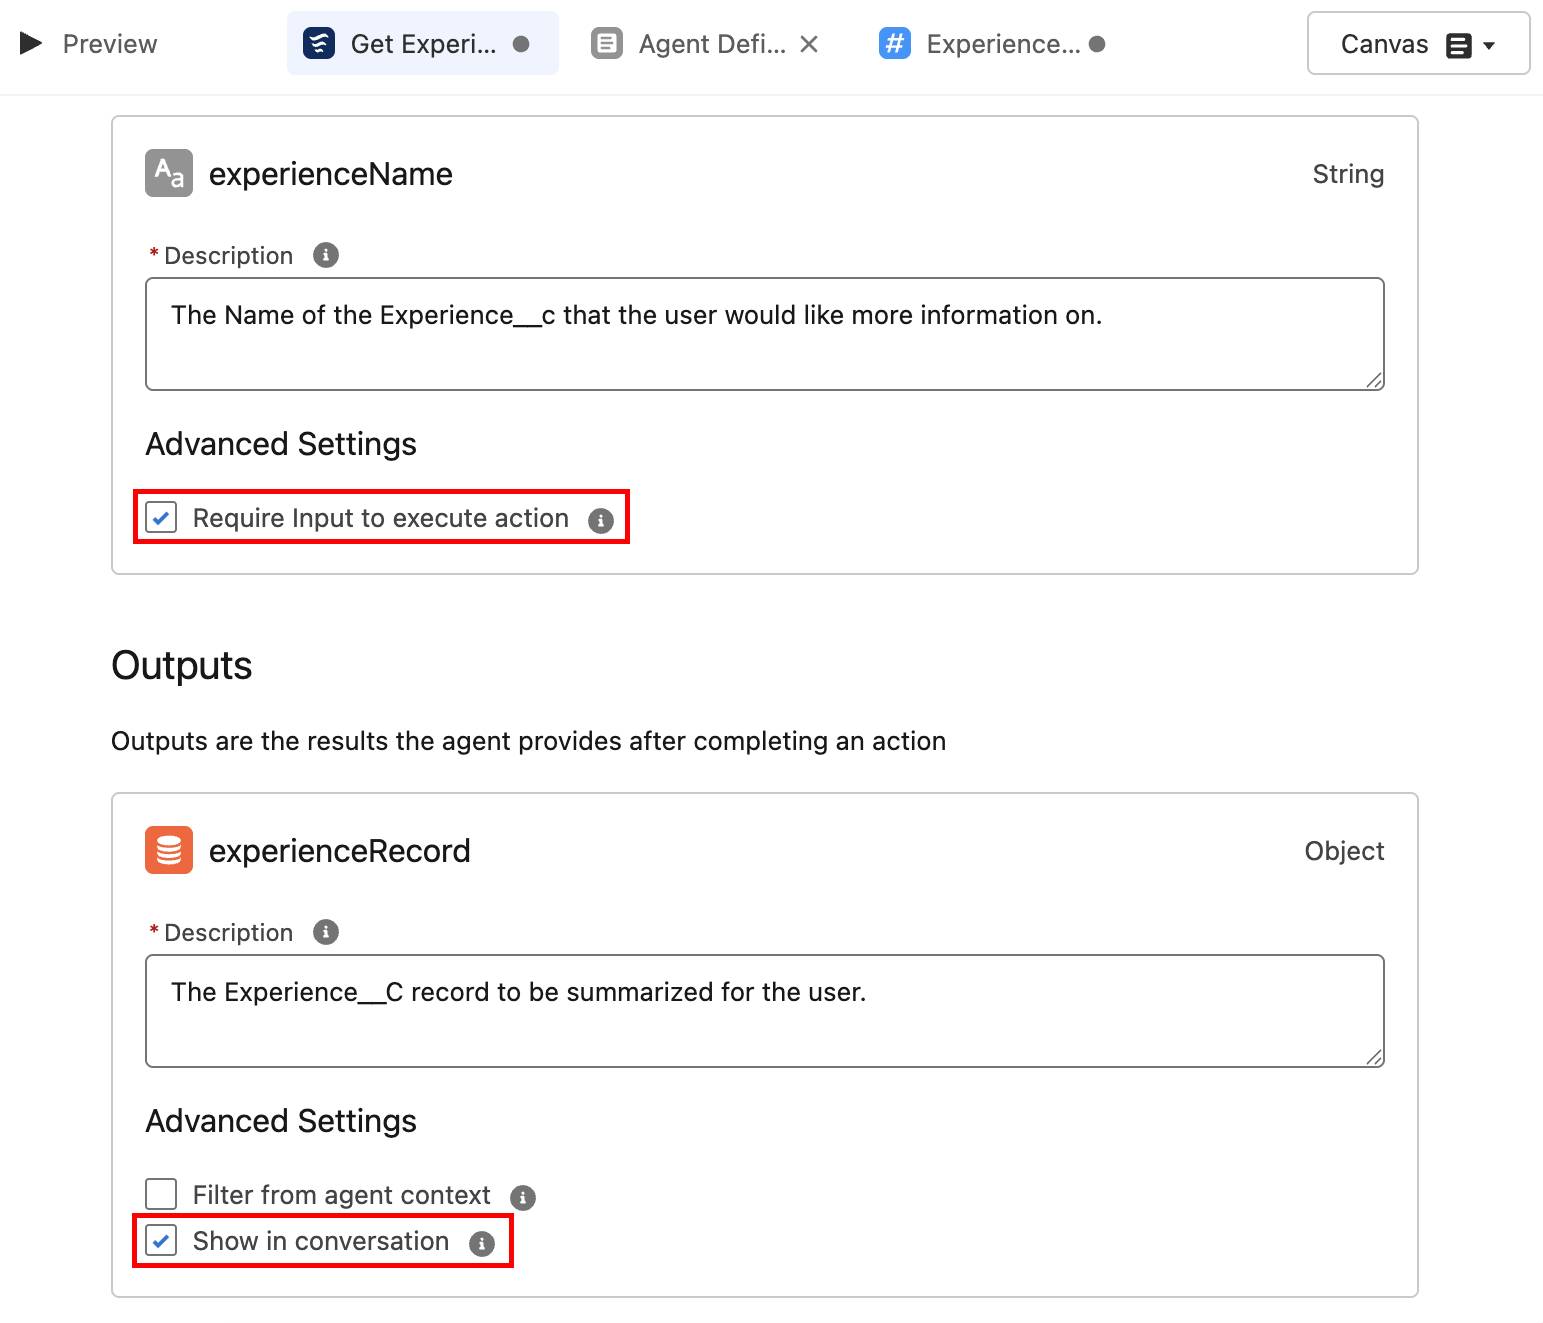
- Fai scorrere la pagina verso il basso fino a visualizzare l’Input experienceName e seleziona la casella di controllo Require Input to execute action (Richiedi input per eseguire l’azione).
- Nell‘Output experienceRecord, seleziona la casella di controllo Show in conversation (Mostra nella conversazione).
- Lascia le altre opzioni invariate e fai clic su Save (Salva).
Aggiungere un'azione per convalidare i dettagli del cliente
Per motivi di sicurezza, l'agente deve confermare che il cliente sia chi afferma di essere. In questo caso, l'agente convalida i dettagli principali del referente, come l'indirizzo email e il numero di iscrizione.
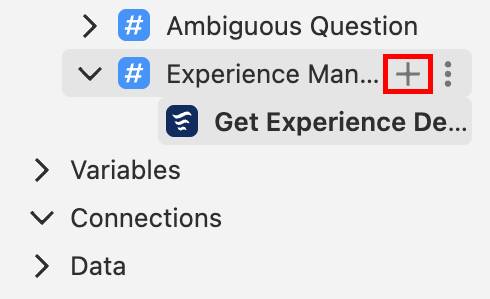
- Nel riquadro Explorer (Esplorazione), fai clic sull’icona del segno più accanto all’agente secondario Experience Management (Gestione esperienze).
- Seleziona +New Action (+Nuova azione).
- Assegna all’azione il nome
Get Customer Details(Recupera dettagli cliente).
- Aggiungi il testo seguente nella sezione Description (Descrizione):
Validate the Customer details by passing their email and memberNumber to see if there is a related contact.(Convalida i dettagli del cliente passando i valori di email e memberNumber per vedere se esiste un referente correlato).
- Fai clic su Create and Open (Crea e apri).
- In Reference Action Type (Tipo di azione riferimento), seleziona Flow (Flusso).
- In Reference Action (Azione riferimento), seleziona Get Customer Details (Recupera dettagli cliente).
- Fai scorrere la pagina verso il basso fino a visualizzare le sezioni Input e Output e seleziona le seguenti caselle di controllo:
- Input email: Require Input to execute action (Richiedi input per eseguire l’azione)
- Input memberNumber: Require Input to execute action (Richiedi input per eseguire l’azione)
- Output contact: Show in conversation (Mostra nella conversazione)
- Input email: Require Input to execute action (Richiedi input per eseguire l’azione)
- Lascia le altre opzioni invariate e fai clic su Save (Salva).
Aggiungere due azioni dalla libreria di asset
Se sono già state create alcune azioni, queste possono essere facilmente aggiunte al nuovo agente recuperandole dalla libreria di asset. Nel nostro caso, due azioni sono già state create e devono essere aggiunte all’agente secondario Experience Management (Gestione esperienze). Le azioni sono:
-
Get Sessions (Recupera sessioni): consente all’agente di recuperare singole sessioni per ciascuna esperienza.
-
Create Experience Session Booking (Crea prenotazione sessione di esperienza): consente all’agente di creare un nuovo record in Salesforce.
- Nel riquadro Explorer (Esplorazione), fai clic sull’icona del segno più accanto all’agente secondario Experience Management (Gestione esperienze).
- Seleziona Add From Asset Library (Aggiungi da libreria di asset).
- Inserisci
sessionnella casella Search actions… (Cerca azioni…).
- Fai clic su Select (Seleziona) su queste due azioni:
- Create Experience Session Booking (Crea prenotazione sessione di esperienza)
- Get Sessions (Recupera sessioni)
- Fai clic su Add to Agent (Aggiungi all’agente). Nota: ora dovrebbero esserci quattro azioni elencate sotto l’agente secondario Experience Management (Gestione esperienze).
- Fai clic su Save (Salva).
Aggiungere istruzioni all’agente secondario
Ora l’agente ha a disposizione diverse azioni che può eseguire, ma non sa esattamente quando e come utilizzarle. Se solo esistessero delle istruzioni da aggiungere per dare all’agente un contesto su come usare queste azioni... Ma certo che esistono! Le istruzioni dell’agente secondario indicano all’agente cosa fare e come rispondere. L’agente secondario Experience Management (Gestione esperienze) al momento dispone di istruzioni minime.
- Nel riquadro Explorer (Esplorazione), fai clic sull’agente secondario Experience Management (Gestione esperienze) per aprire la relativa scheda nell’editor.
- Con l‘agente secondario Experience Management (Gestione esperienze) aperto, elimina le istruzioni esistenti (se presenti).

- Aggiungi le nuove istruzioni di seguito all‘agente secondario Experience Management (Gestione esperienze):
1.If a customer would like more information on Activities or Experiences, you should run the “appropriate action” and then summarize the results with improved readability. Always ensure you know the customer before running this action.
2.If the customer is not known, you must always ask for their email address and their membership number to get their Contact record by running {!@actions.Get_Customer_Details} before running any other actions.
3.If asked to get sessions for the experience use {!@actions.Get_Sessions}. Ask for the Date of the sessions if not provided. Use the Id of the Experience__c from {!@actions.Get_Experience_Details}. Do not use the experience name, this must be an ID.
Aggiornare le istruzioni dell’agente secondario
La prima istruzione dell’agente secondario Experience Management (Gestione esperienze) deve essere aggiornata per fare riferimento correttamente all’azione prevista.
- Con la scheda dell’agente secondario Experience Management (Gestione esperienze) ancora aperta, evidenzia le parole (e le virgolette) “appropriate action” (“azione appropriata”) nella prima istruzione.

- Elimina ”appropriate action” (“azione appropriata”) e digita @ per aprire il selettore risorse. Nota che il simbolo @ (attivazione del selettore risorse) deve essere digitato: il copia e incolla non funziona.
- Fai clic su Actions (Azioni) nel selettore risorse per visualizzare tutte le azioni selezionabili.
- Seleziona l’azione Get Experience Details (Recupera dettagli esperienza). L’azione viene aggiunta all’istruzione.
Cambiare la visualizzazione
Una funzionalità esclusiva del Generatore Agentforce è la possibilità di mostrare gli elementi nella visualizzazione Script. Questa visualizzazione è utile per scrivere e modificare gli script direttamente.
- Con la scheda dell’agente secondario Experience Management (Gestione esperienze) ancora aperta, fai clic su Canvas (Area di disegno)
 nell’angolo in alto a destra della pagina e seleziona Script.
- In questo modo si passa alla visualizzazione Script. Gli elementi dell’agente possono essere modificati in questa visualizzazione proprio come nella visualizzazione Area di disegno.
- Posiziona il cursore alla fine dell’ultima istruzione e premi Invio per creare una nuova riga vuota. Nota: se hai bisogno di aiuto per trovare le istruzioni di questo agente secondario, prova a fare clic nello script e premere Command+F o Ctrl+F e inserire poi
if asked to get(se viene richiesto). Cerca la parola “actions” (“azioni”) e posiziona la riga vuota sopra di essa.

- Aggiungi la seguente istruzione:
| If asked to book, use the appropriate action. The Contact__c is the contact ID from the {!@actions.Get_Customer_Details}. The Session__c is the ID of the session from the action {!@actions.Get_Sessions}. If multiple sessions are present, ask to select one of the sessions and use that Session as the ID for the Session__c. Prompt for the Number of Guests and use that for the Number_of_Guests__c.(| Se ti viene richiesto di effettuare una prenotazione, usa l’azione appropriata. Contact__c corrisponde all’ID referente restituito dall’azione {!@actions.Get_Customer_Details}. Session__c corrisponde all’ID della sessione restituita dall’azione {!@actions.Get_Sessions}. Se esistono più sessioni, chiedi all’utente di selezionarne una e utilizza quella sessione come ID per Session__c. Chiedi qual è il numero di ospiti e usa questo numero per Number_of_Guests__c.)
- Nella prima frase della nuova istruzione, sostituisci le parole appropriate action (azione appropriata) con
{!@actions.Create_Experience_Session_Booking}.
- Le istruzioni in Agent Script dovrebbero avere il seguente aspetto:

- Fare clic su Save (Salva).
- Reimposta la visualizzazione su Canvas (Area di disegno). Nota: la nuova istruzione dell’agente secondario riflette le modifiche implementate nella visualizzazione Script. È possibile modificare i dati sia nella visualizzazione Canvas (Area di disegno) che nella visualizzazione Script.
- Fai clic su Commit Version (Conferma versione) e poi nuovamente su Commit Version per confermare.
Nota: ricevi il messaggio di errore Can’t commit (Impossibile confermare)? Il riquadro AI assistant (Assistente IA) può essere d‘aiuto. Inserisci ”scan and fix” (“scansiona e correggi”) nel riquadro AI assistant (Assistente IA) e segui i prompt in modo che l‘Assistente IA aiuti a risolvere i problemi comuni. Fai clic su Accept All (Accetta tutto) e prova nuovamente a confermare.
- Fai clic su Activate (Attiva) e poi nuovamente su Activate (Attiva) per confermare.
Visualizzare un’anteprima dell’agente
Le funzionalità dell’agente possono essere testate in qualsiasi momento durante il processo di creazione. La scheda Preview (Anteprima) consente di seguire l’agente durante la creazione del piano e l’esecuzione delle azioni in base alle interazioni con l’utente. Durante le interazioni con l’agente, il riquadro Interaction Details (Dettagli interazioni), mostra in dettaglio le operazioni eseguite dall’agente.
- Fai clic su Preview (Anteprima).

Nota: se necessario, aggiorna la pagina come da istruzioni.
- Nell’area di input Describe your task or ask a question… (Descrivi l’operazione o poni una domanda…), inserisci il prompt seguente:
Can you let me know more about the full moon beach party experience?(Puoi dirmi di più sull’esperienza Festa sulla spiaggia al chiaro di luna?) e premi il tasto Invio.
- Quando ti viene richiesto di fornire l’indirizzo email e il numero di iscrizione, inserisci
I am sofiarodriguez@example.com and my membership number is 10008155(Sono sofiarodriguez@example.com e il mio numero di iscrizione è 1000815). Premi il tasto Invio.
- Chiedi di prenotare una sessione per domani.
- Osserva la presenza del menu a discesa Live Test Mode (Modalità Test live) sul lato superiore del riquadro. Questo indica che l’agente accede e può modificare dati reali dell’organizzazione durante il testing. La modalità Test live consente di testare la conversazione in modo più accurato, ma le modifiche apportate dall’agente sono reali. Per eseguire il test in un ambiente sicuro, senza alcun impatto sui dati reali, fai clic sul menu a discesa Live Test Mode (Modalità Test live) e seleziona Simulate (Simula), quindi modifica il contesto in base alle tue specifiche.
- Fai clic sulla freccia indietro
 per uscire dal Generatore agente.
Pubblicazione e aggiornamento
Pubblica la distribuzione web e aggiorna il flusso.
- Fai clic su
 e poi su Setup (Imposta).
- Nella casella Quick Find (Ricerca veloce) di Setup (Imposta), cerca e seleziona Embedded Service Deployments (Distribuzioni servizio incorporato).
- Seleziona ESA Web Deployment (Distribuzione Web ESA).
- Fai clic su Publish (Pubblica) per ripubblicare le aggiunte più recenti. Nota: la pubblicazione può richiedere fino a 10 minuti ma non devi aspettare, puoi procedere al passaggio successivo.
Reinstradare il flusso
Ora aggiorna il flusso esistente in modo che il lavoro venga instradato all'agente dell'assistenza appena creato.
- In Setup (Imposta), utilizza la casella Quick Find (Ricerca veloce) di Setup (Imposta) per cercare e selezionare Flows (Flussi).
- Fai clic sul flusso Route to ESA (Instrada a ESA).
Nota: i nomi dei flussi sono in ordine alfabetico. Fai clic su Flow Label ↑ (Etichetta flusso ↑) per riordinare l'elenco dalla Z alla A. Ora il flusso Route to ESA (Instrada a ESA) dovrebbe trovarsi intorno alla nona posizione nell'elenco.
- Fai clic sul componente Route to ESA (Instrada a ESA).

- Aggiorna i valori seguenti nella sezione Set Input Values (Imposta valori di input):
- Route to (Instrada a): Agentforce Service Agent (Agente dell’assistenza Agentforce)
- Agente dell'assistenza Agentforce: CC Service Agent (Agente dell'assistenza CC)
- Route to (Instrada a): Agentforce Service Agent (Agente dell’assistenza Agentforce)
Nota: se l'opzione CC Service Agent (Agente dell'assistenza CC) non è visualizzata, apri CC Service Agent (Agente dell'assistenza CC) nel Generatore Agentforce e accertati che sia attivo.

- Fai clic su Save As New Version (Salva come nuova versione).
- Lascia tutti i campi invariati e fai clic su Save (Salva).
- Fai clic su Activate (Attiva).
- Fai clic sulla freccia Indietro
 per tornare a Setup (Imposta).
Aggiungere l'agente Agentforce al sito di Coral Cloud
L'ultimo passaggio consiste nell'incorporare il componente chat nel sito Experience Cloud di Coral Cloud.
- Fai clic su
 e poi su Setup (Imposta).
- Nella casella Quick Find (Ricerca veloce) di Setup (Imposta), cerca e seleziona All Sites (Tutti i siti).
- Fai clic su Builder (Generatore) in corrispondenza del sito coral-cloud.
- Fai clic sul widget Components (Componenti)
 .
.
- Cerca Embedded Messaging (Messaggistica incorporata) e trascina il componente sulla sezione Book an Experience of a Lifetime (Prenota un'esperienza indimenticabile). Nota: sta a te decidere il punto esatto in cui collocare il componente e potrebbero essere necessari alcuni secondi prima che venga visualizzato.
- Lascia invariate le impostazioni predefinite.
- Fai clic su Publish (Pubblica) nell'angolo in alto a destra.
- Nella finestra di conferma, fai clic su Publish (Pubblica).
- Fai clic su Got It (Ho capito).
Visualizzare l'agente come cliente
Siamo arrivati alla fine. È il momento di interagire con il nuovo agente.
- Fai clic sul menu di Experience Builder (Generatore di esperienze)
 .
.
- Seleziona View coral-cloud (Visualizza coral-cloud) per aprire il sito di Coral Cloud pubblicato. Nota: potrebbero essere necessari alcuni minuti per la pubblicazione del sito. Verifica la sfida qui sotto mentre aspetti il completamento della pubblicazione del sito Experience Cloud.
- Fai clic sull'icona dei messaggi
 nell'angolo in basso a destra per iniziare a interagire con il nuovo agente. Aspetta che l’agente ti saluti e poi prova il prompt seguente:
-
Can you let me know about the Underground Cave Exploration?(Puoi dirmi di più sull'esplorazione delle grotte sotterranee?) - Promemoria:
sofiarodriguez@example.com and my membership number is 10008155.(sofiarodriguez@example.com e il mio numero di iscrizione è 1000815).
- Rispondi alle domande dell'agente e prenota una sessione.
- Anche se non è richiesto, puoi tornare al CRM e aprire il record della sessione Underground Cave Exploration (Esplorazione delle grotte sotterranee) associata alla data che hai selezionato. Come vedrai, l’agente ha aggiornato il record con le informazioni che hai fornito.
Ora Coral Cloud Resorts dispone di un nuovo fantastico agente dell’assistenza che non solo può rispondere a domande sulle attività disponibili presso il resort, ma è anche in grado di prenotarle per i clienti. Che l'alta stagione abbia inizio!
Risorse
- Trailhead: Nuovo Generatore Agentforce: breve panoramica
- Guida di Salesforce: Creazione di agenti in tempo record con le guide all’implementazione Agentforce
- Sito web: Salesforce AI Use Case Library (Libreria dei casi d'uso per l'IA di Salesforce)
- Agentforce Developer Guide: Agent Script Reference (Guida di riferimento di Agent Script)