Create a Record-Triggered Flow
Learning Objectives
After completing this unit, you’ll be able to:
- Create a record-triggered flow that calls Document AI and updates the opportunity record.
- Upload a PO to an opportunity record and see the fields auto-populate.

What the Flow Does
Let’s break down the flow into high-level steps.
- The flow triggers every time a new file is added to Salesforce.
- It loops through all records associated with the file and finds the opportunity record. Due to Salesforce Object Query Language (SOQL) constraints, the flow can’t find the opportunity record without looping through all records.
- It checks that an opportunity was found and that the uploaded file is a PDF. If not, the flow ends.
- It passes the file to the DocumentAICaller Apex class that calls Document AI and extracts details in raw JSON.
- If Document AI fails, the flow sends a failure notification email.
- If Document AI succeeds, the flow passes the raw JSON to the PODetailsExtractor class that parses the JSON into clean fields.
- The flow updates the original opportunity record with the fields.
Next, let’s build the flow.
Configure the Start Element
The start element defines when the flow is triggered.
- Click the grid icon to open App Launcher.
- Search for and select Flows.
- Click New.
- Click Record-Triggered Flow.
- In the Configure Start panel, for the Object, search for and select Content Version (Beta).
- Under Configure Trigger, leave A record is created.
- For the Condition Requirements, select All Conditions Are Met (AND).
- For the field, search and select Version Number.
- For Operator, leave Equals.
- For Value, enter
1.
Entering 1 makes sure that you only process the original upload of the file. If you didn’t have this filter, the flow would trigger if the same PDF was re-uploaded or updated.
- Under Optimize Flow, leave Actions and Related Records.
- Toggle Add Asynchronous Path.
You need an asynchronous path because you make HTTP callouts to Document AI, and elements on the Run Immediately path can’t make callouts. You configure the rest of the flow in the asynchronous path.
Check the File Type
While Document AI supports PDFs and images, for the purposes of this exercise, let’s limit it to PDFs only.
- On the Flow Canvas, under Run Asynchronously, click
 .
- Search for and select Decision.
- Name the element
Is PDF?. Make sure the API Name is Is_PDF.
- For the Outcome Label, enter
Yes - Continue. Make sure the API Name is Yes_Continue.
- Leave All Conditions Are Met (AND).
- For the Resource, click Triggering ContentVersion, then search for and select File Type.
- Leave Equals as the Operator.
- For the Value, enter
PDF.
- Click the Default Outcome tab.
- For the Label, enter
No - Skip.
- Back on the Flow Canvas, under No - Skip, click
 .
- Search for and select End.
Now, the flow will only process the file if it’s a PDF.
Get Records Linked to the Triggering File
This element gets every record linked to the triggering file. Later, you loop through these records and find the opportunity record.
- Under Yes - Continue, click
 .
- Search for and select Get Records.
- Name the element
Get All Content Document Links. Make sure the API Name is Get_All_Content_Document_Links.
- For Data Source, leave Salesforce Object.
- For Object, search for and select Content Document Link.
- For Filter Conditions, leave All Conditions Are Met (AND).
- For Field, search for and select Content Document ID.
- For Operator, leave Equals.
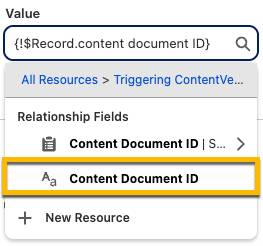
- For Value, click Triggering ContentVersion, then search for and select the second Content Document ID with the text type.
- For Sort Order, leave Not Sorted.
- For How Many Records to Store, click All records.
- For How to Store Record Data, click Automatically store all fields.
Create an OppId Variable
This variable will hold the opportunity record ID that you find later.
- Open the Toolbox by clicking the icon
 in the upper left corner.
- Click New Resource.
- For the Resource Type, click Variable.
- For the API Name, enter
OppId.
- For the Data Type, click Text.
- Leave Available for input and Available for output unchecked.
- Click Done.
Find the Opportunity Record
These elements loop through every Content Document Link and find the opportunity record.
- Under Get All Content Document Links, click
 .
- Search for and select Loop.
- Name the element
Loop Through Links.
- Make sure the API Name is Loop_Through_Links.
- For Collection Variable, click Content Document Link from Get All Content Document Links.
- For Direction, leave First item to last item.
Next, configure the element that decides if the link is an opportunity. Opportunity IDs all start with 006.
- Under For Each, click
 . Search for and select Decision.
- Name the element
Is Link an Opportunity? - Make sure that the API Name is Is_Link_an_Opportunity.
- For the Outcome Label, enter
Yes - Is Opportunity. Make sure the API Name isYes_Is_Opportunity.
- For the Condition Requirements, leave All Conditions Are Met (AND).
- For Resource, click Current Item from Loop Through Links, then Linked Entity ID.
- For Operator, click Starts With.
- For the Value, enter
006.
- Click Add Condition.
- For Resource, select OppId.
- For Operator, click Is Null.
- For Value, search for and select True.
Purchase orders are unique to one opportunity, so multiple matches shouldn’t happen. If there are multiple matches, it’s a mistake. This filter addresses that mistake by keeping the first match and not overwriting the OppId.
- Under Outcome Order, click Default Outcome.
- For the Label, enter
No - Continue Loop.
Ensure the No path eventually connects back to the Loop element. This makes sure that the flow continues looping through links after it finds a non-opportunity link. It should be connected by default.
Next, set the OppId.
- Under Yes - Is Opportunity, click
 .
- Search for and select Assignment.
- For Label, enter
Set Opp Id.
- Make sure the API Name is Set_Opp_Id.
- For Variable, search for and select OppId.
- For Operator, leave Equals.
- For Value, select Current Item from Loop Through Links, and Linked Entity ID.
The loop continues looping through until you’ve finished looping through all links. Then, the flow checks if it found an opportunity. If it doesn't find an opportunity, the flow ends.
- Under After Last on the right side of the Loop element, click
 .
- Search for and select Decision.
- Name the decision
Has Opportunity Link?Make sure the API Name is Has_Opportunity_Link.
- Name the outcome
Yes - Process File. Make sure the API Name is Yes_Process_File.
- Leave All Conditions Are Met (AND).
- For the Resource, select OppId.
- For the Operator, select Is Null.
- For the Value, select False.
- Click the Default Outcome tab.
- Name the outcome
No - Skip.
- Under the No - Skip outcome you just created, click
 , then search for and select End.
Call Document AI
Next, the Apex action authenticates, fetches the file, calls Document AI, and returns the extracted raw JSON.
- Under Yes - Process File, click
 .
- Search for and select Action.
- Search for and select Run Document AI Image/File Recognition with Schema Configuration.
- Name the element
Call Document AI. Make sure the API Name is Call_Document_AI.
- Locate the Consumer Key, Consumer Secret, and domain URL from Unit 1. If you forgot to save them, go back to unit 1, locate them, and come back to this step.
- For Client ID, paste the Consumer Key.
- For the Client Secret, paste the Consumer Secret.
You’re pasting these values directly for demo purposes. In real situations, these values are pulled from a Named Credential or Custom Metadata Type. Learn more about Named Credentials.
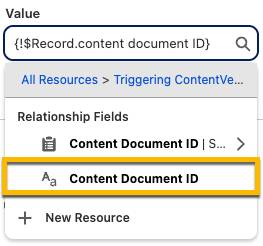
- For the Content Document Id, select Triggering ContentVersion, then search for and select the second option for Content Document ID.
- For the Org Domain, paste the domain URL that you saved in Unit 1. Make sure the URL contains https:// and that there are no extra spaces before or after the URL. Pasting the exact URL is very important; the flow won’t run with an incorrect URL.
- For the IDPConfigId, enter
po_config. This is the name of the Document AI configuration you created in Unit 2.
- Leave the LLM Model blank.
- Leave the other options as the default.
Next, confirm that you successfully extracted details.
- Under Call Document AI, click
 , then search for and select Decision.
- Name the element
Extraction Successful?Make sure the API Name is Extraction_Successful.
- Name the outcome
Success. Make sure the API Name is Success.
- Leave All Conditions Are Met (AND).
- For the Resource, click Outputs from Call Document AI, then click Status.
- For the Operator, leave Equals.
- For the Value, enter
Success.
- Click the Default Outcome tab.
- Name the outcome
Failed.
If Document AI failed, send a notification email. For the purposes of this badge, you’ll send the email to yourself.
- Under Failed, click
 , then search for and select Action.
- Search for and select Send Email.
- Name the element
Send Failure Notification. Make sure the API Name is Send_Failure_Notification.
- For Recipient Addresses, enter your email. Leave CC Addresses and BCC Addresses blank.
- Under Configure Sender Details, for Sender Type, click CurrentUser.
- For Sender Email Address, enter your email.
- Under Configure Email Content, leave Compose Email Content.
- For the Subject, enter
Document AI Extraction Failed.
- At the top of the Body field, click the View as Rich Text dropdown and change it to View as Plain Text.
- For the Body, enter the following.
Document AI extraction failed.
Error:          {!Call_Document_AI.ErrorMessage}
Opportunity Id: {!OppId}
File Id: {!$Record.ContentDocumentId}- Leave the rest of the options blank.
Parse the Extracted JSON
If Document AI succeeded, use the other Apex action to parse the raw JSON and transform it into structured fields: Amount, Close Date, Description, PO Number, and Payment Terms.
- Under Success, click
 , then search for and select Action.
- Search for and select Extract PO Details from Document AI JSON.
- Name it
Extract PO Details. Make sure the API Name is Extract_PO_Details.
- For Extracted Data JSON, click Outputs from Call Document AI, then click Extracted Data (JSON).
- Leave the rest of the options as the default.
Update Opportunity Record
Finally, update the opportunity with the extracted fields.
- Under Extract PO Details, click
 .
- Search for and select Update Records.
- Name the element
Update Opportunity Fields. Make sure the API Name is Update_Opportunity_Fields.
- Click Specify conditions to identify records, and set fields individually.
- For the Object, search for and select Opportunity.
- Leave All Conditions Are Met (AND).
- For Field, search for and select Opportunity ID.
- For Operator, leave Equals.
- For Value, search for and select OppId.
- Under Set Field Values for Opportunity Records, for Field, search for and select Amount.
- For Value, click Outputs from Extract PO Details, then search for and select Total Amount.
- Click Add Field.
- Repeat steps 10-12 until all following fields are added.
Field |
Value |
|---|---|
Close Date |
Outputs from Extract PO Details > Close Date |
Description |
Outputs from Extract PO Details > Line Item Summary |
PO Number |
Outputs from Extract PO Details > PO Number |
Payment Terms |
Outputs from Extract PO Details > Payment Terms |
- Click Save.
- For the Flow Label, enter
PO Enrichment Flow. Make sure the API Name is PO_Enrichment_Flow.
- Leave the description blank.
- Click Save.
Test the Flow
- Click Debug.
- For the Path for Debug Run, click Run Asynchronously.
- For ContentVersion, click PO_NTO_2026.
- Click Run.
- Confirm that the flow ran without errors.
- Refresh the page, and click Activate. It might take a few minutes for the Activate button to appear.
Now your flow is ready to process POs and update opportunities automatically!
See the Flow in Action
Let’s see the flow in action by adding a PO to an opportunity.
- From the App Launcher, search for and select Opportunities.
- Click Northern Trail Outfitters. If you don’t see it, click Recently Viewed and click All Opportunities.
- Click the Details tab. Notice the values in Amount, Close Date, Description, PO Number, and Payment Terms. Most are blank.
- In the Related tab, under Notes & Attachments, click Upload Files.
- Upload the sample PO you saved in Unit 2. It should be named PO_NTO_2026.
- Click Done.
- Wait a few seconds, then refresh the page.
Now the fields are updated with details extracted from the PO! If you don’t see updated fields, you likely input the URL incorrectly in step 9 of Call Document AI. Go back and try again.
Wrap Up
In this badge, you learned how to use Document AI to extract details from unstructured documents. You learned how Apex and flow work with Document AI to enrich records. Now NTO can intelligently process POs and automatically update records, saving valuable time and keeping their opportunities updated with the latest data.