Configure, Map, and Submit Your Import
Learning Objectives
After completing this unit, you’ll be able to:
- Select the appropriate target type (business entity, relationship, or hierarchy) before mapping fields.
- Map CSV columns to business entities and system-generated fields.
- Apply saved field mappings to streamline recurring imports.
In the previous unit, Alex prepared the CSV file, verified the file structure, selected the source system, and chose the right import type and operation type. With all of that groundwork in place, Supplier 360 is ready to read the file. But it still needs to know what each column means and where the data belongs. This unit covers the two steps that complete the import setup. You map each CSV column to the correct field in Supplier 360, and then save that mapping so Alex doesn’t have to repeat the work next time.
Select a Target Type
Before mapping any columns, tell Supplier 360 what kind of data the CSV contains. On the Map Fields page, Supplier 360 asks you to select a target type. This determines the structure Supplier 360 uses to map and store the incoming data.
There are three options.
Target Type |
When to Use |
|---|---|
Business Entity |
Use this when importing supplier records or contact data. This is the most common option and the one Alex selects for the supplier list import. |
Relationship |
Use this when importing records that link two existing entities together, such as connecting a supplier contact to a parent supplier organization using ‘From_sourcePKey’ and ‘To_sourcePKey’ columns. |
Hierarchy |
Use this when importing parent-child structures, such as a supplier group with subsidiary suppliers. Supplier 360 builds the hierarchy automatically after import. |
For example, when Alex imports the new supplier list from the Coral Cloud Resorts procurement portal, Alex selects Business Entity as the target type. When linking Michelle Tran as a related contact under PrimeLinens & Hospitality Goods Company, Alex selects Relationship instead.
With the target type selected, Supplier 360 loads the correct fields for mapping.
Map CSV Columns to Business Entity Fields
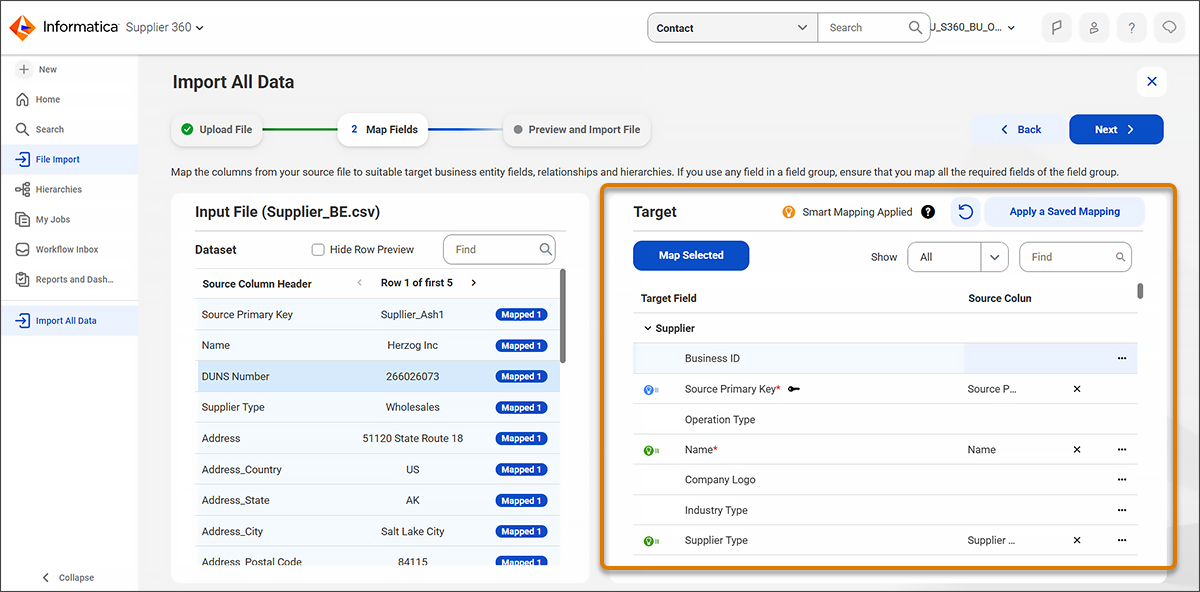
Alex’s CSV has columns like SupplierName, ContactEmail, and StreetAddress. Supplier 360 works with field names like Name, Email Address, and Address Line 1. The Map Fields step is where you bridge that gap and connect each source column to the correct target field in the selected business entity.
After selecting the target business entity, Supplier 360 automatically suggests mappings based on your column headers. Each suggestion comes with a confidence indicator that tells you how reliable it is.
Confidence Indicator |
Meaning |
|---|---|
High |
The import process is confident this column maps to the correct target field. |
Medium |
The mapping might be correct, but review it. Delete and remap if the suggestion doesn’t match your data. |
Low |
The mapping is likely incorrect. Delete and remap this field manually. |
Alex reviews the suggestions. The SupplierName column maps to Name with high confidence, indicating a clear match. For any fields that need correction, Alex remaps them manually.
- Drag a source column to the correct target field, or select both a source column and a target field.
- Select Map Selected to apply the mapping.
- Repeat for any remaining fields with medium or low confidence indicators.
Map System-Generated Fields
Once the business entity fields are mapped, Alex maps three system-generated fields. These fields don’t come from the business entity. They control how each record is identified, matched, and processed during import.
Field |
Required |
Purpose |
|---|---|---|
Source Primary Key |
Yes |
This field uniquely identifies each source record. Every import requires this field to be mapped. |
Population Name |
No |
This field specifies a population to improve match accuracy. If not mapped, the default population of the match configuration is used. For example, the Coral Cloud Resorts procurement team maps this field when importing supplier contacts from different regional supplier databases to ensure name and address matching is accurate for each region. |
NotReadyForMatch |
No |
When this field is set to |
Save and Reuse Field Mappings
Alex imports data every month. Rather than remapping from scratch each time, Alex saves the current mapping on the Preview and Import File page so it can be reused in future imports.
When saving, you can select from three options.
-
Save as a new mapping: Enter a unique name and save the mapping for future imports.
-
Overwrite an existing mapping: Replace a saved mapping with your current configuration.
-
Don’t save: Proceed with the import without saving the mapping.
Alex names and stores this layout as PrimeLinens field mapping to streamline similar imports in the future.
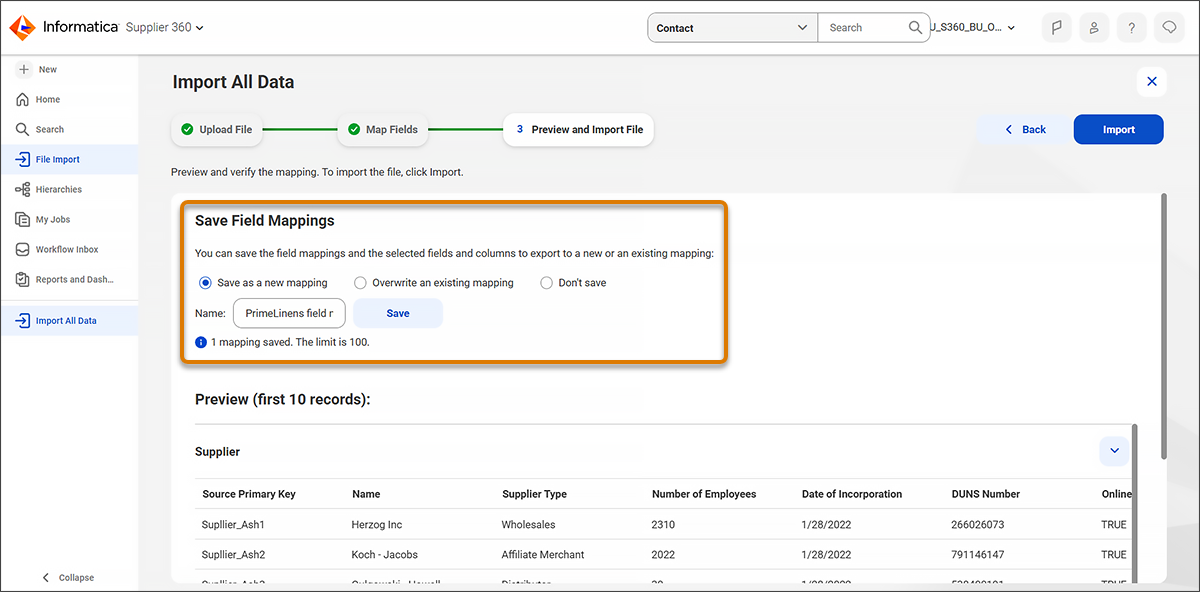
To apply a saved mapping in a future import, open the Map Fields page, select Apply a Saved Mapping, select the mapping, and then select Apply. Supplier 360 maps the columns instantly with no manual work needed.
With fields mapped and the mapping saved, Alex has everything in place. The CSV is structured correctly, the source system is set, and every column points to the right field in Supplier 360. In this unit, you learned how to map CSV columns to business entity fields using confidence indicators, how to map the system-generated fields that every import requires, and how to save and reuse field mappings to speed up recurring imports. Alex selects Import, and Supplier 360 processes the file, turning a manual, multi-day task into a repeatable afternoon workflow.

Import All Data Walkthrough
Review the full Import All Data flow in action, from uploading a CSV file to mapping fields and completing the import, in Supplier 360.
Resources
- Informatica Documentation: Import and Match Data (login required)