Manage Content Scheduling and Visibility
Learning Objectives
After completing this unit, you’ll be able to:
- Explain how to schedule a page to publish and expire at specific times.
- Describe how to use visibility controls to show a page to specific customer groups.
- Identify use cases for scheduling: seasonal campaigns, flash sales, and regional launches.
- Summarize the relationship between Page Designer scheduling and the B2C commerce campaign framework.
Recognize the Scheduling and Visibility Challenge
You built the summer campaign landing page. The launch window is precise: It goes live at midnight Friday and comes down after Labor Day weekend. The VIP preview happens Thursday evening, for loyalty members only.
If someone has to be at their desk at midnight to publish, that’s a problem. In this unit, you learn how to use Page Designer’s scheduling and visibility controls so the right people see the right page at the right time, automatically.
Distinguish Scheduling from Targeting Controls
In Page Designer, you configure scheduling and visibility in a single panel called Targeting. Targeting lives in Page Settings for page-level rules and in the component’s pane for component-level rules. Within Targeting, you set:
-
Customer groups: Shoppers who see the page or component
-
Dates and times: When the page or component is visible
You can set these controls to work together or independently. You can set just a date range, just a customer group, or both. All times correspond to the time zone of your site.
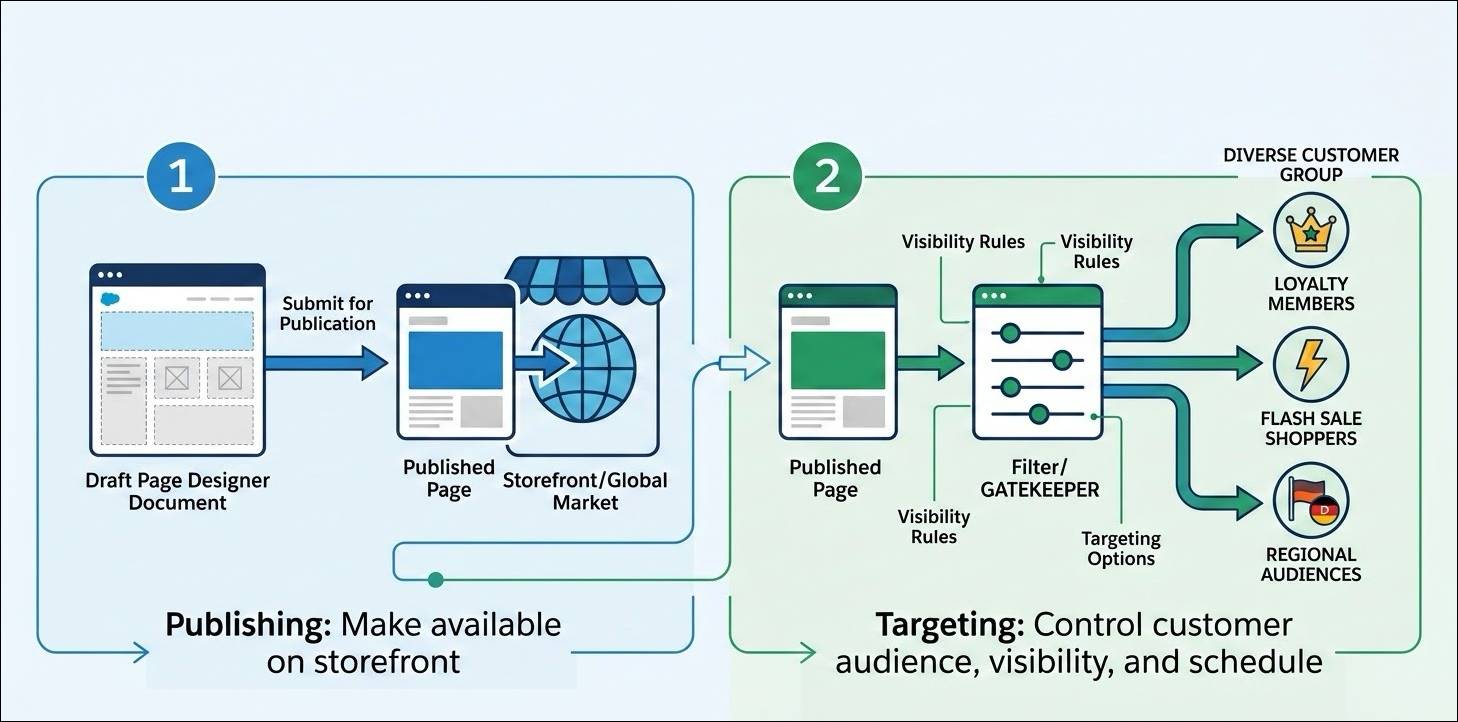
Publishing and targeting are separate steps.
-
Publishing: Makes a page available on the storefront.
-
Targeting: Controls customer groups that see the page when the published page appears.
For a page to appear automatically at midnight, publish it first and set a scheduled start date in Targeting.
Schedule a Page
To set when a page is visible:
- In Business Manager, select App Launcher.
- Select Merchant Tools | Content | Page Designer.
- Open a page in the visual editor.
- Select the Page Settings icon.
- Select Targeting.
- Select the customer group, the start and end dates and times, or both. Times correspond to the site time zone.
- Save your work.
The page appears at the start date and time and disappears after the end date and time. Here are three common scenarios.
-
Seasonal campaigns: A summer sale page visible July 4 through Labor Day.
-
Flash sales: A 24-hour promotional page that appears and expires without manual intervention.
-
Regional launches: Customer groups that include or exclude specific regions or locales. You can target a page to a region-specific audience without creating separate pages.
Control Component Visibility
You can also target components at the component level. A single region holds more than one component, each with different visibility rules. This is how you show a different hero banner to VIP shoppers or swap a winter component for a summer one within the same region.
- To set visibility rules on a component:
- In Business Manager, select App Launcher.
- Select Merchant Tools | Content | Page Designer.
- Open a page in the visual editor.
- Select a component.
- In the right pane, select the Settings tab and select Custom Targeting.
- Select the customer groups, locales, and dates and times when the component is visible. Times correspond to the time zone of your site.
- Select Apply, and save your work.
- Add more components to the region as needed.
- Select the Page Structure icon. Expand the region that holds the components.
- Drag a second component into the same region and repeat the targeting setup for that component.
- Select the Page Structure icon. Expand the region that holds the components.
All components in the region appear in the list. Whether a component appears depends on targeting rules and whether the region has a maximum number of visible components.
-
Regions with a visibility maximum: When the page loads, the system evaluates components from top to bottom. The first components whose customer group, date, and locale match the rules appear, up to the maximum. If no components match, nothing appears in that region. Place a component with no visibility rules at the bottom as a fallback. Drag components in the Page Structure panel to change the order.
-
Regions with no visibility maximum: All components whose visibility rules match appear at the same time.

Set Targeting Rules for Content Blocks
Content blocks support targeting rules to control when and to whom a content block is visible. You can set targeting from the Content Blocks module or from Page Designer when a content block is selected on a page.
To set targeting from the Content Blocks module:
- In Business Manager, select App Launcher.
- Select Merchant Tools | Content | Content Blocks.
- Select the content block.
- Select the Targeting tab.
- Select a targeting method.
- Add to Campaign: Campaign determines schedule and customer group.
- Add to Promotion: Promotion determines schedule and customer group.
- Custom Targeting: Configure schedule (start and end date and time), customer group, and target locale. Times correspond to the site time zone.
- Add to Campaign: Campaign determines schedule and customer group.
- Configure the targeting details.
- Select Apply and save your work.
Each content block supports one top-level targeting rule. A new rule replaces any existing rule. To apply targeting to multiple content blocks at once, use bulk actions in the Content Blocks module.
Assign Pages to Campaigns and Promotions
Page Designer’s built-in scheduling works on its own, but it also integrates with the B2C Commerce campaign and promotion framework. When you assign a page to a campaign or promotion, any visibility rules you’ve configured for the page are overridden. The campaign or promotion rules are used instead.
Approach |
When to Use It |
|---|---|
Custom Targeting |
Pages not tied to a campaign. Simple time-bound visibility or audience-specific pages. |
Campaign-linked |
Pages part of a coordinated campaign. Campaign rules override Page Designer’s targeting. |
Promotion-linked |
Pages tied to a promotion. Promotion rules override Page Designer’s targeting. |
Manual publish, no targeting |
Pages that go live immediately and stay up indefinitely. |
To assign a page to a campaign or promotion:
- From the visual editor, open the page.
- Select the Page Settings icon.
- Select Targeting.
- Under Campaign or Promotion, select Assign.
- Select the campaign or promotion in the left pane. To filter the list, type text in the Search field.
- Select Assign, and save your work.
Preview and Publish
To preview your page, select the Preview icon, set the customer group and date to match your targeting conditions, and confirm the correct content appears. When you’re satisfied with how the page looks, select Publish to make the page available online.
Up Next
In this unit, you learned how to schedule pages and components to appear and expire automatically, how to target specific customer groups with visibility controls, how to set targeting rules for content blocks, and how Page Designer scheduling connects to the B2C commerce campaign framework.
In the next unit, you localize pages for different regions and reuse content across multiple pages.
Resources
- Salesforce Help: Specify When a Page Designer Page Is Visible Based on Customer Group or Schedule
- Salesforce Help: Set Component Visibility by Customer Group, Schedule, or Locale
- Salesforce Help: Target a Page Designer Page for a Campaign or Promotion