Create an Intake Assessment for a Support Program
Learning Objectives
After completing this unit, you’ll be able to:
- Add a category picklist value.
- Create intake assessment questions.
- Create an intake assessment and connect it to a support program.
Explore Support Program Intake Assessments
So far, you’ve created a Study Abroad support program and related benefits. Now you add an intake assessment so that, when students self-enroll from the Learner Portal, they answer a few questions about what they want from the experience.
Intake assessments gather important information to assist advisors and other support team members who facilitate the program and provide guidance to students. When a student self-enrolls in the program, the questionnaire asks pertinent questions related to the program and their individual requirements and preferences. These captured responses can help support teams better understand how to best support the student.
Agentforce Education stores each question as an Assessment Question record, which you can reuse across different assessments. Later, you package these questions into an Omniscript so the intake form appears as a guided experience on the portal.
Before you set up intake assessments, the first step is to create a new value on the Category field of the Assessment object.
Create a New Category Picklist Value
In your sample org, there isn’t yet a way to distinguish intake questions from other assessment questions. Add an ‘Intake’ value to the Category picklist on the Assessment Question object so you can group, filter, and reuse intake questions for this and future support programs.
Follow these steps to create a new Category picklist value.
- Click
 and then select Setup.
- Open Object Manager, and select Assessment Question.
- Click Fields and Relationships, then select Category.
- Click New in the Category Picklist Values section.
- Enter
Intakethen save your changes.
Great! Now that you’ve got that out of the way, it’s time to create some assessment questions that you can use in your intake assessment. To ensure data quality, assessment questions support several different input data types, such as radio buttons, dates, integers, phone numbers, and several other types.
Create Assessment Questions
To capture students’ interest, reasons, and timeline for Study Abroad, create three intake questions.
Follow these steps to create questions for the intake assessment.
- Click
 , then find and select Assessment Questions from the App Launcher.
- Click New.
- On the New Assessment Question window, enter
Study Abroad Program Interestfor the Name.
- Press tab to populate the Developer Name.
- For Data Type, select Radio.
- For Category, select Intake.
- For Question Text, enter
What type of study abroad program are you interested in? - Toggle on the Active checkbox.
- In the Response Values field, enter these values on separate lines.
Unsure/Undecided
Faculty-Led Summer Program
Independent Semester-Based Program
Cohort-Based on Another Campus
- Click Save & New.
- Create the next assessment question using these details:
- Name:
Study Abroad Reason - Data Type: Text Area
- Question Text:
In a few sentences, describe why you are interested in studying abroad? - Category: Intake
- Active: Selected
- Name:
- Click Save & New.
- Create the final assessment question using these details:
- Name:
Study Abroad Timeframe - Data Type: Radio
- Question Text:
When do you anticipate starting your program? - Category: Intake
- Active: Selected
- Response Values:
- Name:
Next term
Within the next year
More than a year
14. Save your work.
With the assessment questions in place, you’re ready to combine the questions into an Omniscript so they appear as a guided intake form on the Learner Portal.
Build an Intake Assessment Omniscript
Omniscripts can power many kinds of guided experiences. In this flow, you use an Omniscript to present the Study Abroad intake questions as a simple form and trigger the program enrollment process when students submit their responses.
First, you use the Discovery Framework form builder to generate a new Omniscript from your intake questions. Here’s how it’s done.
- Duplicate the browser tab so it’s easier to navigate back to the Student Success app later.
- From the App Launcher
 find and select Assessment Questions.
- Click Select Questions.
- On the Create Form page, use this information to populate the fields in the Omniscript Details section:
- Name:
Study Abroad Intake Questionnaire
- Language: English
- Type:
ProgramAssessment - Subtype:
StudyAbroad
- Name:
Next, you define the step in the Omniscript and pull in the intake questions that belong to the Intake category.
- In the Study Abroad Intake Questionnaire section, click
 and rename the Untitled Step to
 Study Abroad Intake.
- For Category, select Intake to show the assessment questions you just created.
- Click Select All to select the three assessment questions.
- Click Add Questions to Step, and then select Study Abroad Intake.
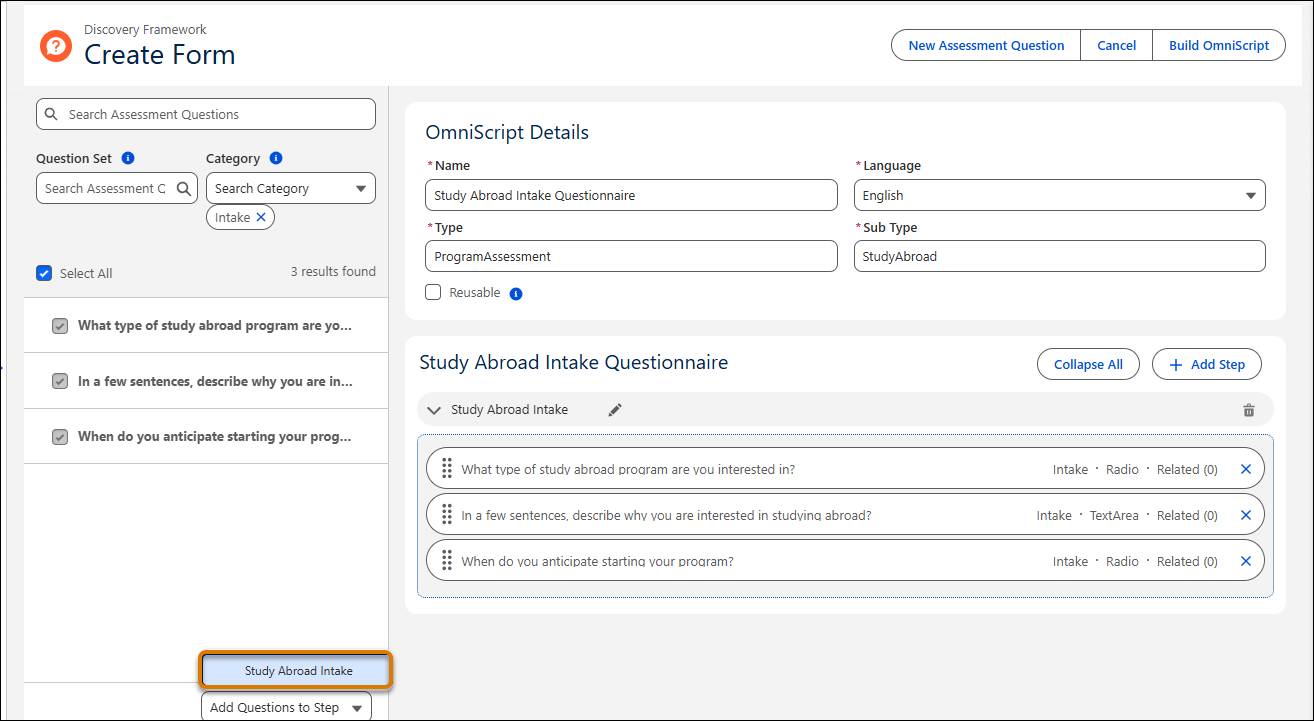
- Review the questionnaire containing the assessment questions, and then click Build Omniscript.
At this point, the OmniScript Designer opens and you have an Omniscript that presents your three questions in a single step. Now you connect it to the prebuilt program enrollment Integration Procedure so that submitting the form runs the enrollment logic.
- In the Elements pane of the Omniscript Builder, search for
Integration Procedure, and then click and drag the Integration Procedure action under the Save remote action element in the canvas.
- In the Integration Procedure Action Properties pane, search for and select EDUProgramMgmt_EnrollInPgm in the Integration Procedure field. This integration procedure creates a program enrollment record and associates the student with the selected program.
Next, you add a navigation action so that after the intake is processed, the learner is taken to their Program Enrollment record.
- In the Elements pane, search for the Navigate standard action and drag and drop the element onto the canvas below the Integration Procedure Action you just added.
- In the Navigate Action Properties pane, enter the following details.
- Page Reference Type: Record
- Object API Name:
ProgramEnrollment
- Record ID:
%programEnrollmentId%
- Page Reference Type: Record
Finally, preview and activate the Omniscript and then associate it with the Study Abroad support program so it’s used during enrollment on the Learner Portal.
- Click Preview to see how the questionnaire will display on the Learner Portal.
- Click Activate and then click OK to confirm the activation.
- Return to the Student Success app in the separate tab, and navigate to the Details tab of the Study Abroad program you created earlier.
- In the Omni Process field, search for and select Study Abroad Intake Questionnaire.
- Save your work.
How cool is that? You just built a fully functional and intuitive web form without using a single line of code. We’ve kept the steps pretty simple here, but there are endless possibilities when it comes to building Omniscripts. For example, for longer forms with several questions, you can organize the questions under additional steps to make the form more manageable for students.
To learn more about Omniscripts, make sure to check out the Get Started with Omnistudio on the Salesforce Platform trail.
You’ve created and connected all of the necessary components for the assessment. You’re now ready to test out the enrollment experience, which you do in the next unit.